Monday 25 March 2013

Needlebook


Materials 


Cut 4” x 6.3” pieces of the following:
  • 2 x heavy sew-in interfacing 
  • 2 x stiff curtain buckram 
  • 1 x double-sided fusible 
  • 3 x felt (for the pages) 

Cut larger 4.6” x 6.9” pieces of the following:
  • 1 x front cover fabric 
  • 1 x lining fabric 

You will also need: 

  • short piece of ribbon button for closure 
  • 10mm cotton tape for labels 
  • 1 sheet iron-on transfer paper 

To make the page labels 


Print out text or decoration with a maximum height of 9mm. I used inkscape to draw my designs and flipped them to a mirror image before printing them onto the iron-on transfer paper.

I used text to label the sort of machine label, and a measuring tape design to indicate the needle size.  You can download my labels here: (pink or green).

Cut out the pieces and iron them on to the 10mm cotton tape (I pressed for 1 minute through a tea towel).

To make the cover 


You will be making a 5-layer sandwich as shown here:

5 layer sandwich to create a stiff book cover with a soft surface
The point of the arrangement is to get a stiff cover from the two fused pieces of buckram, but with a smooth soft surface with a slight loft (from the heavy and soft curtain interfacing).

Iron the double-sided fusible to one of the buckram pieces. Peal off the paper, and position the glue-side onto the other buckram piece. Fuse the two buckram pieces together. While you do this, keep the interfacing on the opposite side to the fusible: I found enough glue leaked through the buckram to almost hold the interfacing on! Before the sandwich cools and hardens, make the spine fold and press in with the iron.
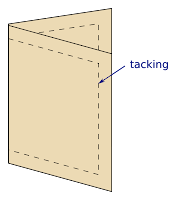
Folded cover sandwich

Since the interfacing is only lightly attached, baste around the edges with a long stitch to hold everything together. Make sure the interfacing does not crease around the inside of the spine!

Arrange the cover fabric around the stiff buckram sandwich. Press the excess fabric toward the inside of the book and catch-stitch to the interfacing to hold it in place. Make sure you do this with the cover bent along the spine so that the fabric can be pulled tightly around the spine but with enough give to allow the book to be closed. Mitre the fabric at the corners.
Covering the outside of the book cover

At this point, affix the button to the outside of the front cover. I used my machine to stitch the button firmly on through all the buckram layers.

Using the cover as a guide, press the edges of the lining fabric underneath (to the wrong side) to create a rectangle just smaller than the book cover.

Create a loop of ribbon and stitch it to the right side of the lining fabric, with the loop pointing toward the spine: make the securing stitches in the unfolded edge of the fabric, between the raw edge and the crease you just pressed in. When you turn the edge of the lining back underneath, the loop should be pointing outward and the stitches hidden.

Folding the lining to size and adding a ribbon loop

Stitch the lining to the inside of the cover using small invisible stitches. Do this with the book slightly closed so that excess lining fabric does not ripple near the spine.

Lining the book cover

To make the pages 


Sandwich three felt pages together and machine baste down the centre.

Fold along the spine stitching and use pinking shears to cut all the pages as one so that they are smaller than the book cover.

Top-stitch the labels to each page.

Finally, sew the pages into the cover by sewing through all layers along the spine.

Making the book pages

This tutorial is part of a series:

Saturday 23 March 2013

My first attempt at pattern cutting!


I'm super excited!  While baby button has been napping I've had chance to draft my own shirt pattern!

I'm using this fab textbook that my mum got me for Christmas, recommended by one of her clever friends who knows lots about these things (hello there, if you're reading!).

Anyway, I'm loving the book.  It's really clear and methodical, and I'm a big fan of neat measurements, step-by-step processes and comprehensive tables, so a big thumbs up so far.  The book also has super clear diagrams and line-art and tonnes of examples of adapting the basic blocks to loads of lovely clothes.  Probably the limit will be my imagination here.  I'm excited to do lots more, but I think the shirt will be a good simple start.

I'm afraid I have an abhorrence of books that declare "It's so easy!".  I can't help feeling that I'm not getting my moneys worth if all the difficult things worth learning from a book have been omitted.  Of course you do need to own a good book of the basics, but if the basics are repeated in the first 3 chapters of every sewing book you own, that's a lot of wasted paper.  Fortunately, since the above book appears to be aimed at students looking towards a career in pattern cutting, there's none of the "Easy-peasy!" jolly-ing along, which I find gets in the way of the content.  (It might indeed be easy, but I'm not going to give up on my project if you forget to remind me of the easiness every page.)

Anyhow, I'm starting a shirt with separate collar and stand and short sleeves in size 12 months.  I'm planning to offer shirts based on this pattern in the shop, so watch this space!  There will also be a girlie version, I think, when I get around to it.

This pattern cutting lark is awesome so far, but the proof will be in the muslin...

On my sewing table today.

Friday 22 March 2013

RSS now fixed!

Hello m'dears! RSS now appears to be functional, so if you subscribed for Button Ship updates and haven't had any news from me for a bit, you might have to re-subscribe. Should all be tickety-boo now, so this should be the last time you have to do it. Sorry about that!

Dressmaking pencil case


Materials 


Cut 11” x 3” pieces of the following:
1 x quilt batting
1 x front fabric
1 x lining fabric

You will also need: 

short piece of ribbon button for closure
button
12mm bias binding

To make the case 


Quilt the three fabric layers together. I used a free motion quilting foot (badly).

Sandwich the batting between two layers of printed fabric with the right sides facing outwards.

Trim the sandwich into a true rectangle again.

Bind the shortest edge of the sandwich and then add the button to the front, about 1.5” from the bound edge.

Binding one of the short edges
Shape the opposite short edge into a curve (this will become the flap).

Fold the bound edge upward to create the pocket and stitch along the sides (very close to the edge) to hold it in place.

Creating the pocket and adding a ribbon loop
Sew a ribbon loop to inside of the top flap, very close to the edge and with the loop facing toward the inside of the pocket.

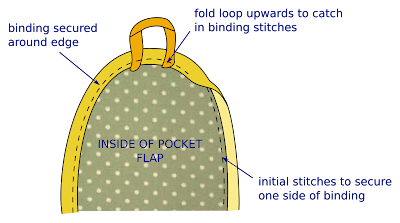
Bind the edge of the case, curving the binding around the top flap. Start by stitching the opened binding to the outside of the case all the way around, and then fold the binding back up and over the raw edge toward the inside. Next, top-stitch over the binding to hold it in place; as you stitch over the curved top, fold the ribbon loop outward so that it catches in the stitching.

Binding top curved edge, catching the ribbon loop
Finish the case by neatening the binding at the bottom of the pocket: I hand-stitched this part, turning the raw edge to the inside.

This tutorial is part of a series:
 

Thursday 21 March 2013

A dull test post

I'm having RSS/feed issues, and I'm trying to fix them.  Please bear with me!

Wednesday 20 March 2013

Pincushion


Materials 


Cut 4.5” x 4.5” pieces of the following:
1 x heavy sew-in interfacing
1 x embroidered cotton (keep the design within the central 3” square)
1 x backing fabric

You will also need: 

~15” piping.  There is a lovely tutorial on making and using piping here at Make It and Love It.


To make the front 

  1. Before cutting into my cotton, I embroidered some words to the front. I wrote my message on paper in black marker and traced it onto my fabric with a sharp pencil. I then embroidered over the words with two strands of floss.  I used backstitch, and there is a good tutorial here at Sublime Stitching.  Learn from my mistakes and take care to weave in your starting and finishing loose ends along the back of your embroidery.  This will avoid knotty blobs showing through as shadows on the front.
  2. Cut the front piece of cotton into a 4.5” x 4.5” square with the design central and baste it on to the interfacing. 
  3. Press lightly through a cloth to avoid flattening your embroidery stitches.
Embroidery location on front of pincushion


To make the cushion 

  1. For each piece (front and back), sew across the corners by folding the fabric edge-to-edge, right sides together, and then stitching perpendicular to the edges, 3/4” from the corner (see image).
  2. Baste the piping to the front piece using a piping foot or zipper foot, allowing 1/4" seam allowance for constructing the cushion.
  3. Sandwich the back and front right-sides together and sew around the edges as close to the piping as possible and leaving a gap at the bottom of the cushion. 
  4. Turn the cushion the right way out through the gap and stuff it firmly. 
  5. Close the gap by hand using small invisible stitches.
Sewing the corners (step 1)

This tutorial is part of a series:
Town shirt

While the cabin-boy was napping, I finished his shirt!  I used this free pattern, and made a size 12 months.  You don't get to see it on the model because it's still a bit big for him (hoorah), and I've made enough too-small clothes to provide a small wardrobe for other people's babies.


I love the fabric, and hoorah for it not being blue (like everything else).

Pleasing things about this pattern include its free-ness, and that you can get the shirt out of 1/2m (even when being a tiny bit fussy about the placement of the pieces in the design).  Also, it has a back yoke which is a feature I really like.


Sadly I can't offer shirts from this pattern in my shop (its not for commercial use), but it's been really useful to help me make some design decisions for my own pattern drafting.

I like the yoke, but I like it done "properly" as a double thickness.  Even though babies don't really need the extra shaping and stability, I think the extra layer makes the shirt look more finished on the inside.  However, the down-sides would be extra fabric and extra complexity.

I've learned that trying to make my life easier by sewing the sleeve seams "as one" with the side seams does not work on this pattern, as the serged seam allowance causes puckers under the arms in a shirt this small.  Maybe I'm nit-picking here, but I should have done it as the pattern directions dictate.

I was initially sceptical about the seam binding used at the shirt hem (why not just turn under twice?), but on reflection I really like the look.  That is, if I can be bothered with the faff again.

Finally, the pattern has the collar and collar stand as a single piece.  An interesting simplification, but I think I prefer ye traditional version.  But again ++complexity and fabric.

I guess I'll have to give these trade-offs some further thought.


Interested in adult shirt-making?  What isn't in "Shirtmaking" by David Page Coffin isn't worth knowing.

Tuesday 19 March 2013

Vest extenders

The shop is now open!  Although presently there is only one item, I hope that soon there will be many more.


I'm listing a set of 3 baby vest/bodysuit extenders.  These solve a little problem with cloth nappies where modern vests or bodysuits won't popper up between baby's legs as they're designed for disposable-nappy wearing babbas.

Problem...

...solved!

If you're looking to purchase vest extenders in pretty fabric and they're no longer in the shop, just drop me a line and ask me to make more.  I'm sure we can sort something out!

Finally, a shout out to my favourite nappies: Tots Bots!  We don't have leaks in this house.

Monday 18 March 2013

Sewing set


This sewing set is in three parts:  a pincushion, a pencil case (for dressmaking pencils) and a needle-book for storing sewing machine needles.  I made these originally as a gift for a sewing friend.

The needle-book I find particularly handy since the needles never seem to go back into the little plastic cases they come with in any sensible way.  Plus, I can never tell what I left in my machine: was it a ballpoint 70 or a sharps 80?!  Well, this problem to be solved by the end of this series of tutorial posts.  (Wow, that makes me sound a bit wierd... do I really care about my machine needles so much?)

Sorry for the lack of photos-as-you-go: I shall have my camera at the ready next time.  I've tried to provide diagrams instead.

I'll come back and edit this entry to link to the tutorials as I post them.

The tutorials are as follows:
  • Pincushion (here)
  • Dressmaking-pencil case (here)
  • Machine-needle book (here)

Friday 15 March 2013

Chicken pattern weights


These little chickens measure approx. 10cm from beak to tail.  They'd make good pattern weights if you stuff them with something heavy!  You could give them to children as toys if you use safety eyes and soft polyester stuffing.

You will need:
  • Fabric that doesn't fray (I used felt) in red, yellow and at least one other colour for the body
  • Two 10mm wobbly eyes
  • Glue suitable for fabric
  • Red thread, plus other thread to match the body fabric
  • Stuffing: to make the bird heavy you could either use rice or a combination of poly-fil and a large pebble
Download the pattern here.

Cut the pieces as directed in the pattern.  The wattle and comb in red, the beak in yellow and the body and base in any other colour.  The pattern includes seam allowance.

Use red thread to stitch the wattles to the body pieces by sewing a circle around where the eyes will go.  Position the wattles as shown in the photograph.

Glue the two beak pieces together (this makes it stiffer).  Pin the beak and comb in place sandwiched between the body pieces (wrong sides together).

Sew the body pieces together along the back of the bird between A and B, moving the wattles out of the way as you go (so you don't sew through them accidentally).  Make the seam just a few mm from the edge.

Pin the base to the bird, matching A and B.  Start at the rear and sew most of the way around before stuffing the bird and closing it up.

Trim the edge of the fabric to neaten it to a uniform distance from the stitching all the way around.  Glue the eyes on.


The walkaway dress

Re-posted from 1st August 2008:

The trouble with finding an awesome hat in the sale is that it is very difficult to find a matching dress. Of course, I ended up making one. The wonderful Mr B spotted the perfect heavyweight cotton in a shop, and I decided to make up the "walkaway dress". Butterick 6015 from 1952, re-issued as Butterick 4690.


So simple, just a few seams and darts, I thought. Only take an evening, I thought. But no. Unless you are the exact size on the pattern packet, this dress is extremely difficult to fit. My lovely dressmakers' bust, Persephone, was still wearing my wedding dress back in Sussex. Result: the long-suffering Mr B had to help me spend an evening pinning in seams and re-stitching repeatedly as I tried to remove the fullness from the back. Even so, with such a bizarre wrap-around construction, it was hard to know which seams to take in to remove the wrinkles in the back.

I have a short bust-shoulder distance to I ended up taking a few inches off the shoulders. I also had to make a new seam right down the back to remove the fullness, and re-cut the back neckline to restore the round shape.

I even tried to make a toile of the bodice before I started, but without the weight of the huge circular skirt, it is hard to know how it will hang.

To top it all off, I had bought the wrong width bias binding (too wide), and there is an absolutely huge distance round the circular skirt to cover with hand stitched blind hemming. I estimate 3 hours of hemming while watching gutter-tv.

I found a small covered button was fine to secure the dress at the back, and not visible through the heavy cotton. Instead of snaps at the front, I made loops and covered buttons with spare bias-binding to secure the front. I was worrying that poppers would pop-off during dancing and expose me to the world! Also, if you wear the dress with tights the inside front tends to ride up a bit and you have to keep pulling it down. Perhaps a slinky slip underneath would cure this.

The moral of the story is:
This pattern is probably not great for beginners because it can be so hard to fit. I would recommend re-drafting the bodice pattern completely to your own measurements before you start. Otherwise, it's a pretty fun unusual pattern, and gets a lot of comments.

For photos, see my BurdaStyle profile.

Buying fabric in Paris

I found the best area to shop for fabrics in Paris quite by chance.  It's around Rue de Steinkerque in the 18ème Arrondissement.  The nearest Metro is Anvers.  At least, it was here in 2008 when I made my colleague run for the Eurostar carrying 6 meters of wool melton fabric...

Wednesday 13 March 2013

Bonjour

Ahoy there, internets!

Before I write some new content, I'm afraid I'm going to tediously re-post (while splitting some infinitives) sewing-related blog entries from an old abandoned blog of mine which is destined for the chop.  However I hope I have some genuinely useful tutorials lined up for you soon.  Just bear with me, internets!

What's on my sewing table:

Since I spent all my Christmas pennies at Fabric Rehab, I'm making this baby shirt, made out of a green and white Summersville fabric with houses and cars on it.  I have quite a few modifications I'd make to the pattern if I make this again, but more on that later when the shirt is done.