So, I finally finished the last pair of curtains which I was cutting out the two days before baby arrived.
Of course, taking photos toward the window in the daytime in a room that is painted in a dark-ish colour does not yield good results with my camera in idiot mode.
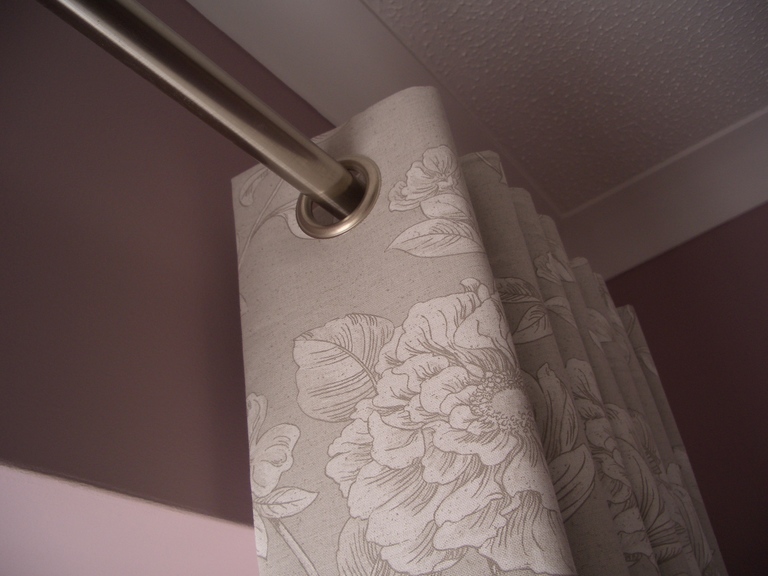
Behold! The curtains with the irritatingly large pattern repeat are done! A further 3m of fabric from a different bolt (so slightly different colour) were found and purchased, but I don't think you can tell that one drop is slightly different.
Also: I bring you another top tip of the blindingly obvious variety. Cheap material is... cheap. Okay, the feel and print of this fabric are fine, but the fabric had a badly wonky grain and off-grain pattern. When cutting out I had to choose between cutting perpendicular to the selvedges, cutting along the grain-line, or cutting along the pattern repeat (we chose to take an average of all three, so hopefully it would hang fine and the pattern not be too wonky). Add to this the 24" pattern repeat and you've got a headache.
Anyways, not much to say here that I didn't already say about these previous curtains of the same design. They're interlined with blackout lining, and lined with polycotton. I still love the metal eyelets and you shouldn't mess around with those shonky plastic ones in the highstreet shops. Just go straight to Hanolex and buy the biggest hammer you'll ever own.
Mr B: "This hammer is awesome. It looks like a Thor Hammer, you know? Like the god Thor?"
Me: "Yes, that's why it's called a Thor Hammer."
Mr B: "Oh."
If you're interested, the wall colour is "Soft Cinnebar 3" by Dulux. For the first time in my life, I copied a "Get the Look!" article in the National Trust Magazine. Except it's cheaper to get a Dulux colour mixed than go to Fired Wallet or wherever they were suggesting.
I am finally rid of the horrid brown and tan pairs of suede-effect unlined curtains that came with the house! But, bad news: Mr B wants them to be re-sewn into covers for his mower and his vice (to protect them from belt sander dust). I don't know if I can bear to touch them... eugh.
Showing posts with label curtains. Show all posts
Friday, 2 October 2015
Friday, 13 March 2015
New eyelet curtains!
A good thing to do when you're heavily pregnant is to make curtains. All the crawling around on the floor measuring is good to get the baby in position, and there is lots of sofa time with all the hand-stitching.
I made some new eyelet curtains for my bedroom. I have previously written about designing eyelet curtains here. Mr Button and I spent many happy hours measuring and laying out fabric as by this time I was quite big and slow to crawl around the floor on my own (thanks, Mr B!). Much thought was put in by both of us to minimise hand-stitching. I did have to hand-sew all edges of the blackout interfacing in and turn up the main fabric hem, but otherwise got away with hand-stitching only the very top corners of the lining, plus the mitred corners in the main fabric. The rest was cunningly machined by assembling the curtain in a strange order. The result is that the front looks like a clean rectangle of fabric with no visible stitching: a boring result from a lot of effort!
Mr B hammered in the metal eyelets using the cunning hole-cutter and die set. He has much better aim and arm strength than me. The tools and eyelets are from Hanolex and I can't recommend them enough. The eyelets feel and look very professional, and Mr B says the tools were easy and a lot of fun to use. The eyelets are bearing up well under the immense weight of these lined and interlined curtains. The interlining might be overkill on this fabric as the spots are woven and some are chenille.
I have yet to finish the curtains with the large pattern repeat that I previously winged about. I only finished these spotty ones a few days before the baby came, but I did have time to cut out the next pair and join the drops together. So the hard pattern-match bit is done. Good times when you need to choose between three options: cutting perpendicular to the selvedge, or with the wonky grain line or with the off-grain pattern. Nice. That's what you get for £10/m, I guess.
I made some new eyelet curtains for my bedroom. I have previously written about designing eyelet curtains here. Mr Button and I spent many happy hours measuring and laying out fabric as by this time I was quite big and slow to crawl around the floor on my own (thanks, Mr B!). Much thought was put in by both of us to minimise hand-stitching. I did have to hand-sew all edges of the blackout interfacing in and turn up the main fabric hem, but otherwise got away with hand-stitching only the very top corners of the lining, plus the mitred corners in the main fabric. The rest was cunningly machined by assembling the curtain in a strange order. The result is that the front looks like a clean rectangle of fabric with no visible stitching: a boring result from a lot of effort!
Mr B hammered in the metal eyelets using the cunning hole-cutter and die set. He has much better aim and arm strength than me. The tools and eyelets are from Hanolex and I can't recommend them enough. The eyelets feel and look very professional, and Mr B says the tools were easy and a lot of fun to use. The eyelets are bearing up well under the immense weight of these lined and interlined curtains. The interlining might be overkill on this fabric as the spots are woven and some are chenille.
I have yet to finish the curtains with the large pattern repeat that I previously winged about. I only finished these spotty ones a few days before the baby came, but I did have time to cut out the next pair and join the drops together. So the hard pattern-match bit is done. Good times when you need to choose between three options: cutting perpendicular to the selvedge, or with the wonky grain line or with the off-grain pattern. Nice. That's what you get for £10/m, I guess.
Labels:
curtains,
finished,
sewing tools
Wednesday, 7 January 2015
Notes on designing curtains with rings
This is a post where I point out things to future Alice which should have been obvious to past Alice when she bought curtain fabric for her spare room.
For context, I am making curtains with 40mm metal eyelets at the top. I need metal eyelets because I am interlining with blackout fabric, and making a polycotton lining too, plus buckram. This is quite a thickness to expect shonky plastic rings to withstand. Therefore, I purchased some badass tools to insert metal eyelets from Hanolex. It involves the biggest hammer I may ever own. The break even point in tool investment seems to be when you are making more than one set of eyelet curtains, especially when you take into account the recorded delivery postage in sending your beautifully handmade curtains off to someone else to butcher in the eyelets for you.
I like to use the blackout as an interlining rather than a lining fabric. When making curtains, one tends not to take the lining all the way to the curtain edge. I find the blackout fabric to be quite stiff compared to some fashion fabrics used for the front of the curtain, so when using it as a simple lining, you end up with floppy leading edges. I've even seen this done on sample curtains in a well-to-do posh national chain of stores. Eugh! Therefore, I like to use the blackout as an interlining, cut to the finished curtain size and tacked inside, making all the curtain the same stiffness. I then use a thin cotton or polycotton to line the curtain.
Here follow some complicated trade-offs and calculations that I won't repeat here, but consider the following constraints:
The narrowest drop of front fabric probably looks best toward the outer edge of your window on each curtain.
For lining, I plan for it to appear on the reverse of the curtain as a neat rectangle coming 4.5" down from the top, 2" in on each side, and 2" up from the bottom. I allow 1/2" for turning on the top and sides, but 2.5" for creating a deep 2" machined hem along the bottom.
I will use 5" buckram along the top edge for stiffening, and I expect to place my eyelets with their midpoints 2.25" from the top of the curtain. The outer two eyelets are spaced by half the eyelet spacing from the curtain edges.
I should have unrolled several meters of the fabric from the roll and stood well back before buying. What I thought was a lovely swirly pattern turns out to have VERY obvious repeats which really ought to be matched. What is more, my guestimate of yardage in the shop was pretty good at first sight: I bought 6.5m, and my later calculations show I need four drops of 62" each, which is 6.3m with no pattern matching. Clearly this is very frugal of me, but I am now cursing myself for not allowing enough for pattern matching.
When you are standing in the shop with a winging toddler, how much extra fabric should you buy for pattern matching? Turns out to be quite simple. Firstly, measure the vertical pattern repeat. Then buy enough for the number of drops (N), plus N times the pattern repeat. So for my fabric, I should have bought 4 x 62", plus 4 x 24" (because 24" is the enormous pattern repeat distance). So I ought to have purchased just over 8.8m to be safe. That's quite a difference from the 6.3m! I now need to attempt to buy another 2.2m+ of the same fabric, six months after my original purchase, if they still have it. ARGH.
For context, I am making curtains with 40mm metal eyelets at the top. I need metal eyelets because I am interlining with blackout fabric, and making a polycotton lining too, plus buckram. This is quite a thickness to expect shonky plastic rings to withstand. Therefore, I purchased some badass tools to insert metal eyelets from Hanolex. It involves the biggest hammer I may ever own. The break even point in tool investment seems to be when you are making more than one set of eyelet curtains, especially when you take into account the recorded delivery postage in sending your beautifully handmade curtains off to someone else to butcher in the eyelets for you.
I like to use the blackout as an interlining rather than a lining fabric. When making curtains, one tends not to take the lining all the way to the curtain edge. I find the blackout fabric to be quite stiff compared to some fashion fabrics used for the front of the curtain, so when using it as a simple lining, you end up with floppy leading edges. I've even seen this done on sample curtains in a well-to-do posh national chain of stores. Eugh! Therefore, I like to use the blackout as an interlining, cut to the finished curtain size and tacked inside, making all the curtain the same stiffness. I then use a thin cotton or polycotton to line the curtain.
Designing your curtain
Here follow some complicated trade-offs and calculations that I won't repeat here, but consider the following constraints:
- For a pair of curtains, each curtain needs to be at least twice the width of the window area it has to cover. E.g. for a 2m wide window with a pair of curtains, each curtain needs to be 2m wide or more.
- You need an even number of rings, and Mr Google suggests typical spacings for 40mm rings are 16-18cm. The spacing you choose is to some extent determined by how far your curtain pole stands off the wall, which should be just a little more than half your ring spacing. Clearly if you have M rings, your total curtain width will need to be M x ring spacing. This allows you a bit of leeway to play around with the number of rings, the ring spacing and the total curtain width, subject to the next constraint.
- Typical fabric widths might be 140mm, so you may need several drops of fabric in order to get your total curtain width. Consider where the join should be between two drops: it ought to fall in a furrow between two rings, i.e. with an even number of rings each side of it. Make sure your ring spacing and number of rings allows you to get this seam positioned correctly, bearing in mind the width of your fabric (which is fixed). It's not as easy as you'd think.
- With all of the above, make sure you're allowing for turnings at the edges on the front fabric! On top of the finished curtain size, I allow 5" at the top, 3.5" at the bottom, and 2.5" at each side. I allow a 1/2" seam to join drops.
The narrowest drop of front fabric probably looks best toward the outer edge of your window on each curtain.
For lining, I plan for it to appear on the reverse of the curtain as a neat rectangle coming 4.5" down from the top, 2" in on each side, and 2" up from the bottom. I allow 1/2" for turning on the top and sides, but 2.5" for creating a deep 2" machined hem along the bottom.
I will use 5" buckram along the top edge for stiffening, and I expect to place my eyelets with their midpoints 2.25" from the top of the curtain. The outer two eyelets are spaced by half the eyelet spacing from the curtain edges.
Matching obvious patterns
I should have unrolled several meters of the fabric from the roll and stood well back before buying. What I thought was a lovely swirly pattern turns out to have VERY obvious repeats which really ought to be matched. What is more, my guestimate of yardage in the shop was pretty good at first sight: I bought 6.5m, and my later calculations show I need four drops of 62" each, which is 6.3m with no pattern matching. Clearly this is very frugal of me, but I am now cursing myself for not allowing enough for pattern matching.
When you are standing in the shop with a winging toddler, how much extra fabric should you buy for pattern matching? Turns out to be quite simple. Firstly, measure the vertical pattern repeat. Then buy enough for the number of drops (N), plus N times the pattern repeat. So for my fabric, I should have bought 4 x 62", plus 4 x 24" (because 24" is the enormous pattern repeat distance). So I ought to have purchased just over 8.8m to be safe. That's quite a difference from the 6.3m! I now need to attempt to buy another 2.2m+ of the same fabric, six months after my original purchase, if they still have it. ARGH.
Subscribe to:
Posts (Atom)