Showing posts with label hat. Show all posts

Wednesday, 25 February 2015

A knitting round-up

There was a long blog silence while I knitted a lot for people's impending babies.  This post has finally been made because all the babies have been born so I can finally not spoil the surprise.  (Unless you stalk me on Ravelry, in which case you've been nosy already.)

I had quite a bit of fun using the same hat pattern and churning out lots of baby hats with some funky intarsia.  I'm definitely getting better at knitting with both hands at once (that is, with a different yarn held in each hand, of course you need two hands for "normal" knitting anyway).

Firstly we have a hat with a pattern and colourway pinched from a WI magazine.  The pattern was printed for a blanket which called for oodles of posh yarn, rendering the whole exercise very expensive.  In any case, the blanket was stranded and not backed, so would have been expensive and delicate to boot.  I shamelessly copied it onto a hat for Zack who has the honour of sharing his birthday with Christmas Day.


Archie got a hat with space invaders on it.


George gets a hat with hearts.


I had a lot of fun making this squirrel cardigan for Phoebe.  I ordered the 100% wool yarn without having ever touched some and I was pleasantly surprised!  I did move the "nut piles" in the design to the front of the squirrels and away from the centre back.  I am honestly surprised that almost 70 people had made this cardigan before me and not commented on Ravelry that it looked like the squirrels on the centre back were having a poop.


The little whale cardigan has been sent to Alfie.  My intarsia has definitely improved from the top of the whales toward the bottom - oops!  Turns out 100% cotton is not the most forgiving yarn for this kind of work.  I hope he won't mind.  Also the cardie turned out massive.


For my dad (not-a-baby!) I made this grey beanie hat for his birthday.  The crazy super-bulky yarn felt like knitting with worms, and I don't recommend teaming that with cheap plastic Pony 6mm needles.  Bendy!  I hope it fits.


Finally, for my own brand-new baby Button, I used up some of my left-over knitcol from this jumper to make a norwegian-style yoked number.


If you are interested in any of the gory pattern or yarn details, you can browse my Ravelry project page here.

Thursday, 29 May 2014

Heads still be growing, I still be sewing.

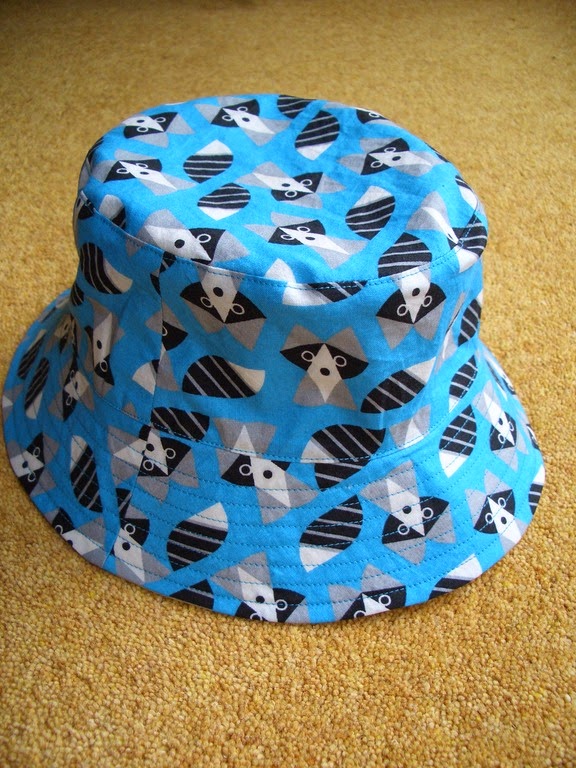
I have made many ... reversible ... bucket hats from this pattern by Oliver & S.  Toddler Button keeps growing, so I have been forced to stitch him a new hat for the sunny days.  We're now in size M (19") which sadly means there is only one size left before I have to draft my own hats.

Behold the epic new hat on a theme of racoons, with a sunny yellow reverse side:


I've got construction down to a fine art now, and I've eliminated all hand-stitchery.  It's charming but I don't have time for that malarky.


Do you want to know my non-hand-stitch secret...?


Alright, here it is:
  1. Construct the brim in it's entirety,  including the top-stitching.
  2. Construct both caps individually including the top-stitching around the top of the crown.
  3. Pin the brim to one of the caps, right sides together and machine stitch around with a 3/8" seam allowance.
  4. Stitch around a short distance (only 2-3") of the same seam but with the usual 1/2" allowance the pattern dictates.  In this area you'll have two rows of stitches.
  5. Pin the second cap around the same seam.  For this, you'll have the two caps right-sides together with the brim all squashed up and sandwiched between them.
  6. Sew around the seam with a 1/2" seam allowance, leaving a gap of 2-3" matching exactly where your double-line of stitching was.
  7. Trim and grade your seam allowances, so the cap allowances are 1/4" and the brim allowance is a shade more.
  8. Turn the hat right-sides out through the gap and press the seam flat.
  9. Close the gap left from turning the hat out, which will only appear on the inside of the hat (due to your careful double-stitching on the other side).  Press the seam allowance in this area appropriately and pin the gap shut.  Carefully top-stitch around the whole hat on the sides, which should catch the gap shut at the same time.
  10. Superb!  A hat with no hand-stitching!

The squashed on floor look: how the hat will spend most of it's life.

Hats look better on heads, so I'm sorry for the floor-based pictures.  It's raining and TButton has the lurgy, so there is no hat-wearing today.  He had a tantrum when I put his old sun-hat in the washer and the new one just wasn't the same (apparently), but I think he'll be over that soon.  I'm aiming to appeal to what remains of his 6 month long obsession with the colour yellow.

I got the fabrics from Backstitch at Burwash manor.  A lovely shop!  :-)

Monday, 19 May 2014

Little fox-and-dots hat for a little head


A colleague of mine is having a little baby!  Hooray!  I couldn't resist the urge to make baby a little hat a week ago.  I hope it will fit: I made size XS, but it's supposed to be for 6-12 months and baby is not here yet.  That said, XS was too big for some of TButton's friends at that age, and much too small for TButton.  So hopefully it will be sunny at some point when it fits the new baby.  The pattern is from Oliver & S here.


I was super-excited to find almost a full fat-quarter of fox print fabric in my stash, and then fortuitously a pale blue dot fabric which is completely non-related but matches so well!  Plus, the hat is reversible.


I tried a different construction method this time, top-stitching the brim before attaching it to the hat.  I then used a cunning technique to attach both sides of the cap to the brim without any hand-stitching.  Honestly, who has time to hand-stitch?

The whole hat only took a few hours.

UPDATE:  Baby is here!  It's a girl!  Happy birthday little one, and congratulations Mummy and Daddy!

Monday, 15 July 2013

Moar hats!!!!!!!one!!

I feel like I'm going to have to begin every post with an apology for blog silence!  Perhaps you should all just expect reduced posting frequency here.  Baby is becoming more active so I can't be sitting at the computer much any more.  It's his least favourite thing for mummy to do (excepting hoovering).  In addition, those of you who are my facebook buddies will already be fed up of hearing about the comedy-of-errors that is our fridge breaking, swiftly followed by our kettle being recalled (no tea, argghhhh).  Our back-up kettle has just leaked a large volume of water all over the 240V connection.  SAFE.   So mostly I have been trying to diagnose faulty refrigeration devices, moving thermocouples around and buying chest freezers.

My sewing machine has been busy!  I finished two hats for friends' babies, which had to be a quick job before the heatwave ended and they grew bigger.  Fortunately the forecast indicates they have another week to wear them at least :-)  I really like the fabric combinations they picked out of my stash.

Quilting cottons

Cotton twill lined with printed silk

I've almost done the long-sleeved shirt for the wedding outfit: I'll post about that later when I finally take some pictures.

In other more wooly news, I finished the mystery crochet which I'll post a picture of another day.  I'm starting to sketch for my next crochet pattern!  The stegosaurus seems popular and I hope most of the pattern errors have now been ironed out.  I find it funny that it's more popular with parents than with babies; maybe toddlers will appreciate it more?

On the sad-and-lacking front, I've still not managed to get that shirt pattern ready for sale.  I think I want to lengthen the sleeves and widen the neck.  One day soon?!

Wednesday, 19 June 2013

Sunny days; shady heads


This has to be the quickest time I've finished a project ever!  The hat was finished last night (Tuesday), and I only started it on Sunday afternoon.  I guess I was spurred on by the sunny weather and tiny alternative hat.  That, and the amazing >1 hour nap that baby took yesterday.  It's amazing what you can do in an hour if your baby actually sleeps when the pram is stationary!


The pattern was from Oliver + S (see here).  I made size "small" (19" head) and it fits quite well now; hopefully it will last at least a few months.  It is quite a nice shape: some hats can be a bit peculiar, but this one isn't.

The pattern gets you to machine together the two hat-tops (like funny brimless caps), then you create the brim.  Next, you machine one of the caps to the brim.  The final cap is supposed to be hand-stitched on.  I did this, but it's quite a faff.  I think you could totally machine it on with the following method:
  1. Make the two caps and brim as the pattern suggests.
  2. Baste one of the caps to the brim, using just less than the 1/2" seam allowance.  This is just like the original directions but using a bit less seam allowance.
  3. Pin the other cap around the same seam.  For this, you'll need the caps right-side together and the brim all squished up and caught between them.
  4. Machine all around with a 1/2" seam allowance, leaving a gap of a few inches for turning right-side out.  This seam line will mean your basting-on of the first cap won't show on the outside of the hat. 
  5. Trim and turn out.  Hand stitch the gap closed on both sides.  (One side won't technically be a "gap", but it'll be basted at a slightly different distance than the rest of the seam, so you'll still need to hand-sew to fix that.)
I used two bits of leftover quilting cotton from the Joel Dewberry "Modern Meadow" range.  The spotty one is "Acorn Chain" and the flowery one is "Sunflower".


The hat is reversible, but I prefer the spotty side.  You don't get a photo of it on the model because he's napping again.  Amazing!