Showing posts with label ottobre. Show all posts

Wednesday, 21 October 2015

Quick trick to make shirts smaller

I bring you one cunning trick to make adult shirts smaller for children!


Here's what to do:

1.  Find suitable 100% cotton adult shirt.  I used a men's work shirt with a 15" collar pilfered from Mr B.

2.  Wash on it's own in the washing machine on a 90degC cycle with bicarb and vinegar.  I used 3 tbsp of bicarb, which I put in the drum with the shirt, and 1 cup of spirit vinegar which I put in the soap drawer.  This should cause the shirt to shrink a little.

3.  Tumble dry on the hottest setting to make the shrinkage permanent.

4.  Repeat steps 2 and 3 again until you have reached the desired size.  I did about 5 repeats to make the shirt small enough for toddler - about a size 104cm (age 4-5).

After this, when you come to launder the shirt normally, just use non-bio soap powder and wash at 40degC with the rest of your laundry.  Magic!


Only joking.  Of course I didn't.  I used this.

Saturday, 10 October 2015

Purple trousers CAPSLOCK MOMENTS


I made my first pair of proper trousers!  I'm not counting the self-drafted trousers here and their many shorts variation friends.

I made the "Elvis" trousers from the 1/2015 issue of Ottobre magazine, whose model displays them in turquoise thusly:


I had to make these because I love me a good pair of brightly coloured trousers on a little man, and toddler likes them too.  I scored some purple twill for £2/m from St Ives bank holiday market.  Although it has an inexplicable fire-retardant backing, this has softened completely in the wash.  Nevertheless, these pants will only ever be metaphorically on fire.

A red bowl of conkers was just lying around, so I kept it in shot.  I'll admit it doesn't look as arty as I thought.

Sadly the notions cost me more than £2, even when I skipped the zippers on the back pockets.  I'm not going to count the £15 I splurged on 32 sewing machine feet from China, or the cost of the top-stitch needles, or the spotty cotton pocket facings and button from my stash.  However, I ought to count the fly zipper and the red top-stitch thread (of which I used an entire spool).  So maybe the trousers cost me £6 all in.

BOOM!  Spotty cotton!  Also, eagle-eyed viewers will note my top-stitch tension issues, even after unpicking 4 times... ARGH.

I have a thing about red and purple together.  I had SO MUCH FUN making these trousers.  Fabric that doesn't fray. lustrous red thread, new machine feet... ahhhh the good times.

The pattern is lovely, although Mr B takes issue with the style detail where the side seam twists onto the front leg.  Pah!  I love it.  They're also slim enough for Toddler B, although I am waiting on a red belt from eBay to keep them up so he can wear them now and make them last longer.  That's why the bottom of the belt-loops are not stitched down yet (just in case the belt is wider than expected).  Also, I ran out of topstitch thread, so you don't get red bar-tacks at the top and bottom of every belt loop.  I ain't buying another spool for that malarky.

I skipped the exposed metal zippers on the back pockets to save money and my furniture.

I did have a few issues with the top-stitching - my machine wouldn't get the tension right sometimes and made loops of top-stitch thread underneath the fabric, usually when sewing right on the edge of 3+ thicknesses of twill.  I think because the presser-foot had uneven pressure over the bulky seam allowances and the fabric got pulled up and down by the needle.  I managed to partly solve it by using a pad of rolled up twill beside the seam to make the foot press evenly.

Sometimes my machine skipped stitches when trying to top-stitch over e.g. 6 thicknesses of twill in a seam intersection.  Tbh who can blame it?

Ok, so now I fess up to the mistakes.  I don't know what possessed me but I didn't take into account the diagonal twill weave when I cut out.  I just folded the fabric and cut double.  I think.  Or something.  It was dark in my windowless sewing space in the evening.  Anyway, the weave is not doing what I would like across the back seam (or indeed the front).  Don't look too closely.   Also, my top-stitching could be more even, but I'm going to allow myself some leeway on that as it's my first attempt.

My top stitching is not the best, but toddler will move too fast in real life for this to cause anyone visual pain.

I'll be making these again!  IN EVERY COLOUR ST IVES WILL SELL ME.  Did you hear that, man on St Ives market stall?  I WILL BUY ALL YOUR WACKY TWO QUID TWILL.  I will look for new audacious colours of top-stitch thread.  MAD LEGS AHOY!

Note that the shirt is looking a bit small - not to worry, a new one is in the works.

In less capslock-inducing news, I have cut up one of Mr B's old work-shirts and am in the process of transforming it into a toddler sized shirt.  This is quite exciting to me (and toddler).


Sunday, 10 May 2015

I totally made another Ottobre shirt!

I have previously made a shirt from the 1/2015 issue of Ottobre magazine, see here.  I made another for my own toddler.

"I want to see [myself] doing cheesing!" - Toddler

The fabric is a nasty cheap polycotton from St Ives bank-holiday market.  I was so disillusioned with it's cheapness that I couldn't be bothered to pattern-match.  I also ended up using thread that was too light in colour because I lost my matching spool somewhere on my messy sewing table.  It turned up just as I finished the shirt, so it got used for the buttonholes only.  Oh well...

I got in a big pickle with the plackets last time and ended up drafting my own.  Time and reflection are a wonderful thing, and I totally understand them now!  I nailed it!  The key phrases that I wish were in the instructions are:  narrow right placket to be applied like an edge binding, and left placket to be applied to the front a bit like an appliqué strip.  And yes, you do need a seam allowance on the opening edge.


I also nailed the hem this time around.  I clipped the curves before overlocking the edge, then turned it under once and top-stitched.  That works!

I re-used six super red buttons from one of my mother-in-law's shirts.  Even omitting the collar buttons, I still didn't have enough matching buttons.  I used two of the six matching buttons on the cuffs and the remaining four down the front.  The lowest button on the front matches in style and size, but is blue instead (turns out my mother-in-law had two identical shirts in different colours).  Finally, the buttons on the collar-stand and pocket are the same red but completely different styles picked from my button jar.  You totally don't see the collar-stand button that much anyway.  Toddler is fascinated with the non-matching blue button: I caught him showing it to his father and then his brother.

I made the 98cm size again (approx 3 years old size), and it fits my tall slim 2 1/2 year old like a glove, which means it won't last long.  (He's just gone into UK age 3-4 clothes.)  I will not make this size for him again: time to trace out the next size up.

The fit of the shirt is amazing, absolutely perfect for my boys.  The outlay on the magazine is totally worth it just for this pattern.  I am already planning shirts number 3, 4 and 5!  Next I am going to make the trousers in the same image.  I scored some purple twill for £2/m from the St Ives market, it's going to be EPIC.


Monday, 16 March 2015

Ottobre 1/2015 "Elvis" shirt

You can tell when I've got a small baby feeding at all hours of the day and night, because my blog posting frequency suddenly goes up!  I've already read the entire internet, so I've resorted to adding my own content... ;-)

I finally caved in and bought myself my first issue of Ottobre magazine as a treat, a few days before baby Button II arrived.  I was so excited to unwrap it on the postnatal ward (although obvs not as excited as having baby himself).  So many lovely designs to make for the boys!

The main reason to select this issue was the shirt (design 20):

Shirt from Ottobre 1/2015, page preview pilfered from their site.

The sizes start at toddler and go up to about age 12, as I recall, so I am hoping this pattern will see me through the next 10 years at least!  Shirts are what I really like to make for Toddler Button, although I like the cool trousers in the image too, so he might be getting a pair of those.  I just wanted to spare myself drafting shirt patterns constantly and focus on sewing them.

Anyway, the shirt has cuffs and a yoke, which I'd always wanted to add to my own patterns.  Sadly, turns out that the yoke is stylistic only, and not double thickness in the original instructions (as it would be on normal menswear), but there is no reason why I could not cut it to be so.  I'm also planning some yoke style changes to mix things up in the future, and maybe a re-draft of the cuff plackets,  These are all speedy and minor drafting changes though, and should be fun.

I was quite nervous to cut into the fabric because I had some real concerns about the piece designs I'd found on the pattern sheets.  Firstly, the left placket looked narrower than I was expecting, especially compared to the tiny schematic of it they print with the instructions.  Secondly, I wasn't sure where to add seam allowances.  They state "The patterns include hem allowances, placket extensions and placket facings.  When cutting out the garment pieces, add seam allowances of approx 1cm ... to each edge of the pattern."  Indeed, the placket patterns had marked seam allowances on them, but the front opening of the shirt didn't have allowances marked, so I wasn't sure if this was included under the placket rule or not.

The shirt front has two cutting lines marked "left" and "right" for the different sides.  The right button placket is supposed to be narrow for style reasons, and the left placket has a more normal width.  In order to have the collar stand fit the neckline correctly, once the plackets are inserted then the front pieces should finish along the line marked "left".  Since I was super confused about how to get this to work, I ended up re-drafting a new pattern for a placket 2 x 44mm in width, adding the 1cm seam allowance at each edge. I cut two new plackets to my re-drafted design, cut both fronts down to the "right" line, then applied my plackets with a 1cm seam allowance.  Both plackets are now identical, loosing a style feature, but at least the shirt has gone together.  Reading back the instructions with hindsight, I can see how the left placket was supposed to work (and yes, you do need to add a seam allowance down the front), but I'm still confused about the right one.  Perhaps all will be clear next time.
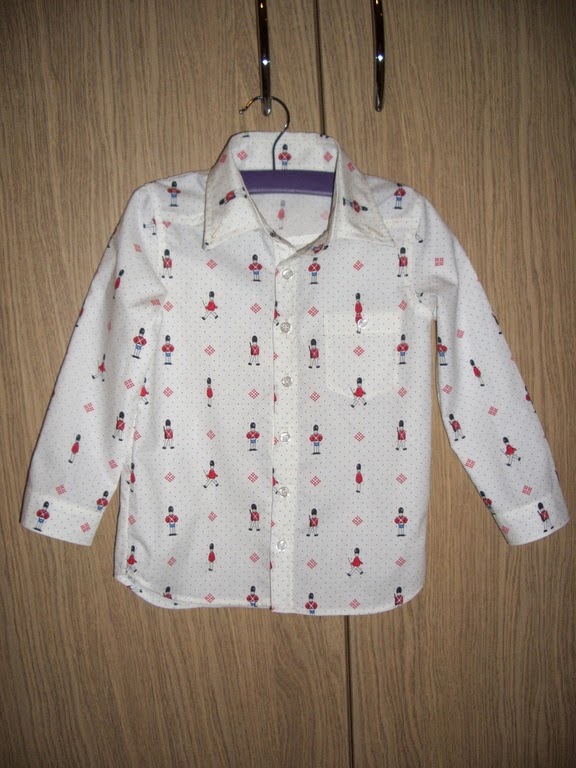
You don't get good garment photos on this blog until I get spare time during the day with two hands!

I made the 98cm size in our old friend the Laura Ashley soldier fabric.  It's probably the last shirt I'll get out of it (boo hoo).  I tried super hard to match patterns on this shirt, but there are still a few things I'd do differently with the pattern placement, especially now that I know how the front plackets work.

In other news, the cuff plackets were easier to figure out than I expected (I couldn't find their suggested method in a brief flick through this book so I did a trial run on scrap fabric).  Also, the sleeves went in without fuss, and I overlocked and topstitched the armhole seam after clipping it, so it lay flat.  Not sure why I never thought to clip the seam allowances at the armhole before (clearly I was being dense), so I'll chalk another one up to the learning experience.  I'm still a bit rubbish at getting the hem done neatly and easily around the side curves.  I wanted to do a rolled hem, but there was no way the thick plackets and seam allowances were going to feed through my rolled hem foot so I did a double turned hem instead.

Check out that pattern matching!

I'm really pleased with this pattern overall.  I love the little details like the collar and pocket buttons, and I'm hoping the slim fit will look really smart on.  I can't wait to make more of them!  I massively underestimated the time it takes to sew it with two small children under 3.  I'd quite forgotten how much work goes into a shirt with all the seam grading and top-stitching.  However, the complexity is exactly why I love to make them; a t-shirt just wouldn't be so satisfying.

The shirt is for Toddler Button's little friend.  It's my payment for the amazing Pocoyo birthday cake his kind and talented mother made for Toddler's birthday in December.  I hope it fits him!

In other news, I am really disappointed with the range of shirting and printed dressmaking cottons available online.  I want to make more funky and bold shirts for Toddler, but all the cotton poplin and lawn is turgid floral patterns that even I wouldn't wear.  I'm going to have to resort to quilting cottons (argh) to make cool shirts.  Toddler likes to wear shirts like Daddy, and he'd dress like a crayola box if I let him.  (Favourite outfit: grass-green trousers, blue and purple t-shirt and bright yellow tank-top.  Granny let him wear it once, because she is nice.  Mummy is a big meany.)