Showing posts with label crochet. Show all posts

Saturday, 14 April 2018

Postcards from Sweden: crochet version

I am so excited to show you my latest creation!


YAAAAAAAY!!!  When I saw the Postcards from Sweden quilt pattern from Jeliquilts here, it was love at first sight.  However, I couldn't afford to quilt it, because this would tie me in to making 2 quilts plus a crochet blanket.  You see, one boy has a crochet blanket so the other was clearly owed one.  I didn't dare add quilting debts to this.  So I had to make the Postcards from Sweden as a crochet blanket for the smallest boy.


Because I cannot step away from the day job, I matched the yarn colours to the original Kona fabrics by writing a python script.  What else would you do?!

The very lovely Kelly has kindly agreed that I can share my colour list with you so you can recreate her work in yarn too!  You'll need to head on over here to download her free pattern, but really you only need to print pages 6 and 7 which describe her layout.  From there, you can write in the yarn colours in to her handy chart and then it's a crochet-by-numbers exercise, and a very lovely one it is too.

Here's the yarn colours I used, numbered to match the original quilt scheme:

  1. Tomato
  2. Matador
  3. Lulk *
  4. Pomegranate
  5. Sage
  6. Green
  7. Pistachio
  8. Leuven *
  9. Citron
  10. Apricot
  11. Saffron
  12. Spice
  13. Pistachio
  14. Kelly Green
  15. Aspen
  16. Cloud Blue
  17. Denim
  18. Turquoise
  19. Empire
  20. Lapis
  21. Sherbet
  22. Wisteria
  23. Magenta
  24. Amstelveen *
  25. Amstelveen *
  26. Lavender
  27. Lipstick
  28. Amersfoort *
  29. Lulk *
  30. Clematis
  31. Fondant
  32. Fondant
  33. Knokke *
  34. Spice
  35. Sunshine
  36. Spring Green

All colours are Stylecraft Special DK, except those marked with an asterisk which are Scheepjes Colour Crafter.  That's 31 distinct colours, I used less than 100g of each colour.

The border is made up of three additional Stylecraft colours:

  1. Grey
  2. Graphite
  3. Cream


In terms of the blocks, they're a solid granny square of UK treble crochet worked in two colours at once, which is achieved by reversing the work direction.  I bring you a diagram:


I worked 6 rounds for each block.  The only non-standard bit is where you reverse direction - after 2 ch, slst into the start of the round, then turn the work and slst back over the ch and then get ready to ch 3 to act as your first tr and you're away again.

Don't worry if the diagram is opaque - I made some video tutorials, so hopefully the diagram will be a good reminder once you have watched them.

There are three parts to the videos:

  1. Round 1
  2. Round 2
  3. Round 3

For the border, I used 5 rounds of linen stitch from the Attic24 blog here.  The colour order is Grey, Cream, Graphite, Cream, Grey.  Again, I was just trying to mimic my favourite quilt binding I've seen on the postcards quilt!

I found it important to keep track of all the squares by storing them on stitch markers as I made them to keep them in order.  Scrap yarn through a square corner would do just as well.

It's like a rainbow slug on my floor.
My squares curled, as you can see in the image above.  It was necessary to block them to 5"x5".  The most painless way is a blocking board - slip them over the pegs and shoot steam at them from above with a hot steam iron - it's enough to relax the synthetic fibres. 

There's no need to fork out for a posh blocking board as long as you've got access to an electric drill and some MDF.  I've heard some people suggest 3mm DPNs as good blocking pegs, but you can save your pennies - 3mm stainless steel rod is widely used in remote control hobby aircraft, so grab yourself some cheap on eBay.  I bought mine too long and owe thanks to my Dad who chopped them up with his grinder.  Sorry Dad.  Then just drill yourself some holes and pop the pegs in.


The blocks are whip-stitched together (I didn't want a visible seam - I wanted to match the quilt look as close as I could).


My little boy now has his own blanket which will doubtless get trashed in den building (as it should be, of course).  If you have kids and are not sure if the blanket is needed - it always is.  Did I mention they look as good as new after a machine wash and tumble dry?!

In my gauge the blocks are 5" square and the blanket comes out approximately double bed sided.  For scale, a real human on the blanket:


Once again, huge thanks to Jeliquilts for offering her quilt pattern to us all for free.  I can honestly say I enjoyed every single stitch I made to re-create her work in yarn.

You might be interested to know that I have started a crochet blanket for me now.  There's no pulling the wool over the kid's eyes (no matter how rainbow coloured) and they've spotted I already made myself a quilt, so have placed their own quilt orders accordingly.  I'd have got away with it if it weren't for those pesky kids...

Sunday, 3 January 2016

I crocheted the saturn V and I'm ambivalent about the result


For our WI's annual entry into the craft competition at the Fenland Fair, I was persuaded to crochet the Saturn V.  The pattern is pretty cool and so is the subject, but nevertheless I had a bad attitude to this project, probably because of the cheap acrylic yarn in my stash that had to be used.  My white yarn was so cheap that it showed the darker stranding inside it.  Also, crochet stitches don't align on top of each other like knitting ones do, rather they are shifted about 1/4st to the right.  Therefore, the vertical black blocks look like they are twisting clockwise around the rocket (they are).  No idea how the designer avoided this fate - vigorous blocking perhaps?

Anyway, it made it back to be stuffed wonkily into Baby B's toy bucket, to look comically bent at me whenever I see it.  Banana rocket.  At least that bit makes me smile.

Monday, 11 August 2014

What happened to July?

The summer seems to be racing by and with hardly a blog post in sight!  I'm a little shocked that I didn't post for a whole month, but I'm still going to tell you what I did.

Mostly, I looked after toddler Button who is reaching new levels of excitement and energy.  I also did some paid work.

After making my ruffle dress, I decided I wanted a matching yellow cardigan, and said as much on the knitting network Ravelry.  Some kind soul (who I don't even know in real life) saw my comment and had the kindness to message me with a link to the perfect yarn she had searched out!  People's generosity on this site amazes me.  I bought the yarn she suggested (Sirdar Simply Recycled) in yellow for 59p/50g ball, which is an incredible price and cast on for Miette by Andi Satterlund.  Fortunately her group "Untangling Knots" was running an outfit-along at the the same time, where you sew and knit a co-ordinating dress and cardigan, so I thought I'd enter.  Sadly I missed the deadline by a matter of hours, but nevertheless I still have a matching dress and cardigan which I love.  Behold:

If I look manic in this photo it's because I was trying to make the toddler standing in the doorway laugh and therefore not toddle out of the house in his slippers.

This manic knitting exercise took pretty much the entire last two weeks of July.  Before that, I was drafting this dress which I have yet to test.

Since the cardigan, I had to crochet some DNA.  This is for a WI competition (don't ask) and I'm afraid I've had a bad attitude about making it.  At least it contains glittery yarn, even if the nucleotides look a bit like suppositories.  The pattern is my own, but I'm not sure I can be bothered to publish it; I'm not feeling the love for this project.


Now I'm back to my sewing machine again, this time to make a gift for someone in the month of September.  I can't say more than that until the gift is given, so you'll have to wait.

Thursday, 5 June 2014

New crochet pattern: Fenland Vegetables

The crochet patterns for Fenland Vegetables are now available!  For just £1 you get the patterns for turnip, butternut squash, beetroot, leek, cauliflower, two widths of carrot and parsnip.  In addition, you get both UK and US terms on appropriately sized paper (A4 or US letter).  Is that a deal or is that a deal?


The pattern has been fully tested by some lovely people on Ravelry to whom I owe a debt of gratitude.

Buy it now in my Ravelry Store for just £1!  The pattern is digital and will zoom to you with all the efficiency of the internet.  Woop!

Tuesday, 14 January 2014

Hello Chameleon, hello pattern shopping!


Steady on there!  Hold on to your seats!  You can now get the pattern for "hello chameleon" from my Ravelry store!  Clicky here: buy now

Massive thanks to my patient and committed testers.  This one's not an easy crochet by any means, but I hope it's rewarding.  The tail contains no wire: short rows of crochet are used to create the right curvature for it to naturally form a spiral.  To run the chameleon gauntlet, you'll need to turn the TV off and drink many cups of tea.  Go go go!

The pattern includes both US terms and UK terms, and a 13-page photo tutorial for the first 11 rows, so you're definitely getting your money's worth.

Sunday, 12 January 2014

hello space bunny!

Exciting times!  You can now purchase the pattern for "hello space bunny" from my Ravelry store!  Something to spend your Christmas pennies on...


Buy space bunny pattern now.

Sunday, 5 January 2014

Crochet tutorial: counting stitches

I've had a lot of questions lately about how to count which crochet stitch you're on.  When I'm working in continuous rounds (like a spiral), I like to keep track of the start of the round by putting a safety pin through the first stitch in that round.  It's really that simple.  Obviously in order to work the next round, it's easiest to take the safety-pin out momentarily while you work the stitch it's in, and then you can put it back: through the first stitch in the next round.

If that's enough for you, you can stop reading now.  For the rest, I'm going to risk over-complicating this with a plethora of extra words and pictures, so here goes...

Wednesday, 1 January 2014

Stitch comparisons or, "why I prefer traditional English crochet terms"

This sounds like a dry topic, and perhaps it is.  Nevertheless, I hope this post will clear up a bit of confusion surrounding UK and US crochet terms.

The abbreviations you are about to see are spoken as follows:
slst = slip stitch
sc = single crochet
dc = double crochet
hdc = half-double crochet
htr = half-treble crochet
tr = treble crochet
dtr = double-treble crochet
trtr = treble-treble crochet

Confusingly, there are two different sets of terminology for crochet stitches and although the stitches themselves are similar, and the stitch names are similar, the mapping of name-to-stitch is different on opposite sides of the pond.  Nice.

Never fear, I am hear to save you with my handy comparison table, which also shows how to make each stitch:
Clicky on the image to enlarge it!

That's not all!  My handy table also aims to persuade you why I'll be sticking to ye traditional UK terms.  More of this in a moment.

Firstly, there is such a thing as a single crochet stitch in UK terms.  The terms "sc" and "slst" are both used in the UK to mean the same thing.  The use of "sc" is more traditional, whereas "slst" is a more modern usage. If you look up some conversion resourses, you’ll find both are given, see:
yarn forward
fresh stitches
amy’s odyssey
I’ve certainly seen UK patterns written with both versions. I prefer to use conversions from the “Happy Hooker Stitch’n’Bitch” book, which states US slst -> UK sc; US sc -> UK dc.

The reason I prefer the UK terms (and the traditional ones at that) is this:

The UK “single”, “double”, “treble” prefixes indicate how many times you wrap-and-pull your yarn through the loops on your hook; this makes it easy to remember.  If you don't believe me, see the bottom section of my table!  It's not quite true for the taller stitches, but they're not often used anyway.

In addition, it feels odd to me to skip straight to “double” with no “single” crochet in the list. So I stick the the traditional English version when I write my patterns, and then convert to US afterwards, through the magic of LaTeX command definitions.

Friday, 27 December 2013

Little loopy lamb hat


I found out with a week to go that the children had to dress up for the village nativity play (well, duh).  So I spent a week making loop stitch so that Baby Button could be a little lamb.  Sadly that was as far as the costume went, but he was toddling off around the church so much I'm not sure how much time he spent in the stable with the Holy Family anyway.  The other lamb made it into the pulpit...


I should get this pattern tested soon so that I can sell it and you can all make your lamb hats for Easter.


You know you want to...

Friday, 20 December 2013

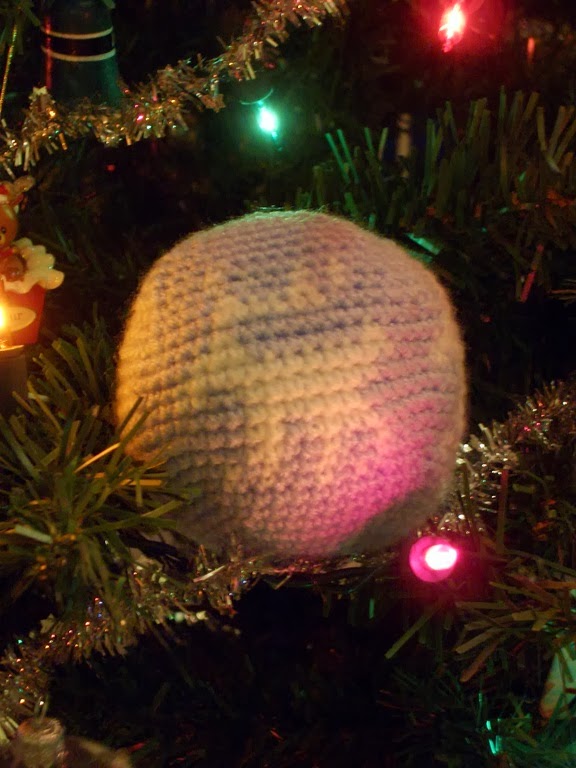
Crochet christmas baubles

I heard that switching colours in crochet work in order to make a picture is called "tapestry crochet".  I've only ever tried this with knitting (where it's known as "intarsia").  I thought it would be fun to make a Christmas Bauble with tapestry crochet.

Because it's in-the-round, the stitches are offset from the ones below and I had to make up some special crochet graph paper to draw the design.  I've gone for reindeer, and I'm telling you that because I'm less-than-pleased with the result and I think you'll need telling what I was aiming for (whoops).


Firstly, I tried to align my increases and decreases to give me more space for the design.  While this works with knitting (because knitting is stretchy), it doesn't work for crochet (because it's firmer) and the result is a slightly wonky and lumpy ball.

Secondly, my choice of pale blue and white was poor because there is not enough contrast to see single stitches in the design, which is why the reindeer looks like it has only three legs.

Gah.  It's now too close to Christmas to fix this pattern ready for release, so I've got another 340 days to perfect this one...

Wednesday, 18 December 2013

hello space bunny

I finished space bunny!


He was my excuse to use the glittery grey wool I bought at the £1 shop.  In addition, because I wanted a different challenge, he has a transparent PVC visor that I crocheted into.  Good times!


 Bunny is with the good kind pattern testers of Ravelry before his pattern is for sale.


Wednesday, 4 December 2013

Better chameleon pictures

Astute readers will note that the previous three tutorials have clearly been made while crocheting this chameleon!

I owe the internet (outside of Ravelry) some pictures of the chameleon taken in the cold light of day.  I will owe my testers on Ravelry a huge debt of gratitude when they're done, since it's not that easy to make the tail!

*Pattern coming soon!*  Woo hoo!

Behold the glittery beast:


Sunday, 1 December 2013

Tiny Santa Hat

Hello m'dears!

It's advent Sunday, so I've made my first batch of 14 mince-pies, listened to some carols and made a teeny-tiny Santa hat to adorn my secret Santa gift for the WI Christmas dinner tomorrow.  Shhhh - don't tell or they'll know it was me!  (If you are reading from my WI then I'm impressed, and don't give me away on Monday...)


Here's how to make your own, should you wish to make gift-tags or tree decorations from them.  Please contact me if you find an error and I'll be pleased to correct it!  I hope you enjoy it and will consider following my blog.  Please don't sell this pattern or items based on it - it's for your personal enjoyment only.  If you want to sell items made from this pattern then contact me and we can work something out!  :-)

You will need:

DK wool scraps in red and white
3mm crochet hook
tapestry needle for weaving in ends
safety pin (for use as stitch numarker)
scissors

Key to abbreviations:

ch = chain
sc = UK single crochet
dc = UK double crochet
tr = UK treble crochet
dec = decrease by dc two stitches together
[tot] = stitch total at end of round
This pattern is written in UK terms throughout.  To convert to US terms, note that UK tr = US dc, UK dc = US sc, and UK sc = US sl st.

Pattern

1)  In white, make a slip stitch onto your hook.  ch 18.
2)  Join into loop by making a dc into your starting ch.  dc around.  [18]
3)  dc around.  [18]
4)  Switch to red.  dc around in back loops.  [18]
5)  dec, 7 dc, dec, 7 dc.  [16]
6)  3 dc, dec, 6 dc, dec, 3 dc.  [14]
7)  1 dc, dec, 5 dc, dec, 4 dc.  [12]
8)  4 dc, dec, 4 dc, dec.  [10]
9)  1 dc, dec, 3 dc, dec, 2 dc.  [8]
10)  dec, dec.
11)  Switch to white.  dc, then make a popcorn stitch as follows:  into the next stitch, tr 5 times (all into the same stitch).  Remove the hook from the loop currently on it (to leave it hanging "free"), insert your hook under the bar made by the first tr, then pull the "free" loop through.  Finally, make a sc into one of the other stitches at the top of the hat to close it.  Bind off and sew in ends.

Friday, 29 November 2013

Fenland vege-troubles

I finished five vegetables for my friend, who wanted them for an interactive exhibit at the museum where she works.  I already LaTeX-ed up the pattern, so hopefully I shall have it tested at some point soon, when I'm done with the chameleon.  Then I can offer the vegetable patterns for sale as a set.

In other news, I've started work on the next pattern.  A glittery SPACE BUNNY.  Whoa.

Now for the picture explosion:


Cauliflower

Enormous Turnip

Butternut Squash

Beetroot

Leek


Friday, 15 November 2013

Crochet tutorial: how to change yarn colour

Changing yarn colour


In my Chameleon pattern, I like to change yarn colour between rounds.  This tutorial shows how I like to make that happen.  Once again, sorry for the tatty hands and nasty cheap yarn.  Maybe I should employ a stunt double for the photos, with nicer hands.  Maybe my husband...?!

I'm going to talk in UK crochet terms; you can tell this by my spelling of "colour"...!  ;-)

1)  Here I am: I've made the last stitch in this round and I've come upon the marker which indicates the first stitch in my next round.  (Sorry for the plethora of other pins: I took this picture when I was mid-way through inventing the pattern!)

2)  Break the yarn, leaving a tail a few inches long.  Insert your hook into "stitch 1" of the next round.  (You'll have to temporarily remove your stitch marker to do this.)

3)  Wrap the new colour of yarn across the throat of your hook, exactly as you would if you were carrying on with the previous colour.  Now carry on making your double crochets.  If you're cool with that, you can skip to step 6.  If you want more help to do the first one, keep reading!

4)  Pull a loop of the new colour through the stitch.  You now have two loops on your hook.

5)  Wrap the yarn round the hook again and pull through both the loops on your hook.

6)  You've made your double crochet!

7)  This was the first stitch in your round, so put that start marker back in to the stitch you've just made.

8)  Merrily keep on double-crocheting along in your new colour.  In the image above, I've made two more double crochets after the first stitch.

9)  At this point, go back and tie the two loose ends together with a reef knot (right over left, left over right).  I've tilted the work towards the camera to show this.

Tuesday, 12 November 2013

Crochet tutorial: breaking yarn with sc


Breaking yarn with a single crochet

(... or slip stitch if you're stateside)


On several occasions in my crochet patterns I'll write something like "...3 dc, 1 sc.  Break yarn."  (In US terms, this would be 3 sc, 1 slst.)  From now on, I'm going to talk UK crochet terms.

This is how I like to perform this manoeuvre.  Apologies apply with regard to my tatty hands and nasty cheap yarn.  I'm not a manicure sort of girl: you can't crochet while the polish is drying.

1)  We're going to make the single crochet.  Insert your hook into the stitch.  Wrap your yarn around the throat of the hook (not shown).

2)  Pull through a loop, and keep pulling that loop through the loop already on your hook.  (The photograph shows the point just before you do that: the short instance where momentarily there are two loops on your hook.)

3)  You've made your single crochet; I like to stick a safety pin in this stitch to mark it so that I can tell it's a real stitch on the next round when I come to work it.  Time to bind off: cut the yarn leaving a tail a few inches long.

4)  Wrap your yarn over the throat of your hook and pull the tail right the way through the loop on your hook.

5)  Give the tail a short tug to tighten it.  Done!