Showing posts with label pattern cutting. Show all posts

Friday, 21 August 2015

Never leave a project un-finished to too long

I have learned that leaving a project incomplete for too long does affect your satisfaction on completing it.  Or maybe it's because this garment has too many niggley errors.  Or maybe the errors crept in because of all the start-stop and distractions, and by the end I was all "Who cares, gerrit DONE."


A few months ago, I started this blue and white spotty dress.  The fabric was bought on my honeymoon, which was before I got a job/house/two children (so clearly a looooong time ago).  The pattern is self-drafted and closely related to my ruffle dress, but I couldn't be bothered to do much more than remove the ruffle and centre-front pleat.  I wanted my new dress FAST.  (Although, not so fast that it took less than almost 3 months, it turns out.)

I got most of the major seams done quite fast, and then my overlocker failed.  The clonking noise became unbearable, the tension went ape and I couldn't get a seam to look half decent.  Maddening!  I just wanted to finish that dress!

I fixed the overlocker.  Then the 2015 outfit-along started (see this post) and I started knitting.  Needless to say the outfit-along was not completed by the deadline, because I later decided to stop knitting and make the baby carrier.  Then I went back to my knitting, which had started to take me 3 nights to do a 12-row sleeve cuff because the children would not sleep with the light evenings and heat.  And I started a crochet space-rocket for a WI competition.

Whatevs, I had to finish the dress which by now only needed the lining hand-stitching around the zip, and a hem.  I finished up, and wore it for a morning before the gape at the neckline irritated me so much I took it off before lunch.  It then languished for a few more weeks (plus family holiday) before I unpicked and re-inserted the zipper.  I finally made it!!!

It's fully lined, except the sleeves which just have a tiny rolled hem.  There is a concealed zipper in the centre-front (breastfeeding necessity), and in-seam side pockets!  Yay pockets!

Bad things:

The neckline still does not sit flat against my chest.  Maybe this is a pattern error disguised by the floppy fabric and ruffles the last time I made this pattern, or maybe I over-stretched it when putting the zip in (I ought to have stay-stitched, hands up.)

Toddler channelling my dress-hate for this make.

One bust dart is inexplicably higher than the other by almost an inch, and I only just noticed (now I can't get to it to unpick).  HOW DID THIS HAPPEN?!  I swear gnomes came and did this error, I am usually so careful and this has never happened before.

The bust darts in general finish a little bit too high and close to my bust point.  I ought to change the pattern.  It's entirely possible my anatomy has changed ;-)

Is the bodice over-fitted?  I read in my new fitting book that this is a thing.  Should it be less fitted?  Or is it just that ready-to-wear are not correctly made for my bust size?  (Hee hee, busts!)

I forgot to stabilise around the neckline, zipper and especially pockets with fusible interfacing, so soon these areas may be as saggy as I am.  ;-)  I forgot to overlock the pocket edges and side-seams before I inserted them.  The bodge is not pretty so don't look too closely inside.

Most irritatingly, while it was hanging on my dress form waiting for the bias to drop before hemming, I realised that I don't like my grain/pattern positioning.  Not at all.  I tried to have central dots running up/down the centre-front and back, and matching the pattern over the seams here but but didn't work very well in my rush.   And it also looks rubbish.  I should have the straight grain running down the centre of each panel in the 4-gore skirt.  This is going to annoy me forever.

Finally, the lining rolled hem got mangled by overlocker which was up to it's old knocking-noise tricks for some inexplicable reason.  (I think it was a combination of bent needle needle, fine fabric and poor quality thread or something.)  I also couldn't be bothered to do make bias binding to try a nicer hem on the outside fabric than the old fold-fold-machine stitch.  Even though a faced hem would have been better.

"More photos mummy!  Mummy I want to see!"

On the plus side, sash!  It's the selvedge of my (still-not-finished) curtain lining in white polyester.  Excited about having a sash to cover my post-baby tummy and poor pattern matching.  Also makes a cheap rubbishy dress look a bit too posh for playgroup.  But it was for free.  So there's that.

Sorry 'bout the naff kitchen photos.  I have to use a self-timer on the worktop because I am too cheap to buy a camera tripod, and my toddler HAS to be in the photos shouting stuff.  Ahhh.

Wednesday, 8 October 2014

Toddlermatician shirt

When I saw this fabric a year ago on a WI outing to Bee Crafty I had to have it.  Isn't this just the most awesome badass maths fabric you have EVER seen?


I love the combination of chalk-board effect with areas of mad colour.  The most awesome part about it is that the maths is correct.  It even contains reference to Napier's rules, which I even had to look up to see what they were as I've never had occasion to use them.  (Mr Button the person with the real actual Mathematics degree guessed they were to do with logarithms: they're not.)

I've only spotted one error in the maths so far (a missing factor of 2.l.b):

This will annoy me for ever.
I decided that Toddler Button needed a shirt in this epic fabric.  He likes shirts a lot now, because Daddy wears shirts.  Daddy doesn't have a shirt as loud as this one:


With every snip and stitch, this fabric seemed more awesome to me, but also more loud.  This shirt is quite... mad?  Somehow it didn't make my eyes dance when it was on the bolt, but is definitely individual as a shirt.

Can you see the patch pocket in this image?  Me neither.
The pattern is my self-drafted size 2-3 years pattern, see this previous shirt with the skewered soldiers.  Toddler has just started to wear this size in my shirts (they seem a bit bigger than commercial 2-3 stuff), so there is plenty of growing room left.  I didn't have enough patience or fabric to draft a back yoke for this shirt, so we'll have to wait until I have a longer length of fabric and less inclination to just get going fast (as a break from knitting).

Yellow buttons.
Obviously there was only one choice for the buttons.  If I intend this shirt to become a favourite of Toddler Button, it has to be his obsession colour: yellow.  He's not worn the shirt yet, but I'll be sure to let you know if it has the honour of being selected by his Lordship from his drawer in the morning.  He did want to try it on before I'd had chance to slit open the buttonholes, so I have hope.

How could I let this fabric languish in my drawer for a whole year?!  WHAT WAS I THINKING?

Sunday, 6 July 2014

The ruffle dress: some happy statistics


I finished!  I'm delighted and I feel I can now conquer the dress world - I have freed myself from the tyranny of purchased patterns!  It's actually quicker for me to draft my own than to make the 2+ muslins required to bend the commercial pattern to my will (and stumpy frame).


I just know you love statistics as much as me (har har) so here are some handy facts relating to the dress.

50p
The price per metre of fabric (bargain basement).

4m & 6m
The quantity of fashion and lining fabrics respectively (and I have some fashion fabric left over).

4
The number of layers of fabric in this dress to guard against V(E)PL (visible ENTIRE panty line).

1:5
The inner to outer ratio of the ruffle lengths.

53
The number of components in this dress (16 bodice pieces, 20 skirt pieces, 2 sleeves, 10 ruffle sections, 4 fusible interfacing strips, 1 zip.  I must hate myself.

£8.30
The total cost of the dress, excluding thread.  (The zip was a pretty expensive addition, huh?)

4
The number of weeks to make this dress, spending only a few hours a week (life gets in the way of vital sewing time).

Sorry for the cheesy close-up, but look at the ruffles!
Next time I'll make my ruffles wider, or else use a cotton for the dress instead.  The ruffles don't look as much like the originals as I'd hoped, but probably because the material is much drapier and so they've flopped.  Spot the sleeve issue: one has fluted because I was having overlocker issues, while the other hasn't.  Bummer.  I'll just wear a cardigan.

I used a purchased ribbon as a belt because I ran out of patience to make the matching fabric belt.  If you're interested in the details, I put a concealed zipper in one of the side seams, which starts at the underarm.  Attaching the lining to the inside of the zipper tape was the only hand-stitching I did.  I used some cunning contortions to sew the lining around the neckline and armholes by machine, and again to sew the seam allowances of the lining and outer together along the waistline.  I thought the latter would be wise, otherwise the weight of the skirt could pull the stretchy bodice lining down and make my hem wonky in a weeks' time.  It also hides all my unfinished seams inside the bodice (overlocking would add too much bulk here).

If you're interested in further geekery, here's how I managed the four layers in the bodice:
1x stripes + 1x lining basted together and sewn as one for the outer
2x lining basted together and sewn as one for the lining
... meanwhile, I let all four layers hang freely for the skirt.  The skirt has french seams throughout, which were dull as hell to make.

I really want to knit or crochet a yellow cardigan to go with this dress.

Overall though, I think it's a dress win.  Not too bad for such difficult fabrics, and I've always wanted a dress like this.  Also, it's really comfortable and I've had a big lunch at a lovely party in it today, and I can still breathe!

Saturday, 5 July 2014

Step up to the drafting challenge

After the fun of the ruffley-nightmare* dress (bad memories fade fast), I feel the need to up the pattern drafting challenge a bit.

I've always liked this pattern:
Image courtesy of Burda Style, see above link.
It's from an old December 2011 issue of Burda Style magazine that I bought.  The magazine contains the pattern (indeed lots of patterns: you should try it!) but I anticipate hell times trying to add a full-bust adjustment and stumpy-me adjustment and everything.  I'm going to draft the pattern myself from the technical drawings, but using the existing pattern to match the size of pleats and gathers.  I'm going to make some style changes too: I'll probably have the waistband narrower and sitting below my bust (rather than partially over it, like the models who have smaller cup sizes).  I'll also add a modesty panel like most other people who've made it.

Obviously I won't be making this up in the peach crepe in the photo, because I don't like to look naked from a distance.  I have a choice of maroon or navy polka-dot fabric, because anyone who's been fabric shopping with me knows that spotty fabrics are my weakness.

Wish me luck!

In other news, I'm wearing the ruffle-bonanza dress for the first time tomorrow.  If it's not a rainy monsoon outside, I'll try and get Mr B to take photos.

* I always spell it "knightmare" first time, and have to delete the k.  That was the best TV programme ever, so I'll forgive myself this typing tick.

Saturday, 21 June 2014

Cascading ruffles: a happy how-to

Ruffles remind me of bad 80s wedding dresses.  Especially the kind of ruffles that are gathered where they attach to the seam: eugh.  They stick out all stiff and bulky.  I do not like this kind of ruffle.

I do like the sort of ruffle that attaches to the seam smoothly, but then flares out along the loose edge.  That feels a bit less granny and a bit more modern.  These ruffles cascade beautifully, instead of sticking out nastily.  See the neckline of this pretty dress by Kathleen at Grosgrain Fabulous:


How to make such elegant ruffles?  We can deploy the magic of maths*!

For the ruffles to fall as they do, the outer (free) edge must be longer than the inner edge (attached to the garment).  Cutting a strip of fabric on a curve gives you an outer edge longer than the inner edge, so Bob is your uncle (or in my case, my mother's aunt). 

For extreme ruffles like the above dress, it turns out that the outer edge of the ruffle must be about 5 times longer than the inner edge (go on, measure it on your screen with string!).  The curve to do this will be so extreme that each end of the strip will meet, i.e. you'll cut out a circle with a hole in it.  Actually, whatever length of ruffle you need, it's easier to calculate as a section of a circle.  I like to calculate what I need to make, rather than trial-and-error cutting.  Fabric is expensive but a little time spent in thought before you cut is free.

First, decide on the width of your ruffle, we'll call it "W".  I want my ruffles to lie on my shoulders like the dress pictured above, so I'm going for a width of W = 8cm.

Next, decide on how much longer you want the outer edge to be compared to the inner edge, call this "X".  For extreme ruffles, I like X = 5, which means your outer edge is 5 times longer than your inner edge.  Lower values of X will give smaller ruffles, while bigger values will ramp up the ruffle mania.

Now imagine drawing two concentric circles (a.k.a. a picture of a doughnut).  The inner circle will become the edge you attach your ruffle on, while the outer circle defines the edge that waves free in the breeze.  Okay, you need to slice through your doughnut at the end to get your curvy strip, but that's fine.

Your generic ruffle pattern.  You're welcome.
The inner circle has a circumference of C = 2 x pi x r, where r is the radius of the doughnut hole.  We'll work out what C and r are going to be in a minute.  The outer circle has a circumference X times larger, because that's the type of ruffle we've chosen.  So, it'll be "X x C".  The radius needs to be r+W, so that when we cut our doughnut open, we have a curvy strip of width W.  So, the equation for this is (X x C) = 2 x pi x (r+W).

Like me, you were probably forced** to take a GCSE (or equivalent) in mathematics, so you can solve your two simultaneous equations for r:

C = 2 x pi x r
X x C = 2 x pi x (r + W)

Full marks if you got the solution r = W / (X-1).

For my happy case of X = 5 and W = 8cm, you get r = 2cm.  So, you draw a doughnut with the hole having radius r = 2cm and the outer edge having radius r + W = 10 cm.  Easy!  (Don't forget to add seam allowances, and finally cut though that circle to get your strip in the manner suggested on the diagram.)

How much ruffle does one circle buy you?  For this you'll be wanting the circumference of the inner circle, which is the edge you'll use to attach your ruffle.  That'll be 2 x pi x r, which is about 6 x r.  For me, that worked out at just over 12cm.  To get a longer bit of ruffle, you'll have to cut out many circles and join the strips together along the straight-cut edges in a tedious manner.

At the end of your ruffle, cut the edge into a pretty curve (see dashed line).

Hemming your ruffles is a pest because of the curve.  You can use a rolled hem on an overlocker in matching (or contrast) thread for minimum hassle, but you have to be okay with that look.  Otherwise, enjoy your painful rolled-hemming!

* I am prepared for more ridicule by posting this.  It's not as bad as the peg bag tutorial though.
** mandatory but it was a pleasure!  ;-)

My ruffle hell

It's been slow progress on my exciting knock-off ruffle dress.  It's been compounded by not being able to use my noisy machine during TButton's nap times, but being either out of the house or doing paid work at all other times.  I'm only snatching 5 minutes here and there.

I've managed to cut the dress out.  I've been worried about visible-entire-panties (never mind VPL), but I've managed to make the dress 4 layers thick.  I got 3 copies of every pattern piece out of the under-6m of light grey stuff, plus a single layer of the stripes.  Of the 4m of stripes I bought, I probably have over 1m left.

The fabric turns out to be 50p/m of pure hell to sew.  The light grey stuff I'm using as lining turns out to be quite stretchy and probably a knit, while the stripy stuff stretches like crazy on the bias.  Both fabrics are super drapey and slide all over the place.  Their only saving grace (apart from the price) is that neither fabric frays too much.

I've sewn all the bodice darts and the centre back and shoulder seams.  I then used the magic of inkscape to trace around the edge of the ruffles in a photo of the dress I'm copying, and compared the length of the ruffle-y edge to the length of the neckline.  It turns out the ruffles are probably 1:5 or 1:6 (wowzers), so I've gone for the 1:5 option.  I should probably do a tutorial on how to make these ruffles.

After much ruffle assembly, I've attached them to the neckline and sewn in the lining around the neckline.  My next plan is to top-stitch the lining down around the neck, but hiding the top-stitching under the ruffle.  I hope this will stop the neck gaping open, but who knows if it will work as the ruffles are so heavy.  I added a fusible interfacing strip around the neck too, but I'm not sure if it's enough to stop this dratted fabric stretching out of shape here too.

Ruffles!

Next I'm planning to install the cap sleeves and attach the armhole lining as per this timely tutorial posted on Elegance & Elephants yesterday, just as I was considering how to do it!  Then it's french-seam time on 4 layers of skirts *yawn* and the hell of an invisible zipper into 2 layers of this &^"£* fabric.  At least the edge finishes are quick with the overlocker rolled hem feature.

ARGHHHH I don't even know if this dress is going to be wearable and it's taking forever!  Give me some nice non-stretchy cotton any day...

Friday, 13 June 2014

For my next trick, I'm going to (attempt to) make this dress...

I'm going to regret posting this when you see the effort I manage to serve up next week (ha ha).

For my next trick, I'm going to attempt to make a knock-off of this knock-off.  I can't find a picture of the original dress, but Kathleen at Grosgrain Fabulous made her own copy of a maternity dress which looked like this (her version):


I really love the combination of cascading ruffles around a v-neck with the blue pinstripe fabric, and I used to have a top from H&M that had a similar look.  (Yes, I wore it with a mustard cardigan.)

I'm not actually expecting a baby (before you ask) - so I'll be making a non-maternity version of this dress.  Nevertheless, I'm keeping the front box pleat to hide my saggy post-baby tummy...!

I'm pretty sure my dress is not going to turn out nearly so nicely, but here goes.

Pattern


I'm making my own from scratch, using a copy of "Dress Pattern Designing" by Natalie Bray.  I've never drafted a pattern for myself before (only for the toddler), so it's an adventure.  I've made two muslins so far: one of my basic sloper, and one of the dress bodice (minus ruffle explosion).  I've no idea how Kathleen has done her skirt (other than her comment that it is bias cut), so I've opted for a half-circle skirt with a 6cm box pleat, divided into 4 panels to align with the four waist darts.  Unlike the dress I'm copying, I'll be adding cap sleeves and a side zipper.

I draft my patterns on the computer in Inkscape, because it has several features that take the tedium out of drafting by hand on paper:
  • Ability to make lots of copies quickly to test changes and keep old versions
  • Easy to measure curve lengths (a few mouse clicks) rather than faffing with a tape-measure held on it's edge
  • Super quick to add seam allowances before printing
The disadvantage is that like most CAD systems, you get a really skewed idea of the size of the object from working on the screen.  It's hard to have an intuitive feel of the feature sizes.

My bodice pattern... uh oh!


Fabric


I picked up some navy and white stripy chiffon-y stuff for 50p/m in Walthamstow, and some pale grey chiffon-y lining.  Who knows if I'll have enough, but at least it was cheap!  I've never made an entire garment from such light fabric either, to I'm setting myself both a pattern drafting and a sewing challenge.  You can see why I'm not confident in the results.  ARGH!

I'm planning a overlocker-based rolled hem on the raw edges of the fabric, and I'll probably have to french-seam it up in most places.  I'll go for a single layer of chiffon for the sleeves, but I think I'll need three layers of fabric in most other places to stop the dress being transparent.  (Nice!)

I wanted to do some shearing in the back bodice to allow more freedom for heaving the toddler around, but I think that's a challenge too far at this stage: both for the pattern drafting and the chiffon-sewing.

Now I've posted this, I'll clearly be forced into actually cutting the thing out now.  This may be a record for impulse-fabric-purchase-into-dress time, but I'll hold onto that thought for now just in case it's a "straight-to-bin" project.  It'll certainly be a challenge.

Saturday, 17 May 2014

It's hot; I have made shorts.

Brits abroad!  Whoa!

It's all sunny and TButton doesn't own a single pair of shorts!  Let the crisis-sewing commence.

I drafted some shorts in "age 2" from the Aldrich book (which I have many reservations about, but at least the baby trouser block is reliable for cloth nappies).  I wasn't sure if the shorts would fit, because he was asleep when I drafted them so I couldn't take any measurements.  Therefore, I was determined to make them from some fabric in my stash that I wasn't keen on and I'm certainly not keen on these shorts!!!

The good news is that they turned out to fit pretty well.  The bad news is that he's now going to have to wear them if it gets any hotter.  They remind me of shirtless overweight motor-boat owners holding cans of lager.  (Sorry.)  Brits abroad!  ARGH!

I didn't have enough cotton flag fabric or blue polycotton to make the full shorts, hence the mix-and-match legs.  I was hoping that plain blue would tone the flags down a bit, but somehow they're even worse.  Mum gave me the flag print to make myself a Geri-Halliwell-style union dress about 12 years ago, but the fabric wouldn't even union-up my left leg now (boo hoo).  Sorry about being rude about your fabric, Mum.  I hope you like the shorts!

The back is still nasty!  Woo hoo!
 
The back has an elasticated waistband, but the front waistband is plain.  There's plenty of room for his cloth-booty.

No about of clever fly detailing will make these shorts a pleasure to put on.
I made a super-low-opening fly to make them easy to get on, with sneaky poppers that are hidden when they're closed.  The waistband has a button fastening with some slightly aged white button I found in my jar.  He's lucky the button wasn't pink.

At least I know the pattern is okay, so I can make more shorts in less nasty fabric.  I've got some reasonable denim and some pale blue linen, and I might buy him some nicer beige twill.  Meanwhile, at least he's not going to swelter in trousers.

I named the pattern "Mizzen Shorts", which is a pleasing sail reference.  After some sail fact trading with Mr Button (who has never heard of a Rotor Sail), he alerted me to the Water Sail.  Wow, that's a funny sail: looks like the boat's pants are falling down.

EDIT:

It got really hot this afternoon, and TButton tried his new man-wear to play with some water in the garden.  Rock those shorts, Toddler.

Sunday, 9 March 2014

Little Soldier Shirt... again!

I mentioned last post that I had an 18-24 month pattern that I was happy with.  I made a little soldier shirt in Laura Ashley fabric using the pattern.  Sadly, Toddler Button continues to grow at an alarming rate.  Something must be done!

I graded my pattern bigger into a size 2-3 years, which is now the size that TButton prefers on his top half.  Then I drafted a new shirt!  This is most exciting:


I made several thrilling (to me) pattern alterations.  I was having some issues with the collar points turning up, so I made two changes in this area.  Firstly, I fused my interfacing to the upper collar, instead of the lower one.  Secondly, I drafted a different upper-collar pattern, allowing an extra 2mm on the outside edges for the turn of cloth.  I then had to ease it up as I constructed it.  It works a treat!


I used a different method for drafting the collar stand, which I think I prefer.  I also changed the hem to a shaped line, but it still needs a few tweaks.


I changed the aspect ratio of the pocket which is much more pleasing.  Please ignore that my pattern almost matches, but not quite.  I need to mark my pocket placement on the pattern itself, so that I can nail the pattern matching at cutting out time.  Instead of my current method of: nah, wing it.

Unfortunately, when I was cutting my front pieces from a double-thickness of fabric, the under-layer must have twisted slightly because my pattern does not match across the centre front.  It matches perfectly at the sides, though.  Bummer!  Don't mention it to TButton if you see him wearing it: I know he'll look embarrassed... ;-)

Skewer'd!  Oof.

Finally, I found these pleasingly red buttons in my jar.  Every one is slightly different, but you'd have to look pretty closely to be able to tell.  A bonus effect is that some soldiers look sadly injured by the placement of the buttons.  Ooops!

***

In other news, I drafted a t-shirt pattern but it turns out that all my old t-shirts are too small to be able to cut up for TButton.  I'll have to order him some actual new fabric to test it out.  I'm also nearing the end of my custard-yellow knitting, and I designed some fabric for a competition regarding whales.  Look out for more posts soon!

Saturday, 22 February 2014

Little town shirt again!

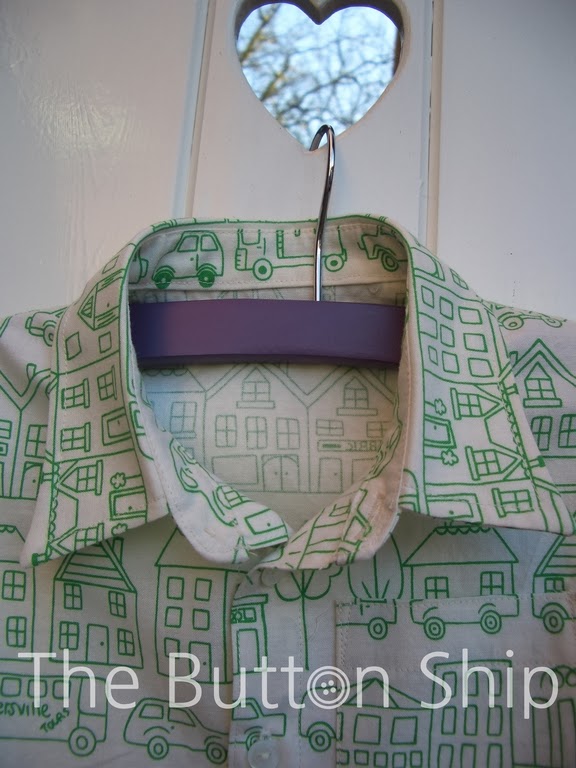
Once upon a time, I made a little shirt with a town on it.  I was delighted with many aspects of the pattern (which was made by someone else), but not so delighted with others.  In particular, it happened that when baby Button grew into it, he did so by stretching lengthways, making it more of a crop-top.  (Which I just mistyped as "crap-top", coincidence?  I think not.)  I'm sure the patten would be fine on more normally proportioned children though.  He was wearing size 12 months at age 6 months, so probably this was part of the problem.

Not so long ago, I made another shirt with soldiers on it.  This was a pattern I drafted myself and I was pretty chuffed with it.  I lowered the sleeve cap a little more after making that shirt, so now I have a 18-24month pattern that I'm happy with.

The next chapter of the story is here:


I used up the rest of my town fabric (I had half-a-metre) to make another little shirt from my own pattern.

Unfortunate house on wheels.

Behold!  It has a pocket!  However, there was so little fabric that I couldn't fussy-cut the pocket and as a result it looks like the house is on wheels.  I can't get too sad about this though: I thought I'd have to make the inside of the collar stand and the under-collar from plain cream fabric, but I did at least have enough to make everything match.  Just.


I had to wait almost 2 whole weeks for a day dry and bright enough to photograph this shirt.  I seem to gravitate towards photographs on my garden gate with the cute heart cut-outs.  Big thank-yous to my father-in-law who made the gate and acquiesced to cut the "silly hearts" into his handiwork.  I know you read this blog sometimes: now you have your own mention!  :-)

This shirt is a birthday gift for a very cute little man who is 1 year old this weekend.  Happy birthday, little one! x

Tuesday, 4 February 2014

Little Solider Shirt

I can't remember if I wrote about this (I think I didn't), but last year I got fed up with Winifred Aldrich's "Metric pattern cutting for children's wear and baby wear".  Or rather, I didn't understand what I was doing and the blocks were too boxy.  A nice person over at the sewing forum suggested I get Natalie Bray's books, which I did.  Nice and cheap and second-hand.  See here and here.  I read the first one cover-to-cover, and in the second one I read the children's wear chapter.

This is my first attempt at a shirt from her blocks.  I'm pretty pleased!  The bodice block for aged 2-3 actually fits my (pretty giant) 14 month-old like a glove.

Behold: Toddler Button in his fancy new threads:


The fabric is a cute Laura Ashley print of soldiers with a background of blue pin-dots and red diamonds.  It was a kind gift from a family friend.  (Thank you, Sue!)  Sadly, since I made the shirt in a windowless room (no jokes) and mostly during the dark evenings, I failed to notice the fabric was light cream, rather than the white I had supposed when picking out my thread.  Whoops, although I suspect I'll be the only one scrutinising the top-stitching enough to notice.  I modified the armcye in my pattern a bit after making this, as it was still an effort to get the sleeve caps to set flat like in his other casual shirts.

TButton wore his shirt to Ikea (this seems like it's becoming a tradition: I don't always go there, honest).  It's a relief to return from Ikea and still like the hand-sewn clothes we went in!  Note he is smiling in the above photo: that's because it's taken before the flat-pack-hell-hole, hence also the newly-pressed-new-shirt look he's sporting.

Are you wondering how I got him to pose like a menswear model while holding a little teddy by his paw all cute-like?  Do you want to know my secret?  The answer is... fluke.  All the rest look blurry and manic like this:


Wednesday, 11 September 2013

What's (geometrically) wrong with my peg bag.

I should be cleaning the kitchen, but instead I bring you: what is wrong with my peg bag (geometry edition).


From this ugly photo of the ugly bag, I think part of the wrongness arises because the sides of the bag taper inwards towards the bottom.  I'm not talking about the round-bottom shaping, but the slightly sloping sides.  They're not sloping enough to be style, just enough to be looking like a mistake.  And that's because they are.

I put two darts in the bottom of the bag to give volume for pegs.  I failed to calculate that this would make the slides slope inwards and make the bottom of the bag narrower than the top (well, duh).  In the interests of making my pattern correct next time, I thought I'd calculate what I was supposed to do when I drew those darts on my pattern.

Towards the bottom of the bag, my pattern should look like the image above with darts of angle theta and side l, and dart points separated by a distance x.  The total width of this pattern piece is z.  I also marked distance d and delta, which come in handy later.


When I come to sew up the darts, the bag will appear to have a width w when viewed from above.  This is narrower than z marked on my pattern piece, because the darts have given the piece some three-dimensional shape.


When viewed in cross-section, lying on a flat surface, the middle of the fabric will rise above the surface by height h (at least, if it were made of stiff card, not floppy cotton).

The interesting quantities to me when I design the bag are theta and h.  The dart angle lets me choose how "boxy" I want the bag to be:  theta = 0 is no shaping at all, theta = 90 degrees is a square bottomed bag, and intermediate values give gentle shaping.  The quantity h allows me to choose how wide back-to-front my bag will be inside.

From my choice of theta and h, I can calculate some useful design parameters which help me to draw my darts in later.  Time to get out my calculator and calculate these numbers:


One can also find a few more useful numbers, in particular x and l which tell me the separation of my dart points, and how long the dart sides should be.

Finally, the total width of my pattern piece at the lower end should be z:
... while at the top by the hanger (where there are no darts), it should just be width w.  So, there we have my mistake, my friends: it's equal to z-w, if you cared.

I can now re-visit my wrong pattern with real numbers.  I'd just drawn darts in at random, but it looks like I used an angle of theta = 28 degrees, with a dart length of l = 4.5cm.  The top of my bag has width w = 34cm.  I find that tan(xi) = 0.601 (that's tan(squiggle), where "squiggle" is clearly the best greek letter), and  d = 3.86cm.  It means the inside of my bag has h = 3.1cm, but really it's 6.2cm across because I used darts in the back and front bag pieces.  Now for the interesting bit: the bottom of my flat pattern (near the darts) should have been z = 37cm across, not the 34cm that I used.  That's an 8% error: enough to make my bag look crap.

Time to re-draw!

I'm also going to change the mouth of the bag, add elastic loops inside to hold the hanger up, and a small fabric loop on the outside at the bottom to pass the hook through when you fold the bag in half for storage.

Sorry for the algebra explosion: if anyone thinks this sort of thing will actually be useful for them then drop me a comment and I could make a calculator-type thing, if maths isn't your forte...

Monday, 5 August 2013

Gennaker Trousers finished!


Huzzah!  I have finally finished baby's outfit for the wedding!  I re-did the trouser pattern and sewed them up in double-quick time and with 6 days to spare.

The gabardine fabric for these trousers is as good as the shirt fabric is poor!  It's really soft and drapes beautifully, with a tight weave.  It also washed really well.  The photos don't show the colour too well, so you'll have to take it from me that the black didn't fade at all.  It was also lovely to sew with: it feels like you are making a proper pair of suit trousers.


I'm finally happy with this trouser pattern, I think.  I just need to replace the 1.5cm hem turn-up on the pattern that I forgot in my haste.  The back waistband is gathered with elastic, while the front is left smooth.  I lined the waistband with a fun blue and green floral print cotton.  The fly closure (which now appears in its rightful place on the centre front) is deep and shuts with 3 snap poppers and a big button - this will make it a lot easier than wrestling shop bought trousers over big nappies.  In addition, I made the construction such that the backs of the poppers are hidden from the front and inside of the trousers: they are concealed inside the fly construction.


I also managed to take a photograph of the big patch pockets on the bum.  You have to stretch the waistband to see them properly, so they're really better viewed with a baby in them.  I guess it's for him to store his collection of shredded carpet that he's creating in my living room?  He likes to scratch the pile up with his little fingers... I thought it was only puppies that did that?

I'm pretty thrilled with these so far.  I just need to make more trousers and take photos for the instructions, but it was pointless to take photos of black trousers made at night.  Even I could hardly see where the stitching was!  I'll probably make some jeans with contrast stitching for that purpose.  Then I might add fun details like belt loops and side pockets.  Apply now to be a pattern tester!  :-)

Friday, 2 August 2013

Tiny trousers, huge mistakes!


I finished my first effort at the Gennaker trousers.  At least I made them from some corduroy hanging about so they were effectively "free", which makes me feel less bad about the state of the pattern.  At least the execution was passable, despite my foolish choice of a thick fabric with some stretch and nap.

I took my own wriggly baby measurements with him in a nappy, just to ensure the trouser pattern would leave space for all the fluffiness of his cloth nappy.  It wasn't clear from my pattern book if baby measurements should be taken with one or not.  It turns out not: these are huge!  I tried to pull in fullness using the elastic bit at the back, but this makes the side seams pull away from the sides.  Complete fail.

Sadly by the time I got to finishing them, they're ankle-swingers on my tot.  The next pattern is already drafted: longer and slimmer.

Cuffs and topstitching on the legs
Sadly, I haven't got any reasonable pictures of the cute patch pockets on the bum.  The rest of the pictures are pretty rubbish at any rate!

Super-deep popper and button fly for easy application to wiggly child
I like the fly, even after all the faffing removing it from it's stupid place on the hips of the pattern.  It's deep and easy to put on the baby, and I managed to hide the popper fastenings from the trouser front. I went for a fun cotton waistband: I'll totally do that again!

So, in summary: a poor first attempt at trousers, but I'm totally going to crack this one before the wedding.  Only 8 days to go...

Wednesday, 17 July 2013

I am a muppet (trouser edition).

It must have been late at night when I drafted the trouser pattern, because when I got to sewing it up this morning I find the fly is on the outside of the leg!!!  ARGH!  No baby I know is constructed that way.  I feel such an idiot.  Am going to have to bodge a new fly at the front of the trousers, because I don't want to cut out a whole new set.

In other crochet news, I had a request to sell items made on my stegosaurus design.  I'd like to keep this pattern free for home use at the moment, so I'm trialling selling a license for commercial use.  If you're also interested in selling your handmade stegosaurus, contact me! 

I'm starting on my next crochet pattern: "hello chameleon".  I wanted to challenge myself to do something stripy and spirally, so we'll see how that goes.  I'm going to do some quick tests later to see if I can find a construction method with fewer yarn breaks, perhaps by using taller stitches or reversing the stitch direction.

Time to take pictures of my finished long-sleeved baby shirt!  I love having my sewing machine downstairs: I can get so much done, even though most of it is mending.

Saturday, 22 June 2013

Snippety snip

I made a baby trousers pattern!  This could be good, because I struggle to get normal trousers on over the cloth nappies.  However, after finishing the draft I realise:
  • The pattern example in my helpful pattern-drafting book allows for nappies.  I also measured to allow for nappies.  Could he now have room for 2x nappies?!
  • The trousers will fit baby NOW!  This does not guarantee a fit at the wedding in two months' time.
Silly me.  Nevertheless, since I got this far I decided to cut some fabric for them anyway.  I found some soft black needlecord in my fabric chest so I'm going to test out the "Gennaker trousers" with that.  They're cut out and ready to sew, but I've never made trousers with a fly before, so I'll probably have my "Great British Sewing Bee" moment.

My ambition is to have elastic in casing around the back, but a smooth waistband at the front and an opening fly so that I can get the pesky things over the nappy.  The fly is intended to close with a button at the top and potentially some concealed poppers the rest of the way down.  We'll see how that goes.

I also cut out some white cotton for the long-sleeved shirt to go with the waistcoat I made.  I got the cotton for £4/yard from the bank holiday market in St Ives, but in retrospect it wasn't such a great pick.  I totally should have gone for the polycotton.  This fabric is a little too thick, not a very fine or tight weave at all, and basically looks like a crumpled bed-sheet even after I pressed it with ooodles of steam.  It didn't look so bad on the bolt, but that was before I washed the finishing out.  Added to that, I got a yard cut diagonally from the bolt.  Disaster!  The moral is that you get what you pay for, and I should inspect the fabric quality more carefully next time.  I'll report back on the quality of the gabardine and printed polycotton from the same stall when I get to them.  Probably I've just been unlucky with this buy.

Before anyone seems impressed, I'm totally bottling out of cuffs on this shirt.  It's for a baby!  I'm just going to turn-under or use bias binding.  However, I am featuring a pocket on the trousers for him to store his chewed up toast in.

The crochet stegosaurus is doing my head in.

Sunday, 16 June 2013

On my sewing table

Today I discovered that the once-giant red sun-hat won't go onto my child's head.  I never noticed the bit where it fit perfectly: perhaps that day wasn't sunny?!  So, on my sewing table is a partially-made bucket hat (from the pattern here).  It's in some loud patterned blue cotton.

I'm also starting a trouser pattern for baby.  I just measured some of my favourite trousers and the measurements seem a world away from any of the ones in my pattern-making book.  Tomorrow I'm going to attack wriggly baby with a measuring tape and do a custom-fit job.  Watch out for either (a) a pattern that fits a baby in cloth nappies, or (b) a cross mother with some new cotton dusters.

Meanwhile, on the woollen front, Stegosaurus is on iteration 3.  I failed to note that the row starting marker moves round by one stitch every four rows in the direction of stitching, so Stegosaurus mk2 was all twisty.  Eeep.  Still not made it to the fattest part of his body!  Argh!  I cannot post photos of the attempts because they look very rude.  However, I did buy some more brown wool, either for a monkey or a lemur... clearly I am confident the stegosaurus won't proceed to mk4!

This week looks like a busy one, so I'm not confident any of these projects are going to progress too far.  Boo.

Saturday, 15 June 2013

Free baby pattern: Moonraker Waistcoat


I decided to give this pattern away for free - I hope you enjoy it!

The pattern is for a waistcoat in size 6 months, although it comes up large, probably similar in size to a lot of commercial 9-12 month size baby clothes that my baby wears.  That said, he is actually 6 months old, so the size designation is good for him!  The best way to decide if it will fit your little one is to measure some of their clothes and compare it to the pattern.

Get the pattern pieces here: clicky!
Get the instructions here: clicky again!

I made mine up in some fancy silk for a wedding, but I guess you could make it for casual wear too: it would be cute (and warm) in a pin-corduroy with a cotton back.

You need to print the pattern out on A4 paper at "actual size", or scale 100% (whatever your printer offers you); I've provided you some 5cm square boxes to check the scale.

I'm pleased with the construction method I devised - you won't need to finish any raw edges for this garment as they're all hidden inside the lining.  There's just one edge to hand-stitch shut at the end.  It's all in the instructions.  If you want to save on printer ink, the last page of the instructions is a summary, so you could just print out that page for reference when you've read the rest on screen.

Please don't reproduce this pattern or sell it (or any finished garments based on it).  It's intended just for your personal enjoyment.  If you like it, please consider following my blog - I hope I'll have more patterns for you soon!

To see more pictures of my version, see this previous post.  I'd love to see the waistcoats you make from this pattern: do send me pictures if you like!

Thursday, 13 June 2013

Waistcoat finished! Excitement!

My posting frequency has gone right down, I know, but that's because I've been busy working on new patterns and sewing!  Hopefully there might be a rash (or at least a dribble) of posts with exciting freebies in, within a month or so...

Anyways, as the title suggests, I'm done with the waistcoat!


Baby has not tried it on yet because I'm terrified of ruining it before Uncle's wedding day.  Even though I know there will be sick or dribble on it within 5 minutes.


The best thing about this is the "free"-ness of it: it's just fabric I had lying around which I'd already mentally written-off the cost of!  The front is some light-weight woven silk brocade from Hong Kong which I used to make a dress for a friend about 10 years ago.  The back is several layers of "premium" white dress-lining fabric.  I think the pattern would work well in almost any fussy "special" fabric for the front, with slippy lining for the back.

Woo: covered buttons!
I'd forgotten how tricky slippy fabrics are to sew with.  It's what I learned on, so I didn't realise how fiddly they were until now, when I've had 6 months' break from them making cotton baby things.  I had a bit of bother with them fraying and stretching.  Particularly since the white lining is so translucent that you can see the selvedges through it on the finished waistcoat: frayed selvedges look the worst inside that.  I saw it on a bespoke waistcoat once and it spoiled it, so I was pretty careful about not handling the fabric too much, especially after the seam allowances were trimmed short.

I toyed with the idea of false welt-pockets on the front, but in the end I decided it was too much on such a small waistcoat.  Perhaps they'll appear on Moonraker 2.0 for a bigger baby.  It's not like he needs anywhere for all that stuff he carries around: he's got a minder for that!

My mum expressed shock over a pink waistcoat for a boy (or at least what sounded like surprise on the phone).  What do you think?  Real men wear pink shirts, right?  Plus, it's nice and wedding-y I think.

Anyway, I'm thinking of giving this pattern away for free, when I've done the instructions... any takers?

Tuesday, 4 June 2013

Waistcoats and giraffes

I finally finished this little guy:


He contains a highly irritating shaker, as baby likes to hit things with toys.  I used someone else's pattern, see more information at Ravelry.  Next crochet pattern is a stegosaurus which I will be inventing myself, ha ha.  More likely it will be a straight-to-bin wonder; my current drawings of dinosaurs all look a bit slimming-world.

In other sewing news, I just finished and printed out a pattern for a waistcoat.  I'm so excited to try making it!  I googled for some more sail names to name it, and I settled on "moonraker".  It makes it sound very James Bond, but it's also a sail on a square rigger.  Who knew?  I'd better use some of the more tedious sail names soon, else it'll just look like my patterns have nutty names.

Time to raid my prom-dress off-cuts selection!  I'm thinking pink flowery brocade...