Friday, 29 November 2013

Fenland vege-troubles

I finished five vegetables for my friend, who wanted them for an interactive exhibit at the museum where she works.  I already LaTeX-ed up the pattern, so hopefully I shall have it tested at some point soon, when I'm done with the chameleon.  Then I can offer the vegetable patterns for sale as a set.

In other news, I've started work on the next pattern.  A glittery SPACE BUNNY.  Whoa.

Now for the picture explosion:


Cauliflower

Enormous Turnip

Butternut Squash

Beetroot

Leek


Friday, 15 November 2013

Crochet tutorial: how to change yarn colour

Changing yarn colour


In my Chameleon pattern, I like to change yarn colour between rounds.  This tutorial shows how I like to make that happen.  Once again, sorry for the tatty hands and nasty cheap yarn.  Maybe I should employ a stunt double for the photos, with nicer hands.  Maybe my husband...?!

I'm going to talk in UK crochet terms; you can tell this by my spelling of "colour"...!  ;-)

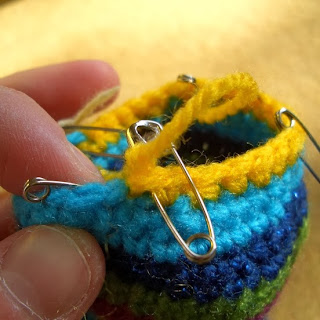
1)  Here I am: I've made the last stitch in this round and I've come upon the marker which indicates the first stitch in my next round.  (Sorry for the plethora of other pins: I took this picture when I was mid-way through inventing the pattern!)

2)  Break the yarn, leaving a tail a few inches long.  Insert your hook into "stitch 1" of the next round.  (You'll have to temporarily remove your stitch marker to do this.)

3)  Wrap the new colour of yarn across the throat of your hook, exactly as you would if you were carrying on with the previous colour.  Now carry on making your double crochets.  If you're cool with that, you can skip to step 6.  If you want more help to do the first one, keep reading!

4)  Pull a loop of the new colour through the stitch.  You now have two loops on your hook.

5)  Wrap the yarn round the hook again and pull through both the loops on your hook.

6)  You've made your double crochet!

7)  This was the first stitch in your round, so put that start marker back in to the stitch you've just made.

8)  Merrily keep on double-crocheting along in your new colour.  In the image above, I've made two more double crochets after the first stitch.

9)  At this point, go back and tie the two loose ends together with a reef knot (right over left, left over right).  I've tilted the work towards the camera to show this.

Tuesday, 12 November 2013

Crochet tutorial: breaking yarn with sc


Breaking yarn with a single crochet

(... or slip stitch if you're stateside)


On several occasions in my crochet patterns I'll write something like "...3 dc, 1 sc.  Break yarn."  (In US terms, this would be 3 sc, 1 slst.)  From now on, I'm going to talk UK crochet terms.

This is how I like to perform this manoeuvre.  Apologies apply with regard to my tatty hands and nasty cheap yarn.  I'm not a manicure sort of girl: you can't crochet while the polish is drying.

1)  We're going to make the single crochet.  Insert your hook into the stitch.  Wrap your yarn around the throat of the hook (not shown).

2)  Pull through a loop, and keep pulling that loop through the loop already on your hook.  (The photograph shows the point just before you do that: the short instance where momentarily there are two loops on your hook.)

3)  You've made your single crochet; I like to stick a safety pin in this stitch to mark it so that I can tell it's a real stitch on the next round when I come to work it.  Time to bind off: cut the yarn leaving a tail a few inches long.

4)  Wrap your yarn over the throat of your hook and pull the tail right the way through the loop on your hook.

5)  Give the tail a short tug to tighten it.  Done!

Saturday, 9 November 2013

Well, hello there, Mr Chameleon!

Finally I finished my chameleon!


There need to be more photos in the cold light of day, but since it's now winter and therefore dismal and dull, it's unlikely the light will be much better.  I couldn't resist posting a preview, just in case a sunny day with no rain for outside photography doesn't arrive for weeks.

I'm pretty pleased, so now I need to write the pattern out ready for testing.  I might tinker with the colour change directions a bit, for those mad enough to follow all the yarn-switching.  I really recommend self-striping wool for this project instead though:  the only reasons I did yarn changes were a) to check the pattern directions would be correct, and b) to use my GLITTERY NAVY WOOL.  That's so exciting it calls for CAPSLOCK.

In other news, I'm still making crochet fenland vegetables for a friend and I've made two so far.  Patterns and pictures for a turnip and butternut squash to follow...

Friday, 8 November 2013

Crochet tutorial: joining yarn with sc


Joining yarn with a single crochet

(... or with a slip stitch if you're stateside)


On several occasions in my crochet patterns I'll write something like "Join by making next st in 4th st from start marker.  1 sc, 3 dc...".  (In US terms, this would be 1 slst, 3 sc.)  From now on, I'm going to talk UK crochet terms.

This tutorial shows how I like to join my yarn by making that first single crochet before the double crochets.  I'm sorry for my tatty hands (which you'll of course notice now that I've pointed it out), but they're unlikely to improve with my current mix of housework and velcro nappy fastening.  Also, sorry for the horrid acrylic wool: oooh that's nasty!  Anyway, here goes.

1)  Create the yarn loop as in the image above.  The short end of the tail is hanging down to the right, while the yarn on the left of the picture is continuing to the ball.

2)  Insert your hook under the middle strand, from the right hand side.

3)  Pull the tails tight so that you form a slip-stitch on your hook.

4)  Look!  A stitch is now on your hook!  You're about to make a single crochet, pretending that this is an ordinary loop left on your hook as you're crocheting along.  If that makes sense to you, stop here.  If not, read on for a blow-by-blow account.

5)  Insert the hook into the stitch you want to join the yarn in.  In my example, it's the 4th stitch from the start marker, so three stitches have been left unworked.

6)  Wrap the yarn around the throat of the hook and pull it through the stitch, AND the loop currently on your hook.

6a)  This image shows the situation half-way through step 6: you now have two loops on your hook:  the starting slip stitch, and the yarn you just pulled through.  You're about to keep pulling the yarn through the starting slip stitch...

7)  You did it!  You now have one loop on your hook, and you've made a single crochet.

8)  I like to stick a safety pin through the single crochet I just made, because it's a bit wonky and might be hard to spot when you come back to crochet it later on.  I find this marking method helpful.

9)  Keep crocheting along!  Here I've continued with two double crochets.  At this point you could stop and tug the tail by the single crochet to tighten it up a bit, but I'd normally save this for the next round.  Alternately, you might like to catch the starting tail in the double crochets as you continue, to tidy things up and make the work more robust.  Saves weaving ends in...

Tuesday, 5 November 2013

Speedy woolly things.

Whoa.  I know I've not posted for an age, but I've been in a self-enforced exile as I put aside all blog-posting, housework and general life in a bid to keep up with the MKAL!  (That's Mystery Knit Along, to the un-ravelrised.)  I finally finished it a few days after the deadline (so I lose), but I'm back in the real world now.  It was fun, but you don't get pictures until after Christmas.  ;-)

Before the MKAL begun, I started things rolling on our house-decorating by moving my sewing room 8ft in the downwards direction: (0, 0, -8)ft for those tagging along with this blog for the maths.  The living room looks much better for the addition of sewing and wool gubbins, but I'm still working on child-proofing it.  The ex-sewing room will be painted this weekend.

In addition to the sewing room moving, I speedily finished most of Hello Chameleon except his eyes.  I'm writing up the pattern with LaTeX because I'm a massive geek.  I'll probably get the pattern tested as soon as his limbs are attached and I've finished typing it all up, then I'm thinking of offering it for sale.  I also took some pictures to do a few crochet how-tos, which should help people follow along with the non-standard way I construct my crochet toys.

Right now I'm making a crochet turnip (that's right), and a bunch more fenland veggies for a friend.  The patterns will probably be free unless I'm unexpectedly delighted with the results.  Turnip is pretty simple so far, but it's always a joy to make purple vegetables.

Right, that's all for now, and I'm sorry for the lack of pictures.  I promise more soon, perhaps when Hello Turnip is complete!  ;-)