Friday, 13 March 2015

New eyelet curtains!

A good thing to do when you're heavily pregnant is to make curtains.  All the crawling around on the floor measuring is good to get the baby in position, and there is lots of sofa time with all the hand-stitching.


I made some new eyelet curtains for my bedroom.  I have previously written about designing eyelet curtains here.  Mr Button and I spent many happy hours measuring and laying out fabric as by this time I was quite big and slow to crawl around the floor on my own (thanks, Mr B!).  Much thought was put in by both of us to minimise hand-stitching.  I did have to hand-sew all edges of the blackout interfacing in and turn up the main fabric hem, but otherwise got away with hand-stitching only the very top corners of the lining, plus the mitred corners in the main fabric.  The rest was cunningly machined by assembling the curtain in a strange order.  The result is that the front looks like a clean rectangle of fabric with no visible stitching: a boring result from a lot of effort!


Mr B hammered in the metal eyelets using the cunning hole-cutter and die set.  He has much better aim and arm strength than me.  The tools and eyelets are from Hanolex and I can't recommend them enough.  The eyelets feel and look very professional, and Mr B says the tools were easy and a lot of fun to use.  The eyelets are bearing up well under the immense weight of these lined and interlined curtains.  The interlining might be overkill on this fabric as the spots are woven and some are chenille.


I have yet to finish the curtains with the large pattern repeat that I previously winged about.  I only finished these spotty ones a few days before the baby came, but I did have time to cut out the next pair and join the drops together.  So the hard pattern-match bit is done.  Good times when you need to choose between three options: cutting perpendicular to the selvedge, or with the wonky grain line or with the off-grain pattern.  Nice.  That's what you get for £10/m, I guess.

Monday, 9 March 2015

Disassembly instructions for Janome 423S

My toddler and my 2 or 3-week old son both napped at the same time a couple of weeks ago, and my husband retreated to his garage.  I used the quiet time to take Able Mabel apart again to fix a problem I'd been having with the presser foot.

In this post, I bring you photographic help to take apart your Janome 423S sewing machine for servicing at home.  I have previously written posts on this subject here and here, and if you are looking here for advice then I strongly suggest you read both of these also.

This one describes polishing and oiling the hook and bobbin race, and this one describes in words how to take the machine to bits.  I'm going to repeat my disassembly order here, but add pictures.
1.  Remove the casing on the end above the needle.  (The screw is hidden behind a plastic cover which can be eased off with a screwdriver.)

2.  Remove the plastic screw-cover on the opposite (plug) side of the machine and remove that screw too.  You won't be able to take the side casing off from this side yet, so don't bother with that: you just need the wiggle room.

3.  Remove the plastic cover underneath the machine.  There are LOADS of screws here.  One of these (near the front right of the machine) you won't be able to remove through the hole: that's because it's to hold the purple front-plate on.  You need to loosen this screw anyway in order to get enough movement in the front plate to work the bottom cover off.  See the image below, where the screwdriver is shoved in the hole to loosen the screw inside.  Don't worry if you hear the screw drop out into the machine: you can retrieve it later.  It's my guess that Janome made a bit of a blooper with this one: the access hole looks like it's been drilled after the case molding when they found they couldn't get the machine together without wiggle room from movement in the front plate.  Whoops!

Note how I use blobs of blu-tack to store the screws next to the holes I just took them out of.  That's my top tip for not losing any fixings.

Loosen Janome's hidden blooper screw ;-)

4.  Once you've removed all the screws, you should be able to take the bottom off by hinging it towards the belt/motor side of the machine: you'll need to wiggle the front and side covers to get enough play to be able to hinge the plate off without snapping the lugs.

Hinging the bottom plate off

Behold!  The hidden screw you were loosening through that hole in the bottom plate!

With the blooper screw removed, you can see that just loosening it will be enough.

5.  Remove the top cover of the machine: there are screws under the handle and also one holding a bobbin-winding "stop" on.  There's also one on the side at the needle-end (see last image).  There's a plastic lug at the right-hand side, so like the bottom piece, the top needs to be carefully removed by hinging it toward the motor/plug side.

Screws under the handle

The bobbin-winder stop screw needs to be removed

This bobbin-winding mechanism screw also needs to come out

Don't forget this screw at the needle-side of the machine, accessible once you've taken the end off in step 1


6.  Remove the side cover over the motor/plug.  I didn't bother to remove the lilac-coloured* front-plate, as I could get the access I needed without it.

Note the small lugs all the way up the side plate.  (Image taken before top removed in step 5)
* Does not look lilac in my image as my model has faded after 12 years in the son.  It used to be lilac!

I cleaned every metal-on-metal moving joint I could find (hand-crank the machine to spot these).  To clean, I rubbed around the area with a Q-tip, and then a drop or two of machine oil did the trick.  I took a few photos (not exhaustive) of a subset of the joints.  There are more than this!


Underneath the machine, with the machine lying on its front

Inside the top of the machine.

There is a triangular cam thingy visible when you look down inside the top of the machine (next image).  This bit needs a SERIOUS clean and oil: it was responsible for my machine groaning and stiffening, threatening to burn out the motor.

The bit highlighted here is the triangular cam thingy.

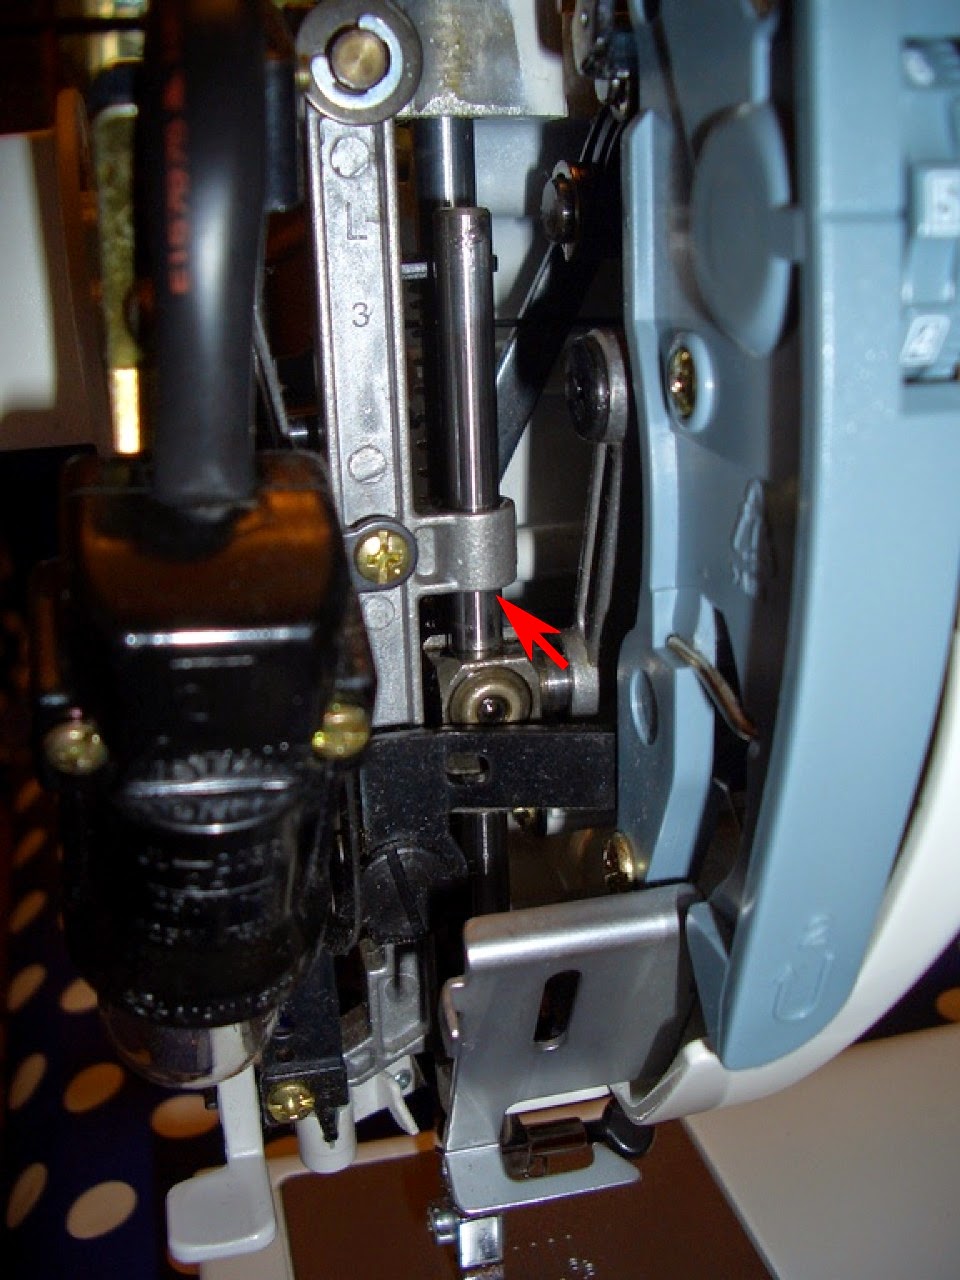
On this trip inside my machine, I paid special attention to the presser-foot mechanism, because the foot wasn't staying clamped down when I was stitching, leading to an exciting free-motion stitching experience with every project.  Argh!

Behind the presser-foot shank.  Oil the joints in the black thingy on the left, and the shank guide on the right.

Oil the presser-foot shank-guide on the front as well.

Also clean and oil the bobbin-race (see other post) to avoid nasty skipped stitches.

That's it!  If you have a Janome 423S, I hope this post helps you to get it apart quickly and without damage to the plastic work.  If you have any other type of sewing machine, I hope you feel ready to service it yourself.  It's easy!  :-)

This machine has run for 12 years with no need for any part change.  If I have to do any further maintenance excepting a clean and oil, you can be sure to hear about it here.  Lucky lucky you.  Ha ha.  There's a reason to subscribe to this blog if ever I heard one!  ;-)

They still sell this Janome model, so if you're looking for a reliable metal-bodied front-loading mechanical machine, I recommend it.  Super reliable.

Wednesday, 25 February 2015

A knitting round-up

There was a long blog silence while I knitted a lot for people's impending babies.  This post has finally been made because all the babies have been born so I can finally not spoil the surprise.  (Unless you stalk me on Ravelry, in which case you've been nosy already.)

I had quite a bit of fun using the same hat pattern and churning out lots of baby hats with some funky intarsia.  I'm definitely getting better at knitting with both hands at once (that is, with a different yarn held in each hand, of course you need two hands for "normal" knitting anyway).

Firstly we have a hat with a pattern and colourway pinched from a WI magazine.  The pattern was printed for a blanket which called for oodles of posh yarn, rendering the whole exercise very expensive.  In any case, the blanket was stranded and not backed, so would have been expensive and delicate to boot.  I shamelessly copied it onto a hat for Zack who has the honour of sharing his birthday with Christmas Day.


Archie got a hat with space invaders on it.


George gets a hat with hearts.


I had a lot of fun making this squirrel cardigan for Phoebe.  I ordered the 100% wool yarn without having ever touched some and I was pleasantly surprised!  I did move the "nut piles" in the design to the front of the squirrels and away from the centre back.  I am honestly surprised that almost 70 people had made this cardigan before me and not commented on Ravelry that it looked like the squirrels on the centre back were having a poop.


The little whale cardigan has been sent to Alfie.  My intarsia has definitely improved from the top of the whales toward the bottom - oops!  Turns out 100% cotton is not the most forgiving yarn for this kind of work.  I hope he won't mind.  Also the cardie turned out massive.


For my dad (not-a-baby!) I made this grey beanie hat for his birthday.  The crazy super-bulky yarn felt like knitting with worms, and I don't recommend teaming that with cheap plastic Pony 6mm needles.  Bendy!  I hope it fits.


Finally, for my own brand-new baby Button, I used up some of my left-over knitcol from this jumper to make a norwegian-style yoked number.


If you are interested in any of the gory pattern or yarn details, you can browse my Ravelry project page here.

Wednesday, 14 January 2015

Mr Sneeze packed the things he'd need for his journey (mainly handkerchiefs)...

The internet does not sell Pocoyo-branded hankies.  The internet only supplies ugly overpriced children's handkerchiefs.  Toddler Button is OBSESSED with Pocoyo, and he also likes to put a tissue in his pocket because Grannie showed him how.  I do not like tissue washes, and now I have a huge amount of tiny pockets to check.

On a separate note, I am not too hot at rolled hems on my sewing machine.  I also have a large amount of awkwardly sized selvedges in cheap poly-cotton left from making curtains.


I have solved all these problems!  I have practised my rolled hemming on 9" square bits of curtain lining to produce 10 neat hankies.  I have also printed 2" square images of Pocoyo and his friends on iron-on inkjet t-shirt transfer paper.  (Mr Sneeze and Mr Silly included as bonus hankies.)  BAM!  Free (or almost-free) hankies that Toddler should love.  Not a moment too soon, as I caught him pilfering a tissue from the kitchen drawer this morning and trying to shove it up his sleeve.


Toddler owns over 10 Mr Men books, but will only allow me to read Mr Sneeze (fortunately handkerchief appropriate) and Mr Silly.  This is because he thinks that Mr Silly is rewarded with a drill at the end of the book.  It's actually the "Nonsense Cup for Silliest Idea of the Year", but there's no persuading him that a drill isn't actually the better prize.

Thursday, 8 January 2015

Boo hoo to the saggy dressed skinny doll

I have just finished sewing the little boy doll from the pattern Simplicity K1900 which my sister-in-law kindly gave to me, and I have a LOT to say about it.


Firstly, big thank-yous to my S.I.L who was very kind to give me the pattern, and I can say with conviction that the pattern picture on the front of the envelope is very cute.  I hope you won't be cross with what I have to say about the pattern itself!

I decided to make boy doll.  I had lots of fun picking out fabrics and cutting him out and embroidering his face.  It was all fun and games until it came to turning the limbs inside out, and then it was HILARIOUS.  I followed their suggested 1/4" seam allowances, and I even made them scant 1/4", but still it was almost impossible to turn the skinny arms out through the minuscule wrists.  The pattern piece suggests the wrists are 7mm across when sewn, giving a circumference of 14mm after stuffing, which means they have a diameter of under 4.5mm.  Do you see the madness here?


Finally I prevailed without torn fabric, and it was time to stuff them.  Har-de-har.  I could just about ram a 4mm knitting needle down the arms (see above comment on the puny diameter), so I managed to use a combination of the knitting needle, tiny bits of stuffing and a kitchen funnel inserted in the arm end to cram stuffing into the hands, arms and legs.  It took me an entire evening to stuff the little blighters for a single doll.

The rest of the doll body went together easily, and although he looks a bit malnourished, I proceeded onto the clothes with hope in my heart.

I made the shirt first.  Here I discovered that they'd omitted to tell me in the cutting directions that the neck facing was needed for view D (the boy) as well as for the girls.  So out came all the fabrics to cut the extra piece.  They give no directions for seam finishes, which is fine if the doll is to sit on your shelf, but less fine if you expect it to withstand the attentions of a lively 2-year-old.  I elected to zig-zag the seams I could.

I then made the little dungaree shorts.  Very cute on the photo.  However, when it came to dress my doll, he does not look like the picture.  Sad times.  The shirt is definitely more roomy than the envelope image shows (especially around the arms) and doesn't quite come down low enough to be sure that the doll doesn't feel draughty around the tummy if he moves.  It requires careful tucking to ensure he's covered below his shorts waistline.  In addition, the shorts are pretty roomy around the hips.  I know that I followed the seam allowances correctly on the shorts because my notches all lined up to the bib part perfectly when I came to attach it, so we can discount incorrect construction on my part.  I can only assume they've cunningly pinned the excess behind the doll before the photo, or else they made the model to a better fitting pattern than the one supplied in the envelope.  That's a bit of a shame.

I had no more luck with the felt shoes.  I sewed them as directed, and this resulted in giant moon-boots that fell off his feet.  I took in an extra 3/8" at the front and re-cut the piece to correct this.  That's quite a correction to get it to look like the photo on the envelope, I'd say.


The hat is also a sad disaster.  Despite adding an extra line of stay-stitching around the brim to prevent the felt stretching, it does not sit snuggly on the dolls head as per the picture.  It looks like a sad loose bowl of custard plonked on his bonce, and comes much further down than the envelope photo shows.  I fail to see how this can go so wrong for such a simple pattern piece.  I can only assume trickery on the part of the envelope photographer.

I made three shirts, two dungarees, two shoes and a hat for my sad doll, because I'd already cut them out at the start.  I hope toddler likes him, but I won't blame him if he doesn't.


So, in summary, cute pattern envelope, shame about the contents.  Either all the boy doll clothes are wrong, or else they've got the wrong seam allowances on the doll itself.  Also, I have learned that I hate sewing titchy tiny doll clothes with a passion.  I don't think I'll be making another doll in a hurry.

Wednesday, 7 January 2015

Notes on designing curtains with rings

This is a post where I point out things to future Alice which should have been obvious to past Alice when she bought curtain fabric for her spare room.

For context, I am making curtains with 40mm metal eyelets at the top.  I need metal eyelets because I am interlining with blackout fabric, and making a polycotton lining too, plus buckram.  This is quite a thickness to expect shonky plastic rings to withstand.  Therefore, I purchased some badass tools to insert metal eyelets from Hanolex.  It involves the biggest hammer I may ever own.  The break even point in tool investment seems to be when you are making more than one set of eyelet curtains, especially when you take into account the recorded delivery postage in sending your beautifully handmade curtains off to someone else to butcher in the eyelets for you.

I like to use the blackout as an interlining rather than a lining fabric.  When making curtains, one tends not to take the lining all the way to the curtain edge.  I find the blackout fabric to be quite stiff compared to some fashion fabrics used for the front of the curtain, so when using it as a simple lining, you end up with floppy leading edges.  I've even seen this done on sample curtains in a well-to-do posh national chain of stores.  Eugh!  Therefore, I like to use the blackout as an interlining, cut to the finished curtain size and tacked inside, making all the curtain the same stiffness.  I then use a thin cotton or polycotton to line the curtain.

Designing your curtain


Here follow some complicated trade-offs and calculations that I won't repeat here, but consider the following constraints:
  1. For a pair of curtains, each curtain needs to be at least twice the width of the window area it has to cover.  E.g. for a 2m wide window with a pair of curtains, each curtain needs to be 2m wide or more.
  2. You need an even number of rings, and Mr Google suggests typical spacings for 40mm rings are 16-18cm.  The spacing you choose is to some extent determined by how far your curtain pole stands off the wall, which should be just a little more than half your ring spacing.  Clearly if you have M rings, your total curtain width will need to be M x ring spacing.  This allows you a bit of leeway to play around with the number of rings, the ring spacing and the total curtain width, subject to the next constraint.
  3. Typical fabric widths might be 140mm, so you may need several drops of fabric in order to get your total curtain width.  Consider where the join should be between two drops: it ought to fall in a furrow between two rings, i.e. with an even number of rings each side of it.  Make sure your ring spacing and number of rings allows you to get this seam positioned correctly, bearing in mind the width of your fabric (which is fixed).  It's not as easy as you'd think.
  4. With all of the above, make sure you're allowing for turnings at the edges on the front fabric!  On top of the finished curtain size, I allow 5" at the top, 3.5" at the bottom, and 2.5" at each side.  I allow a 1/2" seam to join drops.
Having solved that headache, you might want to consider where you place the seams between drops of blackout interlining and polycotton lining.  I didn't want a stiff section in my curtain, so I plan to stagger the seams.  Since it's the next stiffest fabric, I'll place the join in the blackout lining in a different furrow from the front fabric (with an even number of rings each side).  The polycotton lining is relatively thin and floppy, and in any case is on the reverse, so I'll place the join mid-way between that of the front fabric and blackout, even though this is on a projecting fold.

The narrowest drop of front fabric probably looks best toward the outer edge of your window on each curtain.

For lining, I plan for it to appear on the reverse of the curtain as a neat rectangle coming 4.5" down from the top, 2" in on each side, and 2" up from the bottom.  I allow 1/2" for turning on the top and sides, but 2.5" for creating a deep 2" machined hem along the bottom.

I will use 5" buckram along the top edge for stiffening, and I expect to place my eyelets with their midpoints 2.25" from the top of the curtain.  The outer two eyelets are spaced by half the eyelet spacing from the curtain edges.

Matching obvious patterns


I should have unrolled several meters of the fabric from the roll and stood well back before buying.  What I thought was a lovely swirly pattern turns out to have VERY obvious repeats which really ought to be matched.  What is more, my guestimate of yardage in the shop was pretty good at first sight: I bought 6.5m, and my later calculations show I need four drops of 62" each, which is 6.3m with no pattern matching.  Clearly this is very frugal of me, but I am now cursing myself for not allowing enough for pattern matching.

When you are standing in the shop with a winging toddler, how much extra fabric should you buy for pattern matching?  Turns out to be quite simple.  Firstly, measure the vertical pattern repeat.  Then buy enough for the number of drops (N), plus N times the pattern repeat.  So for my fabric, I should have bought 4 x 62", plus 4 x 24" (because 24" is the enormous pattern repeat distance).  So I ought to have purchased just over 8.8m to be safe.  That's quite a difference from the 6.3m!  I now need to attempt to buy another 2.2m+ of the same fabric, six months after my original purchase, if they still have it.  ARGH.

Friday, 24 October 2014

Spooky shirt

It's Hallowe'en soon, and the onslaught of compulsory dressing-up parties for toddlers.  It seems like in the US, any costume goes, however in old blighty we stick to the traditional witches, pumpkins, skeletons and perhaps a zombie or vampire or two.  Sadly it's much cheaper to buy a shiny scratchy polyester outfit from the supermarket than it is to buy the fabric and make your own wonky creation.  That makes me a bit sad, mostly because I can't justify 1m of orange cotton on economy grounds.


Note the sticker from a pumpkin he has applied to his tummy.  Also, this is his "smile" face (eyes are shut).

Nevertheless, Toddler Button gets his own special shirt for the occasion, because it turns out you can just about squeeze my age 2-3 shirt pattern from a piece of 75cm wide 1m cotton for £2.20 off ebay (free postage!).  Here, squeeze means really squeeze: I had to piece the under-collar from two scraps of fabric to make this baby work.

I thought spools of black and white thread never ran out in this house, but it turns out they do run out if you don't keep buying them.  Boo hoo.  Therefore, because I was light on time and thread, we have minimal top-stitching and some of the buttonholes might be stitched with grey/brown thread on the reverse.  Also I was short of one orange button, so we have a different button friend lurking on the collar stand.

The bits all over my floor are pegs.  Thanks, toddler.


I'm sorry that my child is not going as a "thing", but he will look cool (I hope) with his spiders and trick-or-treating skeletons.  I wanted to get shiny sliver and black spiderweb fabric, but it's probably as well it was twice the price because it would have been a bit Liberace.

Model wears his new shirt over a long-sleeve t-shirt.  Did you really think I'd have enough fabric for long sleeves?!  He's also pretty pleased about the buttons, because he can now say "Orange!".

Next year, maybe I should make him this outfit?!  Ha ha!