

Friday, 30 May 2014
New multipack vest extenders!
There are new mixed fabric selection multi-packs of vest extenders in the shop!
Get them while they're still there! :-)

Thursday, 29 May 2014
Heads still be growing, I still be sewing.
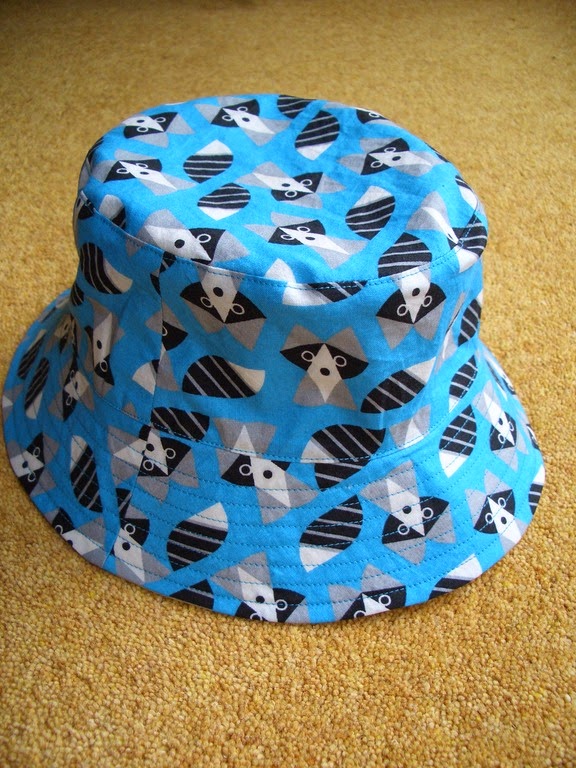
I have made many ... reversible ... bucket hats from this pattern by Oliver & S. Toddler Button keeps growing, so I have been forced to stitch him a new hat for the sunny days. We're now in size M (19") which sadly means there is only one size left before I have to draft my own hats.
Behold the epic new hat on a theme of racoons, with a sunny yellow reverse side:
I've got construction down to a fine art now, and I've eliminated all hand-stitchery. It's charming but I don't have time for that malarky.

Do you want to know my non-hand-stitch secret...?

Alright, here it is:
Hats look better on heads, so I'm sorry for the floor-based pictures. It's raining and TButton has the lurgy, so there is no hat-wearing today. He had a tantrum when I put his old sun-hat in the washer and the new one just wasn't the same (apparently), but I think he'll be over that soon. I'm aiming to appeal to what remains of his 6 month long obsession with the colour yellow.
I got the fabrics from Backstitch at Burwash manor. A lovely shop! :-)
Behold the epic new hat on a theme of racoons, with a sunny yellow reverse side:
I've got construction down to a fine art now, and I've eliminated all hand-stitchery. It's charming but I don't have time for that malarky.
Do you want to know my non-hand-stitch secret...?
Alright, here it is:
- Construct the brim in it's entirety, including the top-stitching.
- Construct both caps individually including the top-stitching around the top of the crown.
- Pin the brim to one of the caps, right sides together and machine stitch around with a 3/8" seam allowance.
- Stitch around a short distance (only 2-3") of the same seam but with the usual 1/2" allowance the pattern dictates. In this area you'll have two rows of stitches.
- Pin the second cap around the same seam. For this, you'll have the two caps right-sides together with the brim all squashed up and sandwiched between them.
- Sew around the seam with a 1/2" seam allowance, leaving a gap of 2-3" matching exactly where your double-line of stitching was.
- Trim and grade your seam allowances, so the cap allowances are 1/4" and the brim allowance is a shade more.
- Turn the hat right-sides out through the gap and press the seam flat.
- Close the gap left from turning the hat out, which will only appear on the inside of the hat (due to your careful double-stitching on the other side). Press the seam allowance in this area appropriately and pin the gap shut. Carefully top-stitch around the whole hat on the sides, which should catch the gap shut at the same time.
- Superb! A hat with no hand-stitching!
 |
| The squashed on floor look: how the hat will spend most of it's life. |
Hats look better on heads, so I'm sorry for the floor-based pictures. It's raining and TButton has the lurgy, so there is no hat-wearing today. He had a tantrum when I put his old sun-hat in the washer and the new one just wasn't the same (apparently), but I think he'll be over that soon. I'm aiming to appeal to what remains of his 6 month long obsession with the colour yellow.
I got the fabrics from Backstitch at Burwash manor. A lovely shop! :-)
Sunday, 25 May 2014
More Mizzen Shorts
The last pair of shorts were so obnoxious* that I had to immediately remedy them by making some more in nicer fabric.

These shorts are in a nice pale blue linen-type fabric that drapes beautifully. The blue is actually a soft sky-blue, not the bright shade my computer is currently rendering for me.

I went all-out with some back patch-pockets, but didn't do as much top-stitching as I'd have liked because a) I thought I was about to run out of matching thread, and b) I was bored of making the shorts already.

I went for the super-low-opening fly again, with concealed poppers. It totally works for me, and this time I remembered to put the poppers in before finishing the fly top-stitching. Wow! However, I didn't remember to put the elastic in before closing the waistband, so never fear: my seam ripper still saw some action.
I'm so glad to be done with these. I've got a lot of vest extenders to make now (the shop is empty), but more excitingly I've got some super scrummy birthday yarn to knit with and some epic 50p/m bargain fabric from Walthamstow Market to sew up. Sorry TButton: Mummy knows you need more shorts and vests and a raincoat and a hat, but Mummy wants a new blouse. Too bad.
* I went to the park with TButton wearing the terrible union shorts and this soldier shirt (because it was the only one that matched), and then realised it was a terrible UKIP-style combo. I almost felt I should apologize to the other mothers... ARGH.
These shorts are in a nice pale blue linen-type fabric that drapes beautifully. The blue is actually a soft sky-blue, not the bright shade my computer is currently rendering for me.
I went all-out with some back patch-pockets, but didn't do as much top-stitching as I'd have liked because a) I thought I was about to run out of matching thread, and b) I was bored of making the shorts already.
I went for the super-low-opening fly again, with concealed poppers. It totally works for me, and this time I remembered to put the poppers in before finishing the fly top-stitching. Wow! However, I didn't remember to put the elastic in before closing the waistband, so never fear: my seam ripper still saw some action.
I'm so glad to be done with these. I've got a lot of vest extenders to make now (the shop is empty), but more excitingly I've got some super scrummy birthday yarn to knit with and some epic 50p/m bargain fabric from Walthamstow Market to sew up. Sorry TButton: Mummy knows you need more shorts and vests and a raincoat and a hat, but Mummy wants a new blouse. Too bad.
* I went to the park with TButton wearing the terrible union shorts and this soldier shirt (because it was the only one that matched), and then realised it was a terrible UKIP-style combo. I almost felt I should apologize to the other mothers... ARGH.
Monday, 19 May 2014
Little fox-and-dots hat for a little head

A colleague of mine is having a little baby! Hooray! I couldn't resist the urge to make baby a little hat a week ago. I hope it will fit: I made size XS, but it's supposed to be for 6-12 months and baby is not here yet. That said, XS was too big for some of TButton's friends at that age, and much too small for TButton. So hopefully it will be sunny at some point when it fits the new baby. The pattern is from Oliver & S here.

I was super-excited to find almost a full fat-quarter of fox print fabric in my stash, and then fortuitously a pale blue dot fabric which is completely non-related but matches so well! Plus, the hat is reversible.

I tried a different construction method this time, top-stitching the brim before attaching it to the hat. I then used a cunning technique to attach both sides of the cap to the brim without any hand-stitching. Honestly, who has time to hand-stitch?
The whole hat only took a few hours.
UPDATE: Baby is here! It's a girl! Happy birthday little one, and congratulations Mummy and Daddy!
Sunday, 18 May 2014
B-o-r-i-n-g nappy pants.
I'm a big fan of me old cloth nappies. Not because I'm a tree-hugging earth-mother type, but because they work better for me than disposables. I actually don't mind doing laundry, and I'd rather wash the nappies than endless sets of soiled clothes. We have Tots Bots bamboozles, which are a bamboo-based two part shaped nappy.
Anyways, little Button needs boosters now he's bigger, which are just an extra absorbent layer. Tots Bots old-style ones are no longer for sale (boo hoo), and although their new ones are excellent, they're a bit more pricey when you need 12 more boosters for daytime wear.
I elected to make his new boosters myself, using fabric from Plush Addict, who had 20% off nappy making supplies during real nappy week. I went for bamboo velour for the outside, with a single layer of Zorb sandwiched in the middle.
The bamboo velour has a super slinky drape and quite a lot of stretch. The zorb feels like a very dense rough quilt batting, almost like felt.
Apparently, the zorb shrinks quite a lot in washing, but you can't pre-wash it or it will fall apart. Therefore, I bring you the cunning cutting sizes, as determined by my own experiments.
For 1 booster:
2 pieces of 12cm x 30cm bamboo velour
1 piece of 12.5cm x 32cm zorb
Because the zorb is 115cm wide, and the velour is 150cm wide, you can manage to get 13 boosters if you plan your cutting carefully by buying only 0.5m length of zorb, and 0.75m length of the velour. (I didn't care whether I cut on the lengthways or crossways grain; they're just nappies.)
To make up, I found the best method was pin the zorb inside the bamboo layers, stretching the velour to meet the edges of the zorb all round. This is not a problem as the velour is so stretchy. The right-sizes of the velour should be outside.
Next, I used my machine to sew around the edges with a zig-zag, making the corners curved slightly. I found it much easier to hold the pieces by machine stitching first, (before the overlocking stage) as they're really stretchy and slippy.
After machine stitching, I trimmed the corners into a curve with scissors and overlocked around the whole edge with a 3-thread overlock. I found I had to increase my stitch width (compared to how I'd set it for woven cotton), and 4-thread overlock didn't work so well. I know the overlock cuts and sews in one, but I still got better results by trimming the corners with scissors first; it was all too much for the poor machine otherwise.
The booster looks all contorted from the oversize zorb inside, but after washing it shrinks to match the velour and voila! We have a delightfully flat booster!

I did this 13 times. B--o--r--i--n--g.
Anyways, little Button needs boosters now he's bigger, which are just an extra absorbent layer. Tots Bots old-style ones are no longer for sale (boo hoo), and although their new ones are excellent, they're a bit more pricey when you need 12 more boosters for daytime wear.
I elected to make his new boosters myself, using fabric from Plush Addict, who had 20% off nappy making supplies during real nappy week. I went for bamboo velour for the outside, with a single layer of Zorb sandwiched in the middle.
The bamboo velour has a super slinky drape and quite a lot of stretch. The zorb feels like a very dense rough quilt batting, almost like felt.
Apparently, the zorb shrinks quite a lot in washing, but you can't pre-wash it or it will fall apart. Therefore, I bring you the cunning cutting sizes, as determined by my own experiments.
For 1 booster:
2 pieces of 12cm x 30cm bamboo velour
1 piece of 12.5cm x 32cm zorb
Because the zorb is 115cm wide, and the velour is 150cm wide, you can manage to get 13 boosters if you plan your cutting carefully by buying only 0.5m length of zorb, and 0.75m length of the velour. (I didn't care whether I cut on the lengthways or crossways grain; they're just nappies.)
To make up, I found the best method was pin the zorb inside the bamboo layers, stretching the velour to meet the edges of the zorb all round. This is not a problem as the velour is so stretchy. The right-sizes of the velour should be outside.
Next, I used my machine to sew around the edges with a zig-zag, making the corners curved slightly. I found it much easier to hold the pieces by machine stitching first, (before the overlocking stage) as they're really stretchy and slippy.
After machine stitching, I trimmed the corners into a curve with scissors and overlocked around the whole edge with a 3-thread overlock. I found I had to increase my stitch width (compared to how I'd set it for woven cotton), and 4-thread overlock didn't work so well. I know the overlock cuts and sews in one, but I still got better results by trimming the corners with scissors first; it was all too much for the poor machine otherwise.
The booster looks all contorted from the oversize zorb inside, but after washing it shrinks to match the velour and voila! We have a delightfully flat booster!
I did this 13 times. B--o--r--i--n--g.
Saturday, 17 May 2014
It's hot; I have made shorts.
 |
| Brits abroad! Whoa! |
It's all sunny and TButton doesn't own a single pair of shorts! Let the crisis-sewing commence.
I drafted some shorts in "age 2" from the Aldrich book (which I have many reservations about, but at least the baby trouser block is reliable for cloth nappies). I wasn't sure if the shorts would fit, because he was asleep when I drafted them so I couldn't take any measurements. Therefore, I was determined to make them from some fabric in my stash that I wasn't keen on and I'm certainly not keen on these shorts!!!
The good news is that they turned out to fit pretty well. The bad news is that he's now going to have to wear them if it gets any hotter. They remind me of shirtless overweight motor-boat owners holding cans of lager. (Sorry.) Brits abroad! ARGH!
I didn't have enough cotton flag fabric or blue polycotton to make the full shorts, hence the mix-and-match legs. I was hoping that plain blue would tone the flags down a bit, but somehow they're even worse. Mum gave me the flag print to make myself a Geri-Halliwell-style union dress about 12 years ago, but the fabric wouldn't even union-up my left leg now (boo hoo). Sorry about being rude about your fabric, Mum. I hope you like the shorts!
 |
| The back is still nasty! Woo hoo! |
The back has an elasticated waistband, but the front waistband is plain. There's plenty of room for his cloth-booty.
 |
| No about of clever fly detailing will make these shorts a pleasure to put on. |
At least I know the pattern is okay, so I can make more shorts in less nasty fabric. I've got some reasonable denim and some pale blue linen, and I might buy him some nicer beige twill. Meanwhile, at least he's not going to swelter in trousers.
I named the pattern "Mizzen Shorts", which is a pleasing sail reference. After some sail fact trading with Mr Button (who has never heard of a Rotor Sail), he alerted me to the Water Sail. Wow, that's a funny sail: looks like the boat's pants are falling down.
EDIT:
It got really hot this afternoon, and TButton tried his new man-wear to play with some water in the garden. Rock those shorts, Toddler.

Thursday, 8 May 2014
Sorbetto: the revenge of polka dots

You get a hastily taken wonky image of this one. Told you it's not a photography blog. My left hand is being dragged away by a toddler who is in a huff.
I'm not wild about my fabric choice here. It's a bit Minni Mouse, and polka dots on the binding AND the main fabric? What was I thinking? I'll tell you what I was thinking: I like red, and I like purple, and I like them together, and OH LOOK POLKA DOTS. At no point did I envisage the unholy mess they'd be when placed together on this garment. In addition, the fabric has too much body for this top. It would make a lovely dress, but this top would be better in a cotton lawn or something. If I tone it down with a cream cardigan it's totally good for layering, so I'll still wear it.
I made a bunch more pattern changes after my last post about fitting sorbetto. I took another 1/2" off each side seam and shaped the CB even more. In total, this lost another 3" around the waist. This was because my husband described it as looking like a sack. I also lowered the arm-holes a tad. I think I'm finally done with pattern alterations. It must have worked though; I wore the top for a whole day and didn't feel uncomfortable or self-conscious in it, the way I do with some of my efforts when the fabric is pulling and the fit is bad. The first day I spent in this dress was a saggy baggy hell.
Hey ho. I think I'll make it more tastefully next time. How about a lace yoke and plain bottom? Or some nice pale broderie anglaise with a coloured trim? Or a light chambray with pintucks instead of a centre pleat, and floral trim?
Subscribe to:
Posts (Atom)