Friday 24 October 2014

Spooky shirt

It's Hallowe'en soon, and the onslaught of compulsory dressing-up parties for toddlers.  It seems like in the US, any costume goes, however in old blighty we stick to the traditional witches, pumpkins, skeletons and perhaps a zombie or vampire or two.  Sadly it's much cheaper to buy a shiny scratchy polyester outfit from the supermarket than it is to buy the fabric and make your own wonky creation.  That makes me a bit sad, mostly because I can't justify 1m of orange cotton on economy grounds.


Note the sticker from a pumpkin he has applied to his tummy.  Also, this is his "smile" face (eyes are shut).

Nevertheless, Toddler Button gets his own special shirt for the occasion, because it turns out you can just about squeeze my age 2-3 shirt pattern from a piece of 75cm wide 1m cotton for £2.20 off ebay (free postage!).  Here, squeeze means really squeeze: I had to piece the under-collar from two scraps of fabric to make this baby work.

I thought spools of black and white thread never ran out in this house, but it turns out they do run out if you don't keep buying them.  Boo hoo.  Therefore, because I was light on time and thread, we have minimal top-stitching and some of the buttonholes might be stitched with grey/brown thread on the reverse.  Also I was short of one orange button, so we have a different button friend lurking on the collar stand.

The bits all over my floor are pegs.  Thanks, toddler.


I'm sorry that my child is not going as a "thing", but he will look cool (I hope) with his spiders and trick-or-treating skeletons.  I wanted to get shiny sliver and black spiderweb fabric, but it's probably as well it was twice the price because it would have been a bit Liberace.

Model wears his new shirt over a long-sleeve t-shirt.  Did you really think I'd have enough fabric for long sleeves?!  He's also pretty pleased about the buttons, because he can now say "Orange!".

Next year, maybe I should make him this outfit?!  Ha ha!

Wednesday 15 October 2014

Free peg bag pattern

I'm feeling in a generous mood.  So generous that I've digitised my peg bag pattern for you, for free.  You're welcome!

Download the pattern here.  (It's a pdf file.)


The pattern pages should be printed on 6 sheets of A4 paper.  (I'm from England, that's how we roll.)  Remember to set "scaling 100%" or "none"  or whatever when you print, as usual when you have print-at-home sewing patterns.  There are red stars everywhere which should align beautifully when you tape it together properly: there are red letters to help you match pages properly.  You should find yourself taping it into a 3 x 2page block which contains three pattern pieces, the largest of which is about 43cm from top to bottom.

Cut around the solid lines.  I have included lightly dotted lines to show the stitching lines: the seam allowance is 1/4" on the outside edges and the opening edges are left raw for you to finish with bias binding.  I recommend 3/4" binding which you can make yourself.

I'm not generous enough to provide instructions, but I'm sure you can work it out.  I will pass on a few options though:

1.  Use just one fabric layer, or a quilted sandwich as I did.  Finish the dart edges and all raw inside edges with bias binding (not just the opening).

2.  Be a bit clever with separate outside and lining pieces, and sew them up such that all the raw edges are hidden in-between the layers after you construct it.  The final construction will be a bit mind-bending, especially around the opening.  I imagine you'll end up turning it inside out through one or both of the opening edges, then binding the opening edges last.  I've not quite thought it through, but it's probably possible to accomplish with minimum hand-sewing somehow.

For more details of how I made my version, clicky here.  I provide handy methods of calculating bias binding here.

You might wonder why I'm bothering to provide a pattern with no instructions.  I can only be bothered to provide patterns for things that aren't obviously easy to draw yourself (with likely first time success).  This pattern has darts in the bottom to create fullness for a multitude of pegs, and the first pattern you might draw for a bag like this doesn't work unless you engage brain.

In case you are interested (probably not), I use a mixture of Inkscape and Scribus to digitise my patterns.  It's both free and powerful!

Wednesday 8 October 2014

Toddlermatician shirt

When I saw this fabric a year ago on a WI outing to Bee Crafty I had to have it.  Isn't this just the most awesome badass maths fabric you have EVER seen?


I love the combination of chalk-board effect with areas of mad colour.  The most awesome part about it is that the maths is correct.  It even contains reference to Napier's rules, which I even had to look up to see what they were as I've never had occasion to use them.  (Mr Button the person with the real actual Mathematics degree guessed they were to do with logarithms: they're not.)

I've only spotted one error in the maths so far (a missing factor of 2.l.b):

This will annoy me for ever.
I decided that Toddler Button needed a shirt in this epic fabric.  He likes shirts a lot now, because Daddy wears shirts.  Daddy doesn't have a shirt as loud as this one:


With every snip and stitch, this fabric seemed more awesome to me, but also more loud.  This shirt is quite... mad?  Somehow it didn't make my eyes dance when it was on the bolt, but is definitely individual as a shirt.

Can you see the patch pocket in this image?  Me neither.
The pattern is my self-drafted size 2-3 years pattern, see this previous shirt with the skewered soldiers.  Toddler has just started to wear this size in my shirts (they seem a bit bigger than commercial 2-3 stuff), so there is plenty of growing room left.  I didn't have enough patience or fabric to draft a back yoke for this shirt, so we'll have to wait until I have a longer length of fabric and less inclination to just get going fast (as a break from knitting).

Yellow buttons.
Obviously there was only one choice for the buttons.  If I intend this shirt to become a favourite of Toddler Button, it has to be his obsession colour: yellow.  He's not worn the shirt yet, but I'll be sure to let you know if it has the honour of being selected by his Lordship from his drawer in the morning.  He did want to try it on before I'd had chance to slit open the buttonholes, so I have hope.

How could I let this fabric languish in my drawer for a whole year?!  WHAT WAS I THINKING?

Monday 29 September 2014

Peg Bag II: attack of the pegs

For once I've actually made something I'm pleased with!


I made another peg-bag as a gift for a family member.

This is the second peg-bag I've made, as I fortunately decided to do a trial run by making one for myself first.  It was not a resounding success (see here), partly due to the terrible shape, and partly due to my using bias binding which too narrow and wasn't cut on the bias (so let's just call it "binding").  To top it all, the lack of quilting made the fabric sag, and the oval holes for the hanger and peg entrance were a pain to bind and stretched out of shape in the process.  Further still, in the process of using it, I found the hanger kept dropping into the main bag when my toddler was playing with it.  I also want to fold it up to store it so that the pegs don't fall out.

I fixed my problems (well, only the peg-bag related ones).

To fix the terrible shape, I busted out some maths.  Because I have darts for fullness in the bottom but not in the top, my pattern has to be almost trapezoidal in shape (wider at the bottom) so that when I've sewn it up I end with vertical sides.

Overlapping front pieces.  You even get a close-up of my binding because I'm not so ashamed of it this time around.

To fix the stretched ugly openings, I re-drew the front of the bag in two overlapping pieces.  The main opening is now formed from the curved edges of the two pieces and is lots easier to bind.  I also bound the hanger opening in two halves before constructing the bag.

Bound hanger opening.

To fix the nasty binding, I chose a wider width of 3/4".  I made the binding myself and cut it actually on the bias this time.  I'd been previously put off doing this by thinking that cutting such a narrow strip from the central bias of a huge piece of fabric would give a lot of wastage (two huge triangles), but then I found out about this method of cutting continuous bias tape.  I have given some thought to it and provided formulae to work out the size of square you need to cut in order to make the right amount of bias tape of any width.  I didn't have a 3/4" bias maker, but the Scientific Seamstress provides a cardboard plan for one in 1/2" or 1" sizes.  I measured her cunning design and calculated how to make myself the 3/4" version which works a treat.

Bias binding maker!  Thanks, past Alice, for saving the card from your wedding invitations!

To fix the saggy fabric, I decided to quilt two layers together with a layer of quilt batting between them.  I then cut out my pattern shapes and bound the opening edges.  Next, I stitched the darts and placed the pieces right-sides together and sewed round the edges into a bag.  However, this leaves nasty raw edges on the inside to chafe against pegs.  Not to fear - I used bias binding to enclose the raw edges of the darts and seams: nice bound seams!

Because everything takes 2 seconds in my head, I decided to patchwork 2" half-square triangles on the front and back of the bag.  Obviously this takes considerably longer to execute than I'd imagined (duh), and a lot of fabric.  I used 7 fat quarters in total: 4 patchwork fabrics, 2 inside fabrics and 1 binding fabric.  I don't have an awful lot left over, excepting some scraps and a bit of binding.  Thanks so much to my kind friend who gave my the pack of 6 co-ordinating fat quarters for a birthday present!  I know they're being given away again in a different form, but I've had a lot of fun with them and spent a LOT of time agonizing over their construction, not to mention the time spent chopping them into 2" squares and sewing them back together again.  Put like that, patchwork seems quite pointless doesn't it?!

Elastic loops to hold hanger in.  Also starring bound seam and diagonal quilting.  Cleverly hidden by photography: internal ugly patchwork from blue scraps where I ran out of white fabric.  Ha!

To fix my annoying hanger-drop issue, I attached two elastic loops into the top seam as I was stitching my bag together.  This holds the hanger in place, but it's still removable for laundering the bag.

To fix my storage issues, I added a little loop made from bias binding to the outside bottom of the bag.  This means you can slip it over the hanger wire when you fold the bag in half and everything stays put.  Nice!

Bias loop.  It's the little things that stop you having to play 52-peg-pickup.

So, that's your lot.  I can't believe how much thought I put into making a peg bag that looks totally ordinary and is functional.  It turns out it's easier to make something ugly and rubbish.  I'll now go back to cursing the prototype peg bag that I have to live with.

Tuesday 16 September 2014

Continuous bias tape: a magic formula

I'm not going to start this post with an apology for not posting, because I don't have to!  Mwa ha ha!  I've been too busy with paid work and chasing a toddler around.

I have been knitting (as always) and I'm still sewing, but I can't post anything yet.

Nevertheless, I thought I'd spend a few moments in thought about continuous bias tape.  The Coletterie has a lovely tutorial on how to make continuous bias tape, which I highly recommend.  I'm not going to try and give you such a tutorial here when a good one already exists.  However, having followed their tutorial measurements to the letter a few times, I note that I do not get the whole number of 1" strips marked across the fabric as they show for their step 4.  The result is that I get less than the 100" of bias tape they propose.  This is probably because I do not edge-stitch as they suggest in step 2: instead, I use a 1/4" seam to match the one they suggest in step 6. 

I like the 1/4" seam and I do not want to do their flimsy edge-stitch.  Fortunately maths comes to the rescue and I bring you the magic formulas for cutting continuous bias tape.

For this method, follow the Colette tutorial, but substitute my measurements.  Also, use a 1/4" seam in steps 2 and 6.

I want to make a total length (T) of bias strip of width (w).

When I come to draw my lines on the fabric (see tutorial step 4), I'll need to draw enough to separate my fabric into n strips, where n = sqrt(T/(2w).  I'll have to round up to the nearest integer to make sure I get at least length T and I don't end up with half a strip.

I therefore need to start in step 1 with a fabric square of side D = n*w*sqrt(2) + 1/2".

So, to put numbers in my example, say I'd like to make 98" of bias tape of width 1".
w = 1"
T = 98"
So I need to draw lines in step 4 to separate my fabric into n = sqrt(98"/2") = sqrt(49) = 7.  I need to draw 7 strips.
n = 7
Now I need to start in step 1 with a square of D by D, where D = 7*1"*sqrt(2) + 1/2" = 10.4"
D = 10.4".

Therefore, I ought to have started the Colette tutorial with approximately a 10 3/8" square, not a 10" square.  No wonder it went wrong!

Don't stop there: use the magic to find the square size D for however much tape of whatever width you want!  THE POWER IS IN YOUR HANDS!

Monday 11 August 2014

What happened to July?

The summer seems to be racing by and with hardly a blog post in sight!  I'm a little shocked that I didn't post for a whole month, but I'm still going to tell you what I did.

Mostly, I looked after toddler Button who is reaching new levels of excitement and energy.  I also did some paid work.

After making my ruffle dress, I decided I wanted a matching yellow cardigan, and said as much on the knitting network Ravelry.  Some kind soul (who I don't even know in real life) saw my comment and had the kindness to message me with a link to the perfect yarn she had searched out!  People's generosity on this site amazes me.  I bought the yarn she suggested (Sirdar Simply Recycled) in yellow for 59p/50g ball, which is an incredible price and cast on for Miette by Andi Satterlund.  Fortunately her group "Untangling Knots" was running an outfit-along at the the same time, where you sew and knit a co-ordinating dress and cardigan, so I thought I'd enter.  Sadly I missed the deadline by a matter of hours, but nevertheless I still have a matching dress and cardigan which I love.  Behold:

If I look manic in this photo it's because I was trying to make the toddler standing in the doorway laugh and therefore not toddle out of the house in his slippers.

This manic knitting exercise took pretty much the entire last two weeks of July.  Before that, I was drafting this dress which I have yet to test.

Since the cardigan, I had to crochet some DNA.  This is for a WI competition (don't ask) and I'm afraid I've had a bad attitude about making it.  At least it contains glittery yarn, even if the nucleotides look a bit like suppositories.  The pattern is my own, but I'm not sure I can be bothered to publish it; I'm not feeling the love for this project.


Now I'm back to my sewing machine again, this time to make a gift for someone in the month of September.  I can't say more than that until the gift is given, so you'll have to wait.

Sunday 6 July 2014

The ruffle dress: some happy statistics


I finished!  I'm delighted and I feel I can now conquer the dress world - I have freed myself from the tyranny of purchased patterns!  It's actually quicker for me to draft my own than to make the 2+ muslins required to bend the commercial pattern to my will (and stumpy frame).


I just know you love statistics as much as me (har har) so here are some handy facts relating to the dress.

50p
The price per metre of fabric (bargain basement).

4m & 6m
The quantity of fashion and lining fabrics respectively (and I have some fashion fabric left over).

4
The number of layers of fabric in this dress to guard against V(E)PL (visible ENTIRE panty line).

1:5
The inner to outer ratio of the ruffle lengths.

53
The number of components in this dress (16 bodice pieces, 20 skirt pieces, 2 sleeves, 10 ruffle sections, 4 fusible interfacing strips, 1 zip.  I must hate myself.

£8.30
The total cost of the dress, excluding thread.  (The zip was a pretty expensive addition, huh?)

4
The number of weeks to make this dress, spending only a few hours a week (life gets in the way of vital sewing time).

Sorry for the cheesy close-up, but look at the ruffles!
Next time I'll make my ruffles wider, or else use a cotton for the dress instead.  The ruffles don't look as much like the originals as I'd hoped, but probably because the material is much drapier and so they've flopped.  Spot the sleeve issue: one has fluted because I was having overlocker issues, while the other hasn't.  Bummer.  I'll just wear a cardigan.

I used a purchased ribbon as a belt because I ran out of patience to make the matching fabric belt.  If you're interested in the details, I put a concealed zipper in one of the side seams, which starts at the underarm.  Attaching the lining to the inside of the zipper tape was the only hand-stitching I did.  I used some cunning contortions to sew the lining around the neckline and armholes by machine, and again to sew the seam allowances of the lining and outer together along the waistline.  I thought the latter would be wise, otherwise the weight of the skirt could pull the stretchy bodice lining down and make my hem wonky in a weeks' time.  It also hides all my unfinished seams inside the bodice (overlocking would add too much bulk here).

If you're interested in further geekery, here's how I managed the four layers in the bodice:
1x stripes + 1x lining basted together and sewn as one for the outer
2x lining basted together and sewn as one for the lining
... meanwhile, I let all four layers hang freely for the skirt.  The skirt has french seams throughout, which were dull as hell to make.

I really want to knit or crochet a yellow cardigan to go with this dress.

Overall though, I think it's a dress win.  Not too bad for such difficult fabrics, and I've always wanted a dress like this.  Also, it's really comfortable and I've had a big lunch at a lovely party in it today, and I can still breathe!

Saturday 5 July 2014

Step up to the drafting challenge

After the fun of the ruffley-nightmare* dress (bad memories fade fast), I feel the need to up the pattern drafting challenge a bit.

I've always liked this pattern:
Image courtesy of Burda Style, see above link.
It's from an old December 2011 issue of Burda Style magazine that I bought.  The magazine contains the pattern (indeed lots of patterns: you should try it!) but I anticipate hell times trying to add a full-bust adjustment and stumpy-me adjustment and everything.  I'm going to draft the pattern myself from the technical drawings, but using the existing pattern to match the size of pleats and gathers.  I'm going to make some style changes too: I'll probably have the waistband narrower and sitting below my bust (rather than partially over it, like the models who have smaller cup sizes).  I'll also add a modesty panel like most other people who've made it.

Obviously I won't be making this up in the peach crepe in the photo, because I don't like to look naked from a distance.  I have a choice of maroon or navy polka-dot fabric, because anyone who's been fabric shopping with me knows that spotty fabrics are my weakness.

Wish me luck!

In other news, I'm wearing the ruffle-bonanza dress for the first time tomorrow.  If it's not a rainy monsoon outside, I'll try and get Mr B to take photos.

* I always spell it "knightmare" first time, and have to delete the k.  That was the best TV programme ever, so I'll forgive myself this typing tick.

Monday 23 June 2014

Two new babies

By the time you read this post, it will be very old.  I'm writing it before I've given the gifts away, but I'll not post it until the little recipients are here.  (Currently they're probably 9 weeks away.)  I've been knitting.

For little girl, we have:


The pattern is "in threes" by Kelly Herdrich.  The yarn is Fleece Cottage Yarns Merino DK in colour "slowly eating custard pudding", as mentioned here.  I had a whole skein untouched with which I made this cardigan.  I must still have almost a skein left over!


For the little boy, we have:


The pattern is a mix of "poseidon" by Amber Bertram, and "owl baby vest" by Jodi Haraldson.  I used the size and construction of poseidon, and just switched the cabling for the owl cable from the second pattern.  I just preferred the shape and neckline of the poseidon sweater, so that's why I went for that.


By complete accident, the dark sections of the yarn ended up just above and below the owls, making them stand out (which was lucky). I did put a bit more thought into how the colour would change when I picked up the armholes and neckline, but I didn’t bother unwinding yarn to reach the right part of the colour-change: that would loose half the ball as the colour changes are so slow!


This was my first time to try steam blocking acrylic by pinning it out dry, then blasting it from 2cm above with my iron. It worked, actually! The photos don’t do justice to the delicious forest green-ness of this yarn, which looks much better in real life.  It's soft and slippery, but has a slight haze at the same time.  I made TButton a jumper from this when he was a baby, which he wore and wore.


So there we have it.  Two jumpers completed for two babies ahead of due date, and using up left over yarn skeins.  I'm feeling very organised and smug now, but I'm sure it won't last: I'll probably forget a birthday next week and spend too much on more yarn.

Saturday 21 June 2014

Cascading ruffles: a happy how-to

Ruffles remind me of bad 80s wedding dresses.  Especially the kind of ruffles that are gathered where they attach to the seam: eugh.  They stick out all stiff and bulky.  I do not like this kind of ruffle.

I do like the sort of ruffle that attaches to the seam smoothly, but then flares out along the loose edge.  That feels a bit less granny and a bit more modern.  These ruffles cascade beautifully, instead of sticking out nastily.  See the neckline of this pretty dress by Kathleen at Grosgrain Fabulous:


How to make such elegant ruffles?  We can deploy the magic of maths*!

For the ruffles to fall as they do, the outer (free) edge must be longer than the inner edge (attached to the garment).  Cutting a strip of fabric on a curve gives you an outer edge longer than the inner edge, so Bob is your uncle (or in my case, my mother's aunt). 

For extreme ruffles like the above dress, it turns out that the outer edge of the ruffle must be about 5 times longer than the inner edge (go on, measure it on your screen with string!).  The curve to do this will be so extreme that each end of the strip will meet, i.e. you'll cut out a circle with a hole in it.  Actually, whatever length of ruffle you need, it's easier to calculate as a section of a circle.  I like to calculate what I need to make, rather than trial-and-error cutting.  Fabric is expensive but a little time spent in thought before you cut is free.

First, decide on the width of your ruffle, we'll call it "W".  I want my ruffles to lie on my shoulders like the dress pictured above, so I'm going for a width of W = 8cm.

Next, decide on how much longer you want the outer edge to be compared to the inner edge, call this "X".  For extreme ruffles, I like X = 5, which means your outer edge is 5 times longer than your inner edge.  Lower values of X will give smaller ruffles, while bigger values will ramp up the ruffle mania.

Now imagine drawing two concentric circles (a.k.a. a picture of a doughnut).  The inner circle will become the edge you attach your ruffle on, while the outer circle defines the edge that waves free in the breeze.  Okay, you need to slice through your doughnut at the end to get your curvy strip, but that's fine.

Your generic ruffle pattern.  You're welcome.
The inner circle has a circumference of C = 2 x pi x r, where r is the radius of the doughnut hole.  We'll work out what C and r are going to be in a minute.  The outer circle has a circumference X times larger, because that's the type of ruffle we've chosen.  So, it'll be "X x C".  The radius needs to be r+W, so that when we cut our doughnut open, we have a curvy strip of width W.  So, the equation for this is (X x C) = 2 x pi x (r+W).

Like me, you were probably forced** to take a GCSE (or equivalent) in mathematics, so you can solve your two simultaneous equations for r:

C = 2 x pi x r
X x C = 2 x pi x (r + W)

Full marks if you got the solution r = W / (X-1).

For my happy case of X = 5 and W = 8cm, you get r = 2cm.  So, you draw a doughnut with the hole having radius r = 2cm and the outer edge having radius r + W = 10 cm.  Easy!  (Don't forget to add seam allowances, and finally cut though that circle to get your strip in the manner suggested on the diagram.)

How much ruffle does one circle buy you?  For this you'll be wanting the circumference of the inner circle, which is the edge you'll use to attach your ruffle.  That'll be 2 x pi x r, which is about 6 x r.  For me, that worked out at just over 12cm.  To get a longer bit of ruffle, you'll have to cut out many circles and join the strips together along the straight-cut edges in a tedious manner.

At the end of your ruffle, cut the edge into a pretty curve (see dashed line).

Hemming your ruffles is a pest because of the curve.  You can use a rolled hem on an overlocker in matching (or contrast) thread for minimum hassle, but you have to be okay with that look.  Otherwise, enjoy your painful rolled-hemming!

* I am prepared for more ridicule by posting this.  It's not as bad as the peg bag tutorial though.
** mandatory but it was a pleasure!  ;-)

My ruffle hell

It's been slow progress on my exciting knock-off ruffle dress.  It's been compounded by not being able to use my noisy machine during TButton's nap times, but being either out of the house or doing paid work at all other times.  I'm only snatching 5 minutes here and there.

I've managed to cut the dress out.  I've been worried about visible-entire-panties (never mind VPL), but I've managed to make the dress 4 layers thick.  I got 3 copies of every pattern piece out of the under-6m of light grey stuff, plus a single layer of the stripes.  Of the 4m of stripes I bought, I probably have over 1m left.

The fabric turns out to be 50p/m of pure hell to sew.  The light grey stuff I'm using as lining turns out to be quite stretchy and probably a knit, while the stripy stuff stretches like crazy on the bias.  Both fabrics are super drapey and slide all over the place.  Their only saving grace (apart from the price) is that neither fabric frays too much.

I've sewn all the bodice darts and the centre back and shoulder seams.  I then used the magic of inkscape to trace around the edge of the ruffles in a photo of the dress I'm copying, and compared the length of the ruffle-y edge to the length of the neckline.  It turns out the ruffles are probably 1:5 or 1:6 (wowzers), so I've gone for the 1:5 option.  I should probably do a tutorial on how to make these ruffles.

After much ruffle assembly, I've attached them to the neckline and sewn in the lining around the neckline.  My next plan is to top-stitch the lining down around the neck, but hiding the top-stitching under the ruffle.  I hope this will stop the neck gaping open, but who knows if it will work as the ruffles are so heavy.  I added a fusible interfacing strip around the neck too, but I'm not sure if it's enough to stop this dratted fabric stretching out of shape here too.

Ruffles!

Next I'm planning to install the cap sleeves and attach the armhole lining as per this timely tutorial posted on Elegance & Elephants yesterday, just as I was considering how to do it!  Then it's french-seam time on 4 layers of skirts *yawn* and the hell of an invisible zipper into 2 layers of this &^"£* fabric.  At least the edge finishes are quick with the overlocker rolled hem feature.

ARGHHHH I don't even know if this dress is going to be wearable and it's taking forever!  Give me some nice non-stretchy cotton any day...

Friday 13 June 2014

For my next trick, I'm going to (attempt to) make this dress...

I'm going to regret posting this when you see the effort I manage to serve up next week (ha ha).

For my next trick, I'm going to attempt to make a knock-off of this knock-off.  I can't find a picture of the original dress, but Kathleen at Grosgrain Fabulous made her own copy of a maternity dress which looked like this (her version):


I really love the combination of cascading ruffles around a v-neck with the blue pinstripe fabric, and I used to have a top from H&M that had a similar look.  (Yes, I wore it with a mustard cardigan.)

I'm not actually expecting a baby (before you ask) - so I'll be making a non-maternity version of this dress.  Nevertheless, I'm keeping the front box pleat to hide my saggy post-baby tummy...!

I'm pretty sure my dress is not going to turn out nearly so nicely, but here goes.

Pattern


I'm making my own from scratch, using a copy of "Dress Pattern Designing" by Natalie Bray.  I've never drafted a pattern for myself before (only for the toddler), so it's an adventure.  I've made two muslins so far: one of my basic sloper, and one of the dress bodice (minus ruffle explosion).  I've no idea how Kathleen has done her skirt (other than her comment that it is bias cut), so I've opted for a half-circle skirt with a 6cm box pleat, divided into 4 panels to align with the four waist darts.  Unlike the dress I'm copying, I'll be adding cap sleeves and a side zipper.

I draft my patterns on the computer in Inkscape, because it has several features that take the tedium out of drafting by hand on paper:
  • Ability to make lots of copies quickly to test changes and keep old versions
  • Easy to measure curve lengths (a few mouse clicks) rather than faffing with a tape-measure held on it's edge
  • Super quick to add seam allowances before printing
The disadvantage is that like most CAD systems, you get a really skewed idea of the size of the object from working on the screen.  It's hard to have an intuitive feel of the feature sizes.

My bodice pattern... uh oh!


Fabric


I picked up some navy and white stripy chiffon-y stuff for 50p/m in Walthamstow, and some pale grey chiffon-y lining.  Who knows if I'll have enough, but at least it was cheap!  I've never made an entire garment from such light fabric either, to I'm setting myself both a pattern drafting and a sewing challenge.  You can see why I'm not confident in the results.  ARGH!

I'm planning a overlocker-based rolled hem on the raw edges of the fabric, and I'll probably have to french-seam it up in most places.  I'll go for a single layer of chiffon for the sleeves, but I think I'll need three layers of fabric in most other places to stop the dress being transparent.  (Nice!)

I wanted to do some shearing in the back bodice to allow more freedom for heaving the toddler around, but I think that's a challenge too far at this stage: both for the pattern drafting and the chiffon-sewing.

Now I've posted this, I'll clearly be forced into actually cutting the thing out now.  This may be a record for impulse-fabric-purchase-into-dress time, but I'll hold onto that thought for now just in case it's a "straight-to-bin" project.  It'll certainly be a challenge.

Tuesday 10 June 2014

How now brown babydoll dress

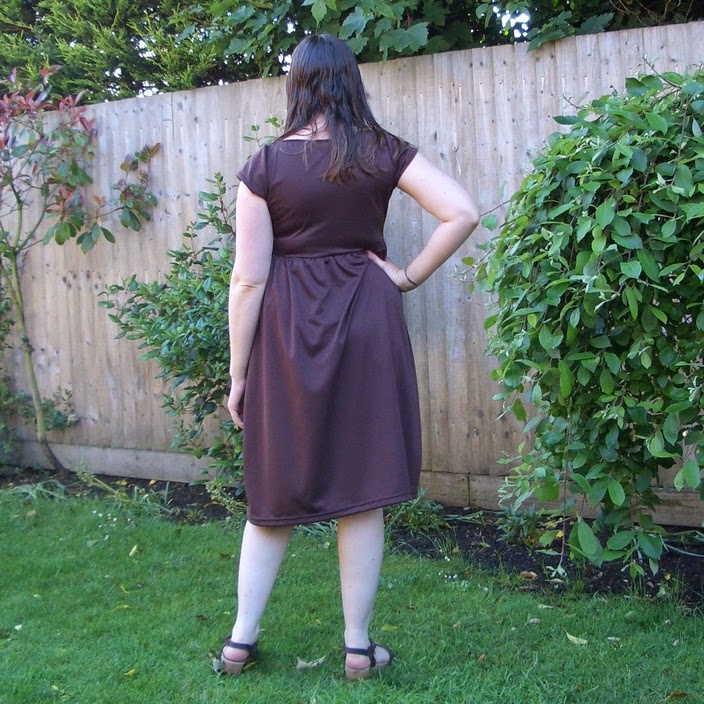
I thwarted my machine to conquer twin needle stitching, and I have thwarted the fit of the "Sew-U home stretch" babydoll pattern.  See here for unfortunate fit issues and sad faces on my cheap toile (which I am actually still wearing as a dress even though it sucks apples*).

* I don't have that many clothes.


I made the following adjustments:
  • Remove 3/4" from shoulder seams (yawn) as I always do
  • Make front neckline less deep
  • Make 1 1/4" full bust adjustment and rotate out the resulting dart (see here)
  • Take in a tapered amount on the side seams from 1 3/8" at the waist up to nothing at the underarm on both front and back pattern pieces
  • Add 1/4" elastic at the waist seam before gathering and attaching the skirt (it's a lot of weight and bulk for that seam to carry without stretching).
  • Remove 2 1/2" from the height of the sleeve cap to (a) match my smaller armhole from lopping off height at the shoulder seams and (b) I hated the gathers on the sleeve cap, so they're gone
  • Cut the sleeves down to cute cap sleeves for the summer
I had thought that £3/m was cheap for the first toile, and I splurged at £3.60/m for this brown interlock knit from myfabrics.co.uk.  I now know this to be expensive compared to the £1-£2/m I could have scored in Walthamstow.  Oh well.  I need another trip there to buy more jersey so that I can spend £12 to get another 6-12 dresses.

I have wet hair, not super greasy as this photo suggests: eugh!

I quite like brown, and I wanted to try sewing with interlock.  It's quite nice to handle: very drapey but quite stable and not particularly stretchy.  This fabric is a bit to shiny for my liking, but it was on sale and cheap.

Jersey dresses and cameras with self-timers balanced on clothes airers allow you room to swing your toddler around in his home-made shorts.

Despite the anger that the twin needle involved and the fixing of the machine and walking foot, it was totally worth it for the professional ready-to-wear look it gives!  Cheers for my birthday present, bro!  :-)

Sunday 8 June 2014

I have actually spent some money on fixing my sewing machine.

I am about 3 hems away from finishing a short-sleeve babydoll dress for meeeeeee in brown interlock knit.  I have now spent several hours fixing my sewing machine and feet before I can finish it and it's driving me bananas.  I still haven't finished my dress.  On the plus side, I'm winning.

Read more of the gripping tale below:

Thursday 5 June 2014

New crochet pattern: Fenland Vegetables

The crochet patterns for Fenland Vegetables are now available!  For just £1 you get the patterns for turnip, butternut squash, beetroot, leek, cauliflower, two widths of carrot and parsnip.  In addition, you get both UK and US terms on appropriately sized paper (A4 or US letter).  Is that a deal or is that a deal?


The pattern has been fully tested by some lovely people on Ravelry to whom I owe a debt of gratitude.

Buy it now in my Ravelry Store for just £1!  The pattern is digital and will zoom to you with all the efficiency of the internet.  Woop!

Sorbetto II: the yoke edition

I finished another Sorbetto!  It's so quick to run these up now I've finished all the pattern adjustments.  I so rarely make the same thing for myself twice that it's a real pleasure to keep sewing without stopping to have fittings/stick pins in myself.

More self-timer shots in my kitchen.  Lucky you.

Sorbetto II is a yoke design without the central front pleat.  More of which after the jump:....

Friday 30 May 2014

New multipack vest extenders!

There are new mixed fabric selection multi-packs of vest extenders in the shop!
Get them while they're still there!  :-)

Thursday 29 May 2014

Heads still be growing, I still be sewing.

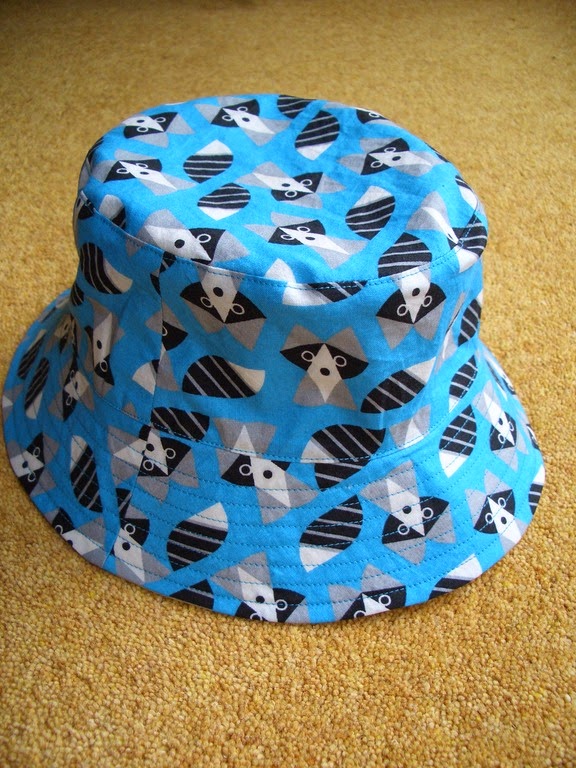
I have made many ... reversible ... bucket hats from this pattern by Oliver & S.  Toddler Button keeps growing, so I have been forced to stitch him a new hat for the sunny days.  We're now in size M (19") which sadly means there is only one size left before I have to draft my own hats.

Behold the epic new hat on a theme of racoons, with a sunny yellow reverse side:


I've got construction down to a fine art now, and I've eliminated all hand-stitchery.  It's charming but I don't have time for that malarky.


Do you want to know my non-hand-stitch secret...?


Alright, here it is:
  1. Construct the brim in it's entirety,  including the top-stitching.
  2. Construct both caps individually including the top-stitching around the top of the crown.
  3. Pin the brim to one of the caps, right sides together and machine stitch around with a 3/8" seam allowance.
  4. Stitch around a short distance (only 2-3") of the same seam but with the usual 1/2" allowance the pattern dictates.  In this area you'll have two rows of stitches.
  5. Pin the second cap around the same seam.  For this, you'll have the two caps right-sides together with the brim all squashed up and sandwiched between them.
  6. Sew around the seam with a 1/2" seam allowance, leaving a gap of 2-3" matching exactly where your double-line of stitching was.
  7. Trim and grade your seam allowances, so the cap allowances are 1/4" and the brim allowance is a shade more.
  8. Turn the hat right-sides out through the gap and press the seam flat.
  9. Close the gap left from turning the hat out, which will only appear on the inside of the hat (due to your careful double-stitching on the other side).  Press the seam allowance in this area appropriately and pin the gap shut.  Carefully top-stitch around the whole hat on the sides, which should catch the gap shut at the same time.
  10. Superb!  A hat with no hand-stitching!

The squashed on floor look: how the hat will spend most of it's life.

Hats look better on heads, so I'm sorry for the floor-based pictures.  It's raining and TButton has the lurgy, so there is no hat-wearing today.  He had a tantrum when I put his old sun-hat in the washer and the new one just wasn't the same (apparently), but I think he'll be over that soon.  I'm aiming to appeal to what remains of his 6 month long obsession with the colour yellow.

I got the fabrics from Backstitch at Burwash manor.  A lovely shop!  :-)

Sunday 25 May 2014

More Mizzen Shorts

The last pair of shorts were so obnoxious* that I had to immediately remedy them by making some more in nicer fabric.


These shorts are in a nice pale blue linen-type fabric that drapes beautifully.  The blue is actually a soft sky-blue, not the bright shade my computer is currently rendering for me.


I went all-out with some back patch-pockets, but didn't do as much top-stitching as I'd have liked because a) I thought I was about to run out of matching thread, and b) I was bored of making the shorts already.


I went for the super-low-opening fly again, with concealed poppers.  It totally works for me, and this time I remembered to put the poppers in before finishing the fly top-stitching.  Wow!  However, I didn't remember to put the elastic in before closing the waistband, so never fear: my seam ripper still saw some action.

I'm so glad to be done with these.  I've got a lot of vest extenders to make now (the shop is empty), but more excitingly I've got some super scrummy birthday yarn to knit with and some epic 50p/m bargain fabric from Walthamstow Market to sew up.  Sorry TButton: Mummy knows you need more shorts and vests and a raincoat and a hat, but Mummy wants a new blouse.  Too bad.

* I went to the park with TButton wearing the terrible union shorts and this soldier shirt (because it was the only one that matched), and then realised it was a terrible UKIP-style combo.  I almost felt I should apologize to the other mothers...  ARGH.

Monday 19 May 2014

Little fox-and-dots hat for a little head


A colleague of mine is having a little baby!  Hooray!  I couldn't resist the urge to make baby a little hat a week ago.  I hope it will fit: I made size XS, but it's supposed to be for 6-12 months and baby is not here yet.  That said, XS was too big for some of TButton's friends at that age, and much too small for TButton.  So hopefully it will be sunny at some point when it fits the new baby.  The pattern is from Oliver & S here.


I was super-excited to find almost a full fat-quarter of fox print fabric in my stash, and then fortuitously a pale blue dot fabric which is completely non-related but matches so well!  Plus, the hat is reversible.


I tried a different construction method this time, top-stitching the brim before attaching it to the hat.  I then used a cunning technique to attach both sides of the cap to the brim without any hand-stitching.  Honestly, who has time to hand-stitch?

The whole hat only took a few hours.

UPDATE:  Baby is here!  It's a girl!  Happy birthday little one, and congratulations Mummy and Daddy!

Sunday 18 May 2014

B-o-r-i-n-g nappy pants.

I'm a big fan of me old cloth nappies.  Not because I'm a tree-hugging earth-mother type, but because they work better for me than disposables.  I actually don't mind doing laundry, and I'd rather wash the nappies than endless sets of soiled clothes.  We have Tots Bots bamboozles, which are a bamboo-based two part shaped nappy.

Anyways, little Button needs boosters now he's bigger, which are just an extra absorbent layer.  Tots Bots old-style ones are no longer for sale (boo hoo), and although their new ones are excellent, they're a bit more pricey when you need 12 more boosters for daytime wear.

I elected to make his new boosters myself, using fabric from Plush Addict, who had 20% off nappy making supplies during real nappy week.  I went for bamboo velour for the outside, with a single layer of Zorb sandwiched in the middle.

The bamboo velour has a super slinky drape and quite a lot of stretch.  The zorb feels like a very dense rough quilt batting, almost like felt.

Apparently, the zorb shrinks quite a lot in washing, but you can't pre-wash it or it will fall apart.  Therefore, I bring you the cunning cutting sizes, as determined by my own experiments.

For 1 booster:
2 pieces of 12cm x 30cm bamboo velour
1 piece of 12.5cm x 32cm zorb

Because the zorb is 115cm wide, and the velour is 150cm wide, you can manage to get 13 boosters if you plan your cutting carefully by buying only 0.5m length of zorb, and 0.75m length of the velour.  (I didn't care whether I cut on the lengthways or crossways grain; they're just nappies.)

To make up, I found the best method was pin the zorb inside the bamboo layers, stretching the velour to meet the edges of the zorb all round.  This is not a problem as the velour is so stretchy.  The right-sizes of the velour should be outside.

Next, I used my machine to sew around the edges with a zig-zag, making the corners curved slightly.  I found it much easier to hold the pieces by machine stitching first, (before the overlocking stage) as they're really stretchy and slippy.

After machine stitching, I trimmed the corners into a curve with scissors and overlocked around the whole edge with a 3-thread overlock.  I found I had to increase my stitch width (compared to how I'd set it for woven cotton), and 4-thread overlock didn't work so well.  I know the overlock cuts and sews in one, but I still got better results by trimming the corners with scissors first; it was all too much for the poor machine otherwise.

The booster looks all contorted from the oversize zorb inside, but after washing it shrinks to match the velour and voila!  We have a delightfully flat booster!


I did this 13 times.  B--o--r--i--n--g.

Saturday 17 May 2014

It's hot; I have made shorts.

Brits abroad!  Whoa!

It's all sunny and TButton doesn't own a single pair of shorts!  Let the crisis-sewing commence.

I drafted some shorts in "age 2" from the Aldrich book (which I have many reservations about, but at least the baby trouser block is reliable for cloth nappies).  I wasn't sure if the shorts would fit, because he was asleep when I drafted them so I couldn't take any measurements.  Therefore, I was determined to make them from some fabric in my stash that I wasn't keen on and I'm certainly not keen on these shorts!!!

The good news is that they turned out to fit pretty well.  The bad news is that he's now going to have to wear them if it gets any hotter.  They remind me of shirtless overweight motor-boat owners holding cans of lager.  (Sorry.)  Brits abroad!  ARGH!

I didn't have enough cotton flag fabric or blue polycotton to make the full shorts, hence the mix-and-match legs.  I was hoping that plain blue would tone the flags down a bit, but somehow they're even worse.  Mum gave me the flag print to make myself a Geri-Halliwell-style union dress about 12 years ago, but the fabric wouldn't even union-up my left leg now (boo hoo).  Sorry about being rude about your fabric, Mum.  I hope you like the shorts!

The back is still nasty!  Woo hoo!
 
The back has an elasticated waistband, but the front waistband is plain.  There's plenty of room for his cloth-booty.

No about of clever fly detailing will make these shorts a pleasure to put on.
I made a super-low-opening fly to make them easy to get on, with sneaky poppers that are hidden when they're closed.  The waistband has a button fastening with some slightly aged white button I found in my jar.  He's lucky the button wasn't pink.

At least I know the pattern is okay, so I can make more shorts in less nasty fabric.  I've got some reasonable denim and some pale blue linen, and I might buy him some nicer beige twill.  Meanwhile, at least he's not going to swelter in trousers.

I named the pattern "Mizzen Shorts", which is a pleasing sail reference.  After some sail fact trading with Mr Button (who has never heard of a Rotor Sail), he alerted me to the Water Sail.  Wow, that's a funny sail: looks like the boat's pants are falling down.

EDIT:

It got really hot this afternoon, and TButton tried his new man-wear to play with some water in the garden.  Rock those shorts, Toddler.