Showing posts with label review. Show all posts

Monday, 16 March 2015

Ottobre 1/2015 "Elvis" shirt

You can tell when I've got a small baby feeding at all hours of the day and night, because my blog posting frequency suddenly goes up!  I've already read the entire internet, so I've resorted to adding my own content... ;-)

I finally caved in and bought myself my first issue of Ottobre magazine as a treat, a few days before baby Button II arrived.  I was so excited to unwrap it on the postnatal ward (although obvs not as excited as having baby himself).  So many lovely designs to make for the boys!

The main reason to select this issue was the shirt (design 20):

Shirt from Ottobre 1/2015, page preview pilfered from their site.

The sizes start at toddler and go up to about age 12, as I recall, so I am hoping this pattern will see me through the next 10 years at least!  Shirts are what I really like to make for Toddler Button, although I like the cool trousers in the image too, so he might be getting a pair of those.  I just wanted to spare myself drafting shirt patterns constantly and focus on sewing them.

Anyway, the shirt has cuffs and a yoke, which I'd always wanted to add to my own patterns.  Sadly, turns out that the yoke is stylistic only, and not double thickness in the original instructions (as it would be on normal menswear), but there is no reason why I could not cut it to be so.  I'm also planning some yoke style changes to mix things up in the future, and maybe a re-draft of the cuff plackets,  These are all speedy and minor drafting changes though, and should be fun.

I was quite nervous to cut into the fabric because I had some real concerns about the piece designs I'd found on the pattern sheets.  Firstly, the left placket looked narrower than I was expecting, especially compared to the tiny schematic of it they print with the instructions.  Secondly, I wasn't sure where to add seam allowances.  They state "The patterns include hem allowances, placket extensions and placket facings.  When cutting out the garment pieces, add seam allowances of approx 1cm ... to each edge of the pattern."  Indeed, the placket patterns had marked seam allowances on them, but the front opening of the shirt didn't have allowances marked, so I wasn't sure if this was included under the placket rule or not.

The shirt front has two cutting lines marked "left" and "right" for the different sides.  The right button placket is supposed to be narrow for style reasons, and the left placket has a more normal width.  In order to have the collar stand fit the neckline correctly, once the plackets are inserted then the front pieces should finish along the line marked "left".  Since I was super confused about how to get this to work, I ended up re-drafting a new pattern for a placket 2 x 44mm in width, adding the 1cm seam allowance at each edge. I cut two new plackets to my re-drafted design, cut both fronts down to the "right" line, then applied my plackets with a 1cm seam allowance.  Both plackets are now identical, loosing a style feature, but at least the shirt has gone together.  Reading back the instructions with hindsight, I can see how the left placket was supposed to work (and yes, you do need to add a seam allowance down the front), but I'm still confused about the right one.  Perhaps all will be clear next time.
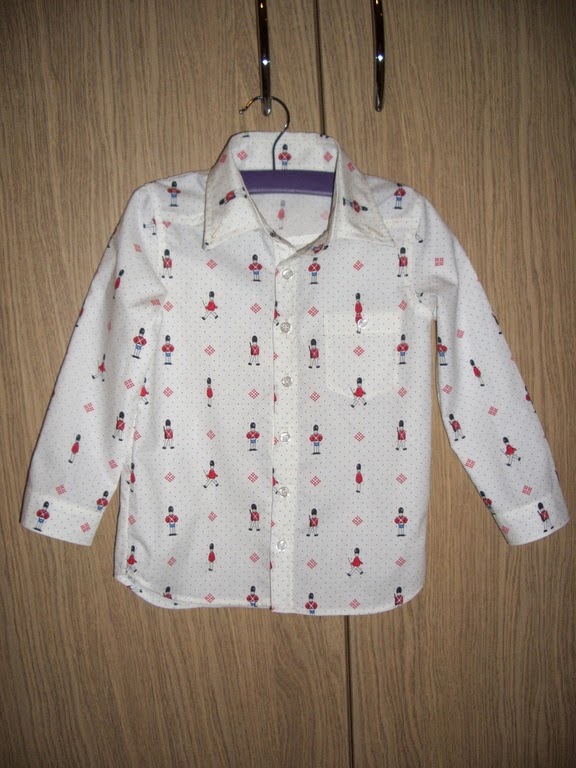
You don't get good garment photos on this blog until I get spare time during the day with two hands!

I made the 98cm size in our old friend the Laura Ashley soldier fabric.  It's probably the last shirt I'll get out of it (boo hoo).  I tried super hard to match patterns on this shirt, but there are still a few things I'd do differently with the pattern placement, especially now that I know how the front plackets work.

In other news, the cuff plackets were easier to figure out than I expected (I couldn't find their suggested method in a brief flick through this book so I did a trial run on scrap fabric).  Also, the sleeves went in without fuss, and I overlocked and topstitched the armhole seam after clipping it, so it lay flat.  Not sure why I never thought to clip the seam allowances at the armhole before (clearly I was being dense), so I'll chalk another one up to the learning experience.  I'm still a bit rubbish at getting the hem done neatly and easily around the side curves.  I wanted to do a rolled hem, but there was no way the thick plackets and seam allowances were going to feed through my rolled hem foot so I did a double turned hem instead.

Check out that pattern matching!

I'm really pleased with this pattern overall.  I love the little details like the collar and pocket buttons, and I'm hoping the slim fit will look really smart on.  I can't wait to make more of them!  I massively underestimated the time it takes to sew it with two small children under 3.  I'd quite forgotten how much work goes into a shirt with all the seam grading and top-stitching.  However, the complexity is exactly why I love to make them; a t-shirt just wouldn't be so satisfying.

The shirt is for Toddler Button's little friend.  It's my payment for the amazing Pocoyo birthday cake his kind and talented mother made for Toddler's birthday in December.  I hope it fits him!

In other news, I am really disappointed with the range of shirting and printed dressmaking cottons available online.  I want to make more funky and bold shirts for Toddler, but all the cotton poplin and lawn is turgid floral patterns that even I wouldn't wear.  I'm going to have to resort to quilting cottons (argh) to make cool shirts.  Toddler likes to wear shirts like Daddy, and he'd dress like a crayola box if I let him.  (Favourite outfit: grass-green trousers, blue and purple t-shirt and bright yellow tank-top.  Granny let him wear it once, because she is nice.  Mummy is a big meany.)

Thursday, 8 January 2015

Boo hoo to the saggy dressed skinny doll

I have just finished sewing the little boy doll from the pattern Simplicity K1900 which my sister-in-law kindly gave to me, and I have a LOT to say about it.


Firstly, big thank-yous to my S.I.L who was very kind to give me the pattern, and I can say with conviction that the pattern picture on the front of the envelope is very cute.  I hope you won't be cross with what I have to say about the pattern itself!

I decided to make boy doll.  I had lots of fun picking out fabrics and cutting him out and embroidering his face.  It was all fun and games until it came to turning the limbs inside out, and then it was HILARIOUS.  I followed their suggested 1/4" seam allowances, and I even made them scant 1/4", but still it was almost impossible to turn the skinny arms out through the minuscule wrists.  The pattern piece suggests the wrists are 7mm across when sewn, giving a circumference of 14mm after stuffing, which means they have a diameter of under 4.5mm.  Do you see the madness here?


Finally I prevailed without torn fabric, and it was time to stuff them.  Har-de-har.  I could just about ram a 4mm knitting needle down the arms (see above comment on the puny diameter), so I managed to use a combination of the knitting needle, tiny bits of stuffing and a kitchen funnel inserted in the arm end to cram stuffing into the hands, arms and legs.  It took me an entire evening to stuff the little blighters for a single doll.

The rest of the doll body went together easily, and although he looks a bit malnourished, I proceeded onto the clothes with hope in my heart.

I made the shirt first.  Here I discovered that they'd omitted to tell me in the cutting directions that the neck facing was needed for view D (the boy) as well as for the girls.  So out came all the fabrics to cut the extra piece.  They give no directions for seam finishes, which is fine if the doll is to sit on your shelf, but less fine if you expect it to withstand the attentions of a lively 2-year-old.  I elected to zig-zag the seams I could.

I then made the little dungaree shorts.  Very cute on the photo.  However, when it came to dress my doll, he does not look like the picture.  Sad times.  The shirt is definitely more roomy than the envelope image shows (especially around the arms) and doesn't quite come down low enough to be sure that the doll doesn't feel draughty around the tummy if he moves.  It requires careful tucking to ensure he's covered below his shorts waistline.  In addition, the shorts are pretty roomy around the hips.  I know that I followed the seam allowances correctly on the shorts because my notches all lined up to the bib part perfectly when I came to attach it, so we can discount incorrect construction on my part.  I can only assume they've cunningly pinned the excess behind the doll before the photo, or else they made the model to a better fitting pattern than the one supplied in the envelope.  That's a bit of a shame.

I had no more luck with the felt shoes.  I sewed them as directed, and this resulted in giant moon-boots that fell off his feet.  I took in an extra 3/8" at the front and re-cut the piece to correct this.  That's quite a correction to get it to look like the photo on the envelope, I'd say.


The hat is also a sad disaster.  Despite adding an extra line of stay-stitching around the brim to prevent the felt stretching, it does not sit snuggly on the dolls head as per the picture.  It looks like a sad loose bowl of custard plonked on his bonce, and comes much further down than the envelope photo shows.  I fail to see how this can go so wrong for such a simple pattern piece.  I can only assume trickery on the part of the envelope photographer.

I made three shirts, two dungarees, two shoes and a hat for my sad doll, because I'd already cut them out at the start.  I hope toddler likes him, but I won't blame him if he doesn't.


So, in summary, cute pattern envelope, shame about the contents.  Either all the boy doll clothes are wrong, or else they've got the wrong seam allowances on the doll itself.  Also, I have learned that I hate sewing titchy tiny doll clothes with a passion.  I don't think I'll be making another doll in a hurry.

Monday, 22 April 2013

My favourite dressmaking book


I guess it's not massively helpful to review an out-of-print book, but you can sometimes get it used on Amazon for £0.01, and I've seen it several times in charity shops, so you can still buy a copy if you look out long enough!  Right now there are several on eBay for 99p.

Here goes: my favourite ever dressmaking book is "The Encyclopedia of Advanced Dressmaking", edited by Annie Woolridge.  It's not really a teach-you-the-basics one, but once you've made a few simple dresses you'll be past that stage anyway.  As soon as you want to try even a simple skirt or shirt there are already techniques in here that you'll find you need.  For example, different hemming methods and when to use them, types of interfacing and when to use them, waistbands, pleats, and this is all before page 25!  Pleasingly, most of the fashions in here have come round again already (inverted contrast pleats, wasn't that 2007-ish?)

There's also a fair bit on pattern alterations, both for fit and style (e.g. sleeve types) which is pleasing, and quite a lot of pages are devoted to grading patterns into different sizes.  That's pretty useful if you want to have a stab at making patterns yourself, or the pattern you got for free/cheap wasn't quite in the right size.

The tailoring techniques section looks to have a lot of the basics, but it's worth investing in a book on that whole subject if you're going there and want to do it properly.

There's also loads on how to work with difficult fabrics: sheers, leather, fur, velvet, sequinned etc.  What I like about this book's approach is that it doesn't waste time telling you how it's easy, it just tells you how to do it right.  There are no corner-cutting suggestions, just dictums on the right way to cut a skirt from tartan fabric so that the checks don't just match, but fall in the right places on the shirt front.  That's the level of nit-picky detail I love it for.

What the book does not do is cover every technique you'll need.  I haven't found piping or invisible zippers in here (although I may have missed them).  It's not really an encyclopedia in that sense.

Unlike so many books today that have you learn techniques through projects, or have "easy" projects at the end of each chapter which turn out mostly to be ugly bags, this book saves the patterns to the last half of the book where they're printed in graph form for you to enlarge yourself.  At a second glance they do seem to include some of the techniques in the book (fur, leather, sheers, silks and lace), but that doesn't appear to have been the motivation for choosing them.  Rather, they're a well rounded selection with something for everyone, and are awesome 70s style.  There is a nightie, several coats and loads of dresses, a peplum camisole (back in fashion right now) with matching skirt, some slightly comical menswear, a dated wedding dress and some maternity wear.  For the kiddies there is a sun-dress, adorable duffel coats and a really cute sou'wester set.  Okay, some patterns look terribly dated, but quite a few are classics.

The book is published by Marshall Cavendish Books Limited in 1978.  It's worth buying just for the fabulous fashion illustrations!

Saturday, 23 March 2013

My first attempt at pattern cutting!


I'm super excited!  While baby button has been napping I've had chance to draft my own shirt pattern!

I'm using this fab textbook that my mum got me for Christmas, recommended by one of her clever friends who knows lots about these things (hello there, if you're reading!).

Anyway, I'm loving the book.  It's really clear and methodical, and I'm a big fan of neat measurements, step-by-step processes and comprehensive tables, so a big thumbs up so far.  The book also has super clear diagrams and line-art and tonnes of examples of adapting the basic blocks to loads of lovely clothes.  Probably the limit will be my imagination here.  I'm excited to do lots more, but I think the shirt will be a good simple start.

I'm afraid I have an abhorrence of books that declare "It's so easy!".  I can't help feeling that I'm not getting my moneys worth if all the difficult things worth learning from a book have been omitted.  Of course you do need to own a good book of the basics, but if the basics are repeated in the first 3 chapters of every sewing book you own, that's a lot of wasted paper.  Fortunately, since the above book appears to be aimed at students looking towards a career in pattern cutting, there's none of the "Easy-peasy!" jolly-ing along, which I find gets in the way of the content.  (It might indeed be easy, but I'm not going to give up on my project if you forget to remind me of the easiness every page.)

Anyhow, I'm starting a shirt with separate collar and stand and short sleeves in size 12 months.  I'm planning to offer shirts based on this pattern in the shop, so watch this space!  There will also be a girlie version, I think, when I get around to it.

This pattern cutting lark is awesome so far, but the proof will be in the muslin...

On my sewing table today.

Wednesday, 20 March 2013

Town shirt

While the cabin-boy was napping, I finished his shirt!  I used this free pattern, and made a size 12 months.  You don't get to see it on the model because it's still a bit big for him (hoorah), and I've made enough too-small clothes to provide a small wardrobe for other people's babies.


I love the fabric, and hoorah for it not being blue (like everything else).

Pleasing things about this pattern include its free-ness, and that you can get the shirt out of 1/2m (even when being a tiny bit fussy about the placement of the pieces in the design).  Also, it has a back yoke which is a feature I really like.


Sadly I can't offer shirts from this pattern in my shop (its not for commercial use), but it's been really useful to help me make some design decisions for my own pattern drafting.

I like the yoke, but I like it done "properly" as a double thickness.  Even though babies don't really need the extra shaping and stability, I think the extra layer makes the shirt look more finished on the inside.  However, the down-sides would be extra fabric and extra complexity.

I've learned that trying to make my life easier by sewing the sleeve seams "as one" with the side seams does not work on this pattern, as the serged seam allowance causes puckers under the arms in a shirt this small.  Maybe I'm nit-picking here, but I should have done it as the pattern directions dictate.

I was initially sceptical about the seam binding used at the shirt hem (why not just turn under twice?), but on reflection I really like the look.  That is, if I can be bothered with the faff again.

Finally, the pattern has the collar and collar stand as a single piece.  An interesting simplification, but I think I prefer ye traditional version.  But again ++complexity and fabric.

I guess I'll have to give these trade-offs some further thought.


Interested in adult shirt-making?  What isn't in "Shirtmaking" by David Page Coffin isn't worth knowing.

Friday, 15 March 2013

The walkaway dress

Re-posted from 1st August 2008:

The trouble with finding an awesome hat in the sale is that it is very difficult to find a matching dress. Of course, I ended up making one. The wonderful Mr B spotted the perfect heavyweight cotton in a shop, and I decided to make up the "walkaway dress". Butterick 6015 from 1952, re-issued as Butterick 4690.


So simple, just a few seams and darts, I thought. Only take an evening, I thought. But no. Unless you are the exact size on the pattern packet, this dress is extremely difficult to fit. My lovely dressmakers' bust, Persephone, was still wearing my wedding dress back in Sussex. Result: the long-suffering Mr B had to help me spend an evening pinning in seams and re-stitching repeatedly as I tried to remove the fullness from the back. Even so, with such a bizarre wrap-around construction, it was hard to know which seams to take in to remove the wrinkles in the back.

I have a short bust-shoulder distance to I ended up taking a few inches off the shoulders. I also had to make a new seam right down the back to remove the fullness, and re-cut the back neckline to restore the round shape.

I even tried to make a toile of the bodice before I started, but without the weight of the huge circular skirt, it is hard to know how it will hang.

To top it all off, I had bought the wrong width bias binding (too wide), and there is an absolutely huge distance round the circular skirt to cover with hand stitched blind hemming. I estimate 3 hours of hemming while watching gutter-tv.

I found a small covered button was fine to secure the dress at the back, and not visible through the heavy cotton. Instead of snaps at the front, I made loops and covered buttons with spare bias-binding to secure the front. I was worrying that poppers would pop-off during dancing and expose me to the world! Also, if you wear the dress with tights the inside front tends to ride up a bit and you have to keep pulling it down. Perhaps a slinky slip underneath would cure this.

The moral of the story is:
This pattern is probably not great for beginners because it can be so hard to fit. I would recommend re-drafting the bodice pattern completely to your own measurements before you start. Otherwise, it's a pretty fun unusual pattern, and gets a lot of comments.

For photos, see my BurdaStyle profile.