Monday 27 May 2013

A wooly week

Whoops, I've not posted in over a week!  That's not good.


What's on my sewing table is nothing, because I spent the week knitting.  I got scared because baby outgrew his last hand-knitted hoodie, so I rapidly had to finish the next size up, which only had half a sleeve left to go.  Just as well, because there isn't much growing room left in it!


After the hoodie, I got excited to knit with some Adriafil knitcol, so I bought some with my birthday pennies and started a jumper.


Finally, I finished adjustments on my Blooper shirt pattern.  I really need to draft a waistcoat and trouser pattern now; we have a wedding to go to in August!  I bought the fabric for the shirt and trousers today.

I really need to get on with patterns and stop being distracted with wool...

Friday 17 May 2013

Sewing tools: what's hot and what's not?

I thought it might be worth a quick analysis of what's worth buying if you're new to sewing, and what's not worth the cash.  I hope this will be useful!

First up, the tools which I use the most.  I'd say they're all essentials to start out, except the last item (overlocker), which is a "nice-to-have", but only for dressmaking.
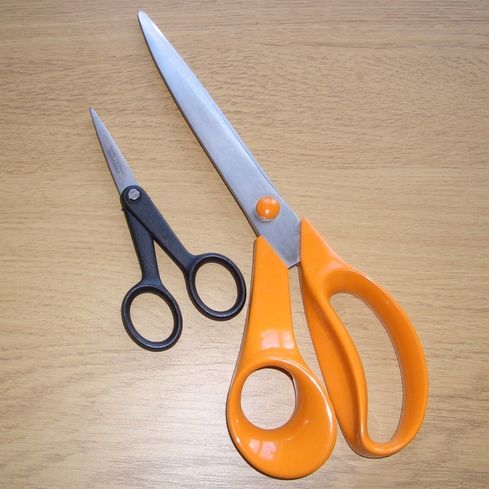
Sewing scissors:

I think it's worth having two pairs: one large pair of fabric shears for cutting large distances and one small pair of embroidery scissors for snipping small things or threads.  Never use these for cutting paper - it will blunt them and leave you with sad fabric snipping.  Boo hoo.


Tape measure:

The kind of one that rolls up into a container when you press a button may look cool, but I find the container annoying when it comes to laying the tape out flat on my fabric.  I prefer a flat non-stretch tape that has both inches and centimetres.  (I draft patterns metrically, but prefer to sew in imperial.)
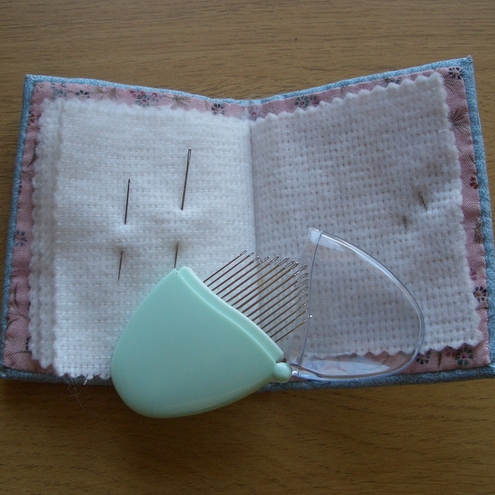

Pins:

I think the ones with a coloured glass or plastic head are easier to spot in your fabric.  Glass is probably better because you won't melt it with the iron, but I'm always too cheap and get the plastic ones.  My supply constantly dwindles because they end up accidentally in the bin attached to fabric scraps, or sucked up by the hoover.  I don't bother with a pin-cushion, I just stick them in a little pot.  Pins, Mother!


Seam ripper:

Even when you're super careful, you'll probably end up ripping out at least one seam per garment, so this is another must-have.  I find they get a little blunt with constant use, so I keep two: one for ripping out seams, and one newer one just for slashing button-holes.  There's nothing worse than using a blunt one for your button hole and accidentally tearing through the bar-tack and half the button-stand.  Almost-finished-shirt = wrecked.  :-(


Iron + board + press cloth:

This is almost the most essential tool.  You MUST work next to your ironing-station and press constantly or your results won't look very good.  Really, it shouldn't be called "sewing", but rather "ironing", as more time is spent pressing than at the sewing machine.
A boring normal iron is great, as long as it does steam.  I think a stainless steel sole-plate is best (not ceramic), but only because I know you can use nasty soleplate-cleaner on the steel ones, which is always handy to remove the interfacing glue from it when you make an error.
A press-cloth is handy to keep fusible-interfacing glue off the iron soleplate to start with.  I just hemmed a bit of cream or white cotton I had hanging around for this job.  Don't use coloured cotton: the colour will transfer!  Argh!


Hand needles:

A collection of sharp fine needles for sewing in threads, tacking and blind-hemming.  I've also found a selection of leather-work needles useful for mending jobs, but those aren't essential for regular sewing.


Sewing machine:

You can get lots of fancy-pants models, but I just have a basic Janome.  I only really use 3 stitches: straight, zig-zag and buttonhole.  A one-step buttonhole feature is nice, but probably 4-step would also be fine.  You might want a blind-hem stitch, but I prefer to hem by hand.  Some machines offer an overlock-style stitch to finish your raw edges if you don't have an overlocker, but I always found I preferred to use zig-zag for this.  Finally, you might want to consider a top-loading lower bobbin as this is easier to switch quickly for quilting.  Don't be tempted by the cute mini-machines on offer unless you're short for space or it's as a second machine.  I think you'll quickly get cross when your work won't fit under the arm: you won't have a hope for quilts.  Finally, make sure you can buy a good selection of feet for your machine.  Don't let the expense of a sewing machine put you off sewing: a super-cheapo one with just straight and zig-zag is really all you'll ever need for most things, as long as you can get the feet for it that I mention next.


Machine Feet:

Most machines come with a regular foot which does well for most work.  Additional feet which I use most often are: one-step buttonhole foot, concealed zipper foot, regular zipper foot.

L to R: buttonhole foot, regular foot, zipper foot, concealed zipper foot.

Overlocker (non-essential):

I managed for years without an overlocker, just zig-zagging my raw edges.  These machines cut and enclose the edges in one action using three or four threads to stitch over the raw edge.  If you find yourself making lots of clothes then this might be a worthwhile investment, but check out the second-hand market as many are returned barely-used by people who can't get on with threading them.  You don't really need one for home-decoration sewing and not for quilting either.  I really only use it for adult clothing.


Coming next:
The nice-to-haves and the blitzy do-withoutables!  :-)

Tuesday 14 May 2013

Blooper shirt finished!


Woo hoo!  It's complete!  All the pieces went together easily (even those dratted sleeves... I hate sleeves) so now you can place your bets on how long baby wears it for before he re-decorates the front.

The rest of the inside seams are serged.


Eventually I'm going to actually have to buy shirt buttons, unless Mr B wants to donate any more of his shirts to the cause.  I've got my eye on the pink, red and purple stripy one with the stain on the front...

Oooh plackets.

I didn't bother to interface the collar since baby shirts are so tiny and it's liable to be chewed anyhow.

I'm pretty pleased with how easy the construction was with a 3/8" seam allowance.  Adult commercial patterns always have 5/8", and this makes sleeve insertion much more difficult in my opinion.  Plus, I saved myself fabric with the smaller allowance and still had enough for easy overlocking.  A shirt in 1/2 meter: win!  (Although this did mean I had bits of selvedge in my seam allowances.)

Pattern available soon, I expect!

Time to go and dress someone in this...

Edit: It's still quite roomy on him!  This is despite having drafted the 6 month size, and him otherwise wearing commercial 9-12month clothes.  Amazingly he might actually still be wearing it at 6 months old!

Friday 10 May 2013

Bobble cushion


This cushion is a knock-off of a similar one I saw for sale in John Lewis:
John Lewis cushion

The cushion is 20.5" x 14" finished size, which meant I could just lop a bit off one side of the template I used for all the others.

The main part of the cushion is grey wool suiting that I had lying around.  Not ideal as it has a bit of stretch, so I had to be careful to use fusible interfacing on the button back.  For a tutorial on the button back, see here.  I reduced the number of buttons to two and used the same pink contrast fabric as the front.

There was an old man of the Hague, whose ideas were excessively vague; he built a balloon to examine the moon, that deluded old man of the Hague.
The front design is an Edward Lear illustration traced onto cream cotton and embroidered with back-stitch in two strands of dark grey floss.  After stitching it, I trimmed it down and pressed the edges under so that it finished as a 6.25" square.  I mounted this on pink fabric which had been pressed into a neat 7" square.  I then stitched this to the cushion front.  Each time I added a fabric layer, I secured it with machine top-stitching in matching thread.

Basting the bobbles to the front fabric before attaching to the back of the cushion.
The bobbles come on a woven strip; I had to use a double thickness to get the bobbles spaced so close.  I basted the tape along the short edges of the front piece on the right side with the bobbles facing inward toward the centre, making sure the tape did not extend further than the 1/2" seam allowance.  This meant that when I stitched the front and back together, the seam would run over the bobble-stalks.  When the cushion is turned right-way-out, the bobbles are sticking out of the seam, while the tape is concealed inside.

This tutorial is part of a series:

Sewing excitement: another shirt

I'm so excited, I finally managed to cut out a shirt for my little cabin-boy, based on my own Blooper pattern!  It's in this amazing coastal houses design by Makower, and it will be his first piece of red clothing:


Pleasingly, I got it out of 1/2 meter by some pretty stingy cutting, and so far all my seams line up.  The sleeves and collar will be the big test, though, and those are the bits I haven't sewn up yet.

I haven't decided yet whether to offer this pattern for sale yet, or just the finished shirts.  Just in case I'm taking instructional photographs as I go, and I have a volunteer who wants to make it up first (hello there!).

This clearly isn't a very useful blog post, but I had to share my sewing geekery excitement at breaking free of the commercial pattern racket.  With the exception of Burda magazine, they're getting ridiculously expensive.  Ye olde patterns had a coat, jacket, dress and skirt in one envelope; now you just get the skirt.  Bah.

I need to sew quickly: baby grows too fast!

Tuesday 7 May 2013

Chrysanthemum cushion


I made this cushion using the tutorial at sewing.org, clicky here.

Not much to say, except a few variations I made:
  • I probably did more than 61 half-circle petals.  I just kept going until it looked right.
  • I made my cushion 16" in diameter, and put a zip in the side panel so I could use a circular removable cushion pad.  To read how I did it, see this earlier post where I did the same thing.
  • I finished the centre off with a covered button because my centre petals looked messy.
  • I didn't hand-stitch petals to the surface because I'm lazy.  I used my machine on a zig-zag stitch to baste them on.
Button centre
Cheating machine basting for lazy people
Side zipper
This post is part of a series:

Monday 6 May 2013

Sunning ourselves and not sewing

I've just written up my last cushion post (all are to be posted by the end of the week).  Hoorah!  I bet you are tired of cushions; I know I am.  Just think how bored I was by making the last one!  But then I had to make two further ones after that (which are dull and boring, so I won't share).  Plus, before that I'd done 6 seat pads.  I still have 2 cushions and 2 seat pads to go, but I can't honestly bring myself to tackle them just yet.  Bah.

The weather has been so good that I've been outside instead of sewing.  In addition, Mr Button has been flat on his back after an operation, so I've been just a little bit busy.  Pleasingly, baby fits in his Town Shirt; less pleasingly he chucked on it before I could get the camera (seriously: two minutes, argh).

In other sewing news, I finally finished the Blooper shirt pattern in the smaller 6 month size, so I'm looking forward to making it up in red coastal-town fabric.  It has lighthouses on it!

Friday 3 May 2013

Sprocket cushion


This cushion is from the amazing tutorial at Cluck Cluck Sew.

The pattern comes for two sizes, but actually you can choose any size and any number of segments by making your own pattern.  You can either draw by hand, or follow my steps (outline at the bottom of this post) in Inkscape, a free vector graphics editor which is a very useful tool (in my opinion).

I made a couple of changes to the pattern.  One was to made the cushion thicker: I went for 5" finished depth.  The other changes were to add a concealed zipper (to make cover removal easier), and to create the final shaping by sewing between two covered buttons (not just one).  I also use a 1/4" seam allowance throughout (the original tutorial uses 1/2").

The zipped side panel


Although you'll still have to snip the buttons off to remove the pad, a zip makes the whole cover-changing process easier (no stitches to unpick).  I've not seen concealed zips on commercial cushions before (only in dressmaking) but I think it's a good thing in this pillow because I wouldn't want to spoil the look with a lapped zip.  Nevertheless, I've done one with a lapped zip before and it was okay.

Concealed zipper.  Behold the pattern matching: woo hoo!
To make inserting the cushion pad easy, ideally the zipper length should be half the circumference of the cushion.  For a 16" diameter cushion this is: 3.14 * 16" = 50.24" circumference, so a 25" zip would be nice.  The longest concealed zip I could find in the right colour was 22" so that had to do.

The cushion side bits consist of three parts.  Two are 3.25" x 23.5" and one is 5.5" x 27.74".  Where did this come from?  The two parts go either side of the zipper and need to be 5/2 + 0.25 + 0.5" = 3.25" wide by 22 - 1 + 2 + 2* 0.25 = 23.5" long.  The width is chosen to be half of the finished width, plus a 1/4" seam allowance on the outer edge and a 1/2" seam allowance at the zip edge.  The length is the nominal zipper length, minus 1" (the working part of the zip always seems a little shorter), plus 1" at either end to join the fabric pieces together at the zip ends. plus 1/4" seam allowance at each end.  The third fabric piece is 5 + 2*0.25 = 5.5" wide by 50.24 - 23 + 2*0.25  = 27.74" long.  This piece completes the circumference (what remains after the 23" length section with the zipper in), and has a width of 5", but we add a 0.25" seam allowance all the way around, hence the 2*0.25 parts we added to width and length.

The concealed zipper is inserted between the two narrow fabric pieces: centre the zipper along the long edge.  We've allowed 1/2" seam allowance to insert the zip; see The Coletterie for a tutorial on inserting this sort of zip.  Finish sewing the seam between the two fabric bits at either end of the zip, so you wind up with a 23.5" strip of fabric which is 5.5" wide and has a zip in the middle.

Join the zipped-piece to the third fabric piece using a 1/4" seam at along the short edges.  You should end up with a loop of fabric which is 5.5" wide and 50.24" around the circumference.  You can now continue making your cushion as described in the original tutorial.

The covered buttons


The cushion is given shape by stitching through the whole pad with a button on the front.  I used another smaller covered button on the back too, so that the stitches didn't pull through the fabric.  To strengthen the areas where the thread passes through, I used several layers of fusible medium weight interfacing (vilene).  I ironed lots of small (2cm square) scraps on in the centre of the back cushion piece.  On the front piece, I stabilised the centre by basting a small circle of cotton on the wrong size of the fabric where the spokes meet, adding scraps of fusible too for good measure.  The basting stitches come through to the front but will be hidden by the button.

Back of cushion

After I had put the cushion pad inside, I added the buttons as follows:
  1. Thread a straight upholstery or bookbinders' needle with a double thickness of button-thread (this stuff is thick!) and pull it well through the eye.  You'll end up with four thicknesses of thread passing through the pillow in one go.
  2. Start on the outside of the centre back, passing through the centre of the cushion and up through the front piece.  Leave the tail of the thread hanging out behind the cushion.
  3. Thread the front button onto the needle and then dive back through the cushion and come out at the back, where you started.
  4. Thread the back button onto the threads.  You can now snip the threads to remove your needle and tie the 8 threads tightly.  Knot them well and trim them short: the knot will disappear under the back button.

A circular cushion pad


None of the ready-made circular ones were to my taste (too small and flat), so I started with a 24" square feather pillow.  If I were sensible (and loved mess) then I'd open it up, empty the feathers somewhere for safekeeping and sew it into a 24" diameter circle before re-stuffing.  Instead, I just sewed over the cushion pad on the outside to knock the corners off.  I didn't even chop off the empty corners of fabric, I just folded them over as I inserted the cushion.  Okay, it's still a little square, but I saved filling my house with duck-down.

This tutorial is part of a series:


[Pattern making steps below the jump!]