Sunday, 29 December 2013
Another little gift...
I had some Patons Smoothie DK left from some jumpers I made for Baby Button a while back. I really like this yarn because although it's 100% acrylic (shocker) it's actually very smooth, soft and quite chunky for a DK. It's actually hard to tell it's 100% acrylic. It has none of the horrid hairiness you get with the really cheap acrylics, and it's still quite reasonably priced. Plus, washable!
I made a little hat and mitts set for a little friend in the village who is 1 year old. I hope they fit and he likes them. The blue is not as bright in real life as it seems in this photo.
The patterns are free (and not by me either, bonus). The hat is the "Simply Spring Beanie" by Megan Grewal, and the mitts are "Fun Freebie Baby Mittens" by Amber Perry. Clicky linky, my friends.
Friday, 27 December 2013
Little loopy lamb hat
I found out with a week to go that the children had to dress up for the village nativity play (well, duh). So I spent a week making loop stitch so that Baby Button could be a little lamb. Sadly that was as far as the costume went, but he was toddling off around the church so much I'm not sure how much time he spent in the stable with the Holy Family anyway. The other lamb made it into the pulpit...
I should get this pattern tested soon so that I can sell it and you can all make your lamb hats for Easter.
You know you want to...
Sunday, 22 December 2013
Little dress for a little friend
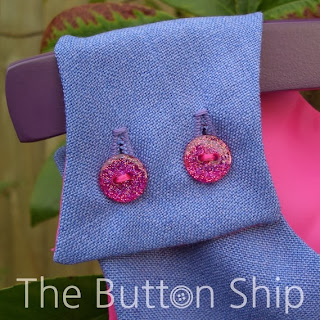
Baby Button has a little friend who is a very cute little lady. We got to give her a gift in a "Secret Santa". Even though it won't end up being that secret, I couldn't resist the chance to make her a little dress myself. Plus, all I had to buy were the buttons. THE AMAZING SPARKLY BUTTONS! Behold:
 |
| Whoa there, buttons! |
The pattern the Vivienne Toddler Jumper and it's free, see here at BurdaStyle.
I hope she'll enjoy wearing it!
Friday, 20 December 2013
Crochet christmas baubles
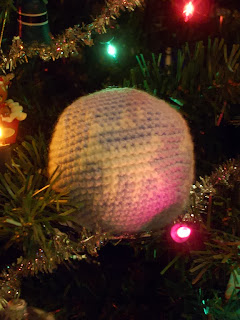
I heard that switching colours in crochet work in order to make a picture is called "tapestry crochet". I've only ever tried this with knitting (where it's known as "intarsia"). I thought it would be fun to make a Christmas Bauble with tapestry crochet.
Because it's in-the-round, the stitches are offset from the ones below and I had to make up some special crochet graph paper to draw the design. I've gone for reindeer, and I'm telling you that because I'm less-than-pleased with the result and I think you'll need telling what I was aiming for (whoops).
Firstly, I tried to align my increases and decreases to give me more space for the design. While this works with knitting (because knitting is stretchy), it doesn't work for crochet (because it's firmer) and the result is a slightly wonky and lumpy ball.
Secondly, my choice of pale blue and white was poor because there is not enough contrast to see single stitches in the design, which is why the reindeer looks like it has only three legs.
Gah. It's now too close to Christmas to fix this pattern ready for release, so I've got another 340 days to perfect this one...
Wednesday, 18 December 2013
hello space bunny
I finished space bunny!
He was my excuse to use the glittery grey wool I bought at the £1 shop. In addition, because I wanted a different challenge, he has a transparent PVC visor that I crocheted into. Good times!
Bunny is with the good kind pattern testers of Ravelry before his pattern is for sale.
He was my excuse to use the glittery grey wool I bought at the £1 shop. In addition, because I wanted a different challenge, he has a transparent PVC visor that I crocheted into. Good times!
Bunny is with the good kind pattern testers of Ravelry before his pattern is for sale.
Wednesday, 4 December 2013
Better chameleon pictures
Astute readers will note that the previous three tutorials have clearly been made while crocheting this chameleon!
I owe the internet (outside of Ravelry) some pictures of the chameleon taken in the cold light of day. I will owe my testers on Ravelry a huge debt of gratitude when they're done, since it's not that easy to make the tail!
*Pattern coming soon!* Woo hoo!
Behold the glittery beast:
I owe the internet (outside of Ravelry) some pictures of the chameleon taken in the cold light of day. I will owe my testers on Ravelry a huge debt of gratitude when they're done, since it's not that easy to make the tail!
*Pattern coming soon!* Woo hoo!
Behold the glittery beast:
Sunday, 1 December 2013
Tiny Santa Hat
Hello m'dears!
It's advent Sunday, so I've made my first batch of 14 mince-pies, listened to some carols and made a teeny-tiny Santa hat to adorn my secret Santa gift for the WI Christmas dinner tomorrow. Shhhh - don't tell or they'll know it was me! (If you are reading from my WI then I'm impressed, and don't give me away on Monday...)
Here's how to make your own, should you wish to make gift-tags or tree decorations from them. Please contact me if you find an error and I'll be pleased to correct it! I hope you enjoy it and will consider following my blog. Please don't sell this pattern or items based on it - it's for your personal enjoyment only. If you want to sell items made from this pattern then contact me and we can work something out! :-)
3mm crochet hook
tapestry needle for weaving in ends
safety pin (for use as stitch numarker)
scissors
sc = UK single crochet
dc = UK double crochet
tr = UK treble crochet
dec = decrease by dc two stitches together
[tot] = stitch total at end of round
This pattern is written in UK terms throughout. To convert to US terms, note that UK tr = US dc, UK dc = US sc, and UK sc = US sl st.
2) Join into loop by making a dc into your starting ch. dc around. [18]
3) dc around. [18]
4) Switch to red. dc around in back loops. [18]
5) dec, 7 dc, dec, 7 dc. [16]
6) 3 dc, dec, 6 dc, dec, 3 dc. [14]
7) 1 dc, dec, 5 dc, dec, 4 dc. [12]
8) 4 dc, dec, 4 dc, dec. [10]
9) 1 dc, dec, 3 dc, dec, 2 dc. [8]
10) dec, dec.
11) Switch to white. dc, then make a popcorn stitch as follows: into the next stitch, tr 5 times (all into the same stitch). Remove the hook from the loop currently on it (to leave it hanging "free"), insert your hook under the bar made by the first tr, then pull the "free" loop through. Finally, make a sc into one of the other stitches at the top of the hat to close it. Bind off and sew in ends.
It's advent Sunday, so I've made my first batch of 14 mince-pies, listened to some carols and made a teeny-tiny Santa hat to adorn my secret Santa gift for the WI Christmas dinner tomorrow. Shhhh - don't tell or they'll know it was me! (If you are reading from my WI then I'm impressed, and don't give me away on Monday...)
Here's how to make your own, should you wish to make gift-tags or tree decorations from them. Please contact me if you find an error and I'll be pleased to correct it! I hope you enjoy it and will consider following my blog. Please don't sell this pattern or items based on it - it's for your personal enjoyment only. If you want to sell items made from this pattern then contact me and we can work something out! :-)
You will need:
DK wool scraps in red and white3mm crochet hook
tapestry needle for weaving in ends
safety pin (for use as stitch numarker)
scissors
Key to abbreviations:
ch = chainsc = UK single crochet
dc = UK double crochet
tr = UK treble crochet
dec = decrease by dc two stitches together
[tot] = stitch total at end of round
This pattern is written in UK terms throughout. To convert to US terms, note that UK tr = US dc, UK dc = US sc, and UK sc = US sl st.
Pattern
1) In white, make a slip stitch onto your hook. ch 18.2) Join into loop by making a dc into your starting ch. dc around. [18]
3) dc around. [18]
4) Switch to red. dc around in back loops. [18]
5) dec, 7 dc, dec, 7 dc. [16]
6) 3 dc, dec, 6 dc, dec, 3 dc. [14]
7) 1 dc, dec, 5 dc, dec, 4 dc. [12]
8) 4 dc, dec, 4 dc, dec. [10]
9) 1 dc, dec, 3 dc, dec, 2 dc. [8]
10) dec, dec.
11) Switch to white. dc, then make a popcorn stitch as follows: into the next stitch, tr 5 times (all into the same stitch). Remove the hook from the loop currently on it (to leave it hanging "free"), insert your hook under the bar made by the first tr, then pull the "free" loop through. Finally, make a sc into one of the other stitches at the top of the hat to close it. Bind off and sew in ends.
Friday, 29 November 2013
Fenland vege-troubles
I finished five vegetables for my friend, who wanted them for an interactive exhibit at the museum where she works. I already LaTeX-ed up the pattern, so hopefully I shall have it tested at some point soon, when I'm done with the chameleon. Then I can offer the vegetable patterns for sale as a set.
In other news, I've started work on the next pattern. A glittery SPACE BUNNY. Whoa.
Now for the picture explosion:
In other news, I've started work on the next pattern. A glittery SPACE BUNNY. Whoa.
Now for the picture explosion:
 |
| Cauliflower |
 |
| Enormous Turnip |
 |
| Butternut Squash |
 |
| Beetroot |
 |
| Leek |
Friday, 15 November 2013
Crochet tutorial: how to change yarn colour
Changing yarn colour
In my Chameleon pattern, I like to change yarn colour between rounds. This tutorial shows how I like to make that happen. Once again, sorry for the tatty hands and nasty cheap yarn. Maybe I should employ a stunt double for the photos, with nicer hands. Maybe my husband...?!
I'm going to talk in UK crochet terms; you can tell this by my spelling of "colour"...! ;-)
 |
| 1) Here I am: I've made the last stitch in this round and I've come upon the marker which indicates the first stitch in my next round. (Sorry for the plethora of other pins: I took this picture when I was mid-way through inventing the pattern!) |
 |
| 2) Break the yarn, leaving a tail a few inches long. Insert your hook into "stitch 1" of the next round. (You'll have to temporarily remove your stitch marker to do this.) |
 |
| 4) Pull a loop of the new colour through the stitch. You now have two loops on your hook. |
 |
| 5) Wrap the yarn round the hook again and pull through both the loops on your hook. |
 |
| 6) You've made your double crochet! |
 |
| 7) This was the first stitch in your round, so put that start marker back in to the stitch you've just made. |
 |
| 8) Merrily keep on double-crocheting along in your new colour. In the image above, I've made two more double crochets after the first stitch. |
 |
| 9) At this point, go back and tie the two loose ends together with a reef knot (right over left, left over right). I've tilted the work towards the camera to show this. |
Labels:
crochet,
techniques,
tutorials
Tuesday, 12 November 2013
Crochet tutorial: breaking yarn with sc
Breaking yarn with a single crochet
(... or slip stitch if you're stateside)
On several occasions in my crochet patterns I'll write something like "...3 dc, 1 sc. Break yarn." (In US terms, this would be 3 sc, 1 slst.) From now on, I'm going to talk UK crochet terms.
This is how I like to perform this manoeuvre. Apologies apply with regard to my tatty hands and nasty cheap yarn. I'm not a manicure sort of girl: you can't crochet while the polish is drying.
 |
| 1) We're going to make the single crochet. Insert your hook into the stitch. Wrap your yarn around the throat of the hook (not shown). |
 |
| 4) Wrap your yarn over the throat of your hook and pull the tail right the way through the loop on your hook. |
 |
| 5) Give the tail a short tug to tighten it. Done! |
Labels:
crochet,
techniques,
tutorials
Saturday, 9 November 2013
Well, hello there, Mr Chameleon!
Finally I finished my chameleon!
There need to be more photos in the cold light of day, but since it's now winter and therefore dismal and dull, it's unlikely the light will be much better. I couldn't resist posting a preview, just in case a sunny day with no rain for outside photography doesn't arrive for weeks.
I'm pretty pleased, so now I need to write the pattern out ready for testing. I might tinker with the colour change directions a bit, for those mad enough to follow all the yarn-switching. I really recommend self-striping wool for this project instead though: the only reasons I did yarn changes were a) to check the pattern directions would be correct, and b) to use my GLITTERY NAVY WOOL. That's so exciting it calls for CAPSLOCK.
In other news, I'm still making crochet fenland vegetables for a friend and I've made two so far. Patterns and pictures for a turnip and butternut squash to follow...
Friday, 8 November 2013
Crochet tutorial: joining yarn with sc
Joining yarn with a single crochet
(... or with a slip stitch if you're stateside)
On several occasions in my crochet patterns I'll write something like "Join by making next st in 4th st from start marker. 1 sc, 3 dc...". (In US terms, this would be 1 slst, 3 sc.) From now on, I'm going to talk UK crochet terms.
This tutorial shows how I like to join my yarn by making that first single crochet before the double crochets. I'm sorry for my tatty hands (which you'll of course notice now that I've pointed it out), but they're unlikely to improve with my current mix of housework and velcro nappy fastening. Also, sorry for the horrid acrylic wool: oooh that's nasty! Anyway, here goes.
 |
| 1) Create the yarn loop as in the image above. The short end of the tail is hanging down to the right, while the yarn on the left of the picture is continuing to the ball. |
 |
| 2) Insert your hook under the middle strand, from the right hand side. |
 |
| 3) Pull the tails tight so that you form a slip-stitch on your hook. |
 |
| 5) Insert the hook into the stitch you want to join the yarn in. In my example, it's the 4th stitch from the start marker, so three stitches have been left unworked. |
 |
| 6) Wrap the yarn around the throat of the hook and pull it through the stitch, AND the loop currently on your hook. |
 |
| 7) You did it! You now have one loop on your hook, and you've made a single crochet. |
Labels:
crochet,
techniques,
tutorials
Subscribe to:
Posts (Atom)


