Saturday 22 June 2013

Snippety snip

I made a baby trousers pattern!  This could be good, because I struggle to get normal trousers on over the cloth nappies.  However, after finishing the draft I realise:
  • The pattern example in my helpful pattern-drafting book allows for nappies.  I also measured to allow for nappies.  Could he now have room for 2x nappies?!
  • The trousers will fit baby NOW!  This does not guarantee a fit at the wedding in two months' time.
Silly me.  Nevertheless, since I got this far I decided to cut some fabric for them anyway.  I found some soft black needlecord in my fabric chest so I'm going to test out the "Gennaker trousers" with that.  They're cut out and ready to sew, but I've never made trousers with a fly before, so I'll probably have my "Great British Sewing Bee" moment.

My ambition is to have elastic in casing around the back, but a smooth waistband at the front and an opening fly so that I can get the pesky things over the nappy.  The fly is intended to close with a button at the top and potentially some concealed poppers the rest of the way down.  We'll see how that goes.

I also cut out some white cotton for the long-sleeved shirt to go with the waistcoat I made.  I got the cotton for £4/yard from the bank holiday market in St Ives, but in retrospect it wasn't such a great pick.  I totally should have gone for the polycotton.  This fabric is a little too thick, not a very fine or tight weave at all, and basically looks like a crumpled bed-sheet even after I pressed it with ooodles of steam.  It didn't look so bad on the bolt, but that was before I washed the finishing out.  Added to that, I got a yard cut diagonally from the bolt.  Disaster!  The moral is that you get what you pay for, and I should inspect the fabric quality more carefully next time.  I'll report back on the quality of the gabardine and printed polycotton from the same stall when I get to them.  Probably I've just been unlucky with this buy.

Before anyone seems impressed, I'm totally bottling out of cuffs on this shirt.  It's for a baby!  I'm just going to turn-under or use bias binding.  However, I am featuring a pocket on the trousers for him to store his chewed up toast in.

The crochet stegosaurus is doing my head in.

Wednesday 19 June 2013

Sunny days; shady heads


This has to be the quickest time I've finished a project ever!  The hat was finished last night (Tuesday), and I only started it on Sunday afternoon.  I guess I was spurred on by the sunny weather and tiny alternative hat.  That, and the amazing >1 hour nap that baby took yesterday.  It's amazing what you can do in an hour if your baby actually sleeps when the pram is stationary!


The pattern was from Oliver + S (see here).  I made size "small" (19" head) and it fits quite well now; hopefully it will last at least a few months.  It is quite a nice shape: some hats can be a bit peculiar, but this one isn't.

The pattern gets you to machine together the two hat-tops (like funny brimless caps), then you create the brim.  Next, you machine one of the caps to the brim.  The final cap is supposed to be hand-stitched on.  I did this, but it's quite a faff.  I think you could totally machine it on with the following method:
  1. Make the two caps and brim as the pattern suggests.
  2. Baste one of the caps to the brim, using just less than the 1/2" seam allowance.  This is just like the original directions but using a bit less seam allowance.
  3. Pin the other cap around the same seam.  For this, you'll need the caps right-side together and the brim all squished up and caught between them.
  4. Machine all around with a 1/2" seam allowance, leaving a gap of a few inches for turning right-side out.  This seam line will mean your basting-on of the first cap won't show on the outside of the hat. 
  5. Trim and turn out.  Hand stitch the gap closed on both sides.  (One side won't technically be a "gap", but it'll be basted at a slightly different distance than the rest of the seam, so you'll still need to hand-sew to fix that.)
I used two bits of leftover quilting cotton from the Joel Dewberry "Modern Meadow" range.  The spotty one is "Acorn Chain" and the flowery one is "Sunflower".


The hat is reversible, but I prefer the spotty side.  You don't get a photo of it on the model because he's napping again.  Amazing!

Sunday 16 June 2013

On my sewing table

Today I discovered that the once-giant red sun-hat won't go onto my child's head.  I never noticed the bit where it fit perfectly: perhaps that day wasn't sunny?!  So, on my sewing table is a partially-made bucket hat (from the pattern here).  It's in some loud patterned blue cotton.

I'm also starting a trouser pattern for baby.  I just measured some of my favourite trousers and the measurements seem a world away from any of the ones in my pattern-making book.  Tomorrow I'm going to attack wriggly baby with a measuring tape and do a custom-fit job.  Watch out for either (a) a pattern that fits a baby in cloth nappies, or (b) a cross mother with some new cotton dusters.

Meanwhile, on the woollen front, Stegosaurus is on iteration 3.  I failed to note that the row starting marker moves round by one stitch every four rows in the direction of stitching, so Stegosaurus mk2 was all twisty.  Eeep.  Still not made it to the fattest part of his body!  Argh!  I cannot post photos of the attempts because they look very rude.  However, I did buy some more brown wool, either for a monkey or a lemur... clearly I am confident the stegosaurus won't proceed to mk4!

This week looks like a busy one, so I'm not confident any of these projects are going to progress too far.  Boo.

Saturday 15 June 2013

Free baby pattern: Moonraker Waistcoat


I decided to give this pattern away for free - I hope you enjoy it!

The pattern is for a waistcoat in size 6 months, although it comes up large, probably similar in size to a lot of commercial 9-12 month size baby clothes that my baby wears.  That said, he is actually 6 months old, so the size designation is good for him!  The best way to decide if it will fit your little one is to measure some of their clothes and compare it to the pattern.

Get the pattern pieces here: clicky!
Get the instructions here: clicky again!

I made mine up in some fancy silk for a wedding, but I guess you could make it for casual wear too: it would be cute (and warm) in a pin-corduroy with a cotton back.

You need to print the pattern out on A4 paper at "actual size", or scale 100% (whatever your printer offers you); I've provided you some 5cm square boxes to check the scale.

I'm pleased with the construction method I devised - you won't need to finish any raw edges for this garment as they're all hidden inside the lining.  There's just one edge to hand-stitch shut at the end.  It's all in the instructions.  If you want to save on printer ink, the last page of the instructions is a summary, so you could just print out that page for reference when you've read the rest on screen.

Please don't reproduce this pattern or sell it (or any finished garments based on it).  It's intended just for your personal enjoyment.  If you like it, please consider following my blog - I hope I'll have more patterns for you soon!

To see more pictures of my version, see this previous post.  I'd love to see the waistcoats you make from this pattern: do send me pictures if you like!

Thursday 13 June 2013

Waistcoat finished! Excitement!

My posting frequency has gone right down, I know, but that's because I've been busy working on new patterns and sewing!  Hopefully there might be a rash (or at least a dribble) of posts with exciting freebies in, within a month or so...

Anyways, as the title suggests, I'm done with the waistcoat!


Baby has not tried it on yet because I'm terrified of ruining it before Uncle's wedding day.  Even though I know there will be sick or dribble on it within 5 minutes.


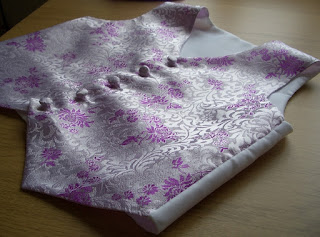
The best thing about this is the "free"-ness of it: it's just fabric I had lying around which I'd already mentally written-off the cost of!  The front is some light-weight woven silk brocade from Hong Kong which I used to make a dress for a friend about 10 years ago.  The back is several layers of "premium" white dress-lining fabric.  I think the pattern would work well in almost any fussy "special" fabric for the front, with slippy lining for the back.

Woo: covered buttons!
I'd forgotten how tricky slippy fabrics are to sew with.  It's what I learned on, so I didn't realise how fiddly they were until now, when I've had 6 months' break from them making cotton baby things.  I had a bit of bother with them fraying and stretching.  Particularly since the white lining is so translucent that you can see the selvedges through it on the finished waistcoat: frayed selvedges look the worst inside that.  I saw it on a bespoke waistcoat once and it spoiled it, so I was pretty careful about not handling the fabric too much, especially after the seam allowances were trimmed short.

I toyed with the idea of false welt-pockets on the front, but in the end I decided it was too much on such a small waistcoat.  Perhaps they'll appear on Moonraker 2.0 for a bigger baby.  It's not like he needs anywhere for all that stuff he carries around: he's got a minder for that!

My mum expressed shock over a pink waistcoat for a boy (or at least what sounded like surprise on the phone).  What do you think?  Real men wear pink shirts, right?  Plus, it's nice and wedding-y I think.

Anyway, I'm thinking of giving this pattern away for free, when I've done the instructions... any takers?

Sunday 9 June 2013

Error! Reverse the stegosaurus!

Mr Button has just pointed out to me that Mr Stegosaurus is not rotationally symmetric about his axis and that's why my crochet attempt looks like a fried egg with a head.

I've been expecting my stitches to travel 22cm over the dinosaur's back, but just 15cm under his belly.  Spot the error?  Only 15 rounds difference!  Whoops!

Back to the drawing board...

Friday 7 June 2013

Inventing crochet patterns?

Since my last post, I've managed to cut out the waistcoat fabric and sew a few short seams.  Nothing to write home about, since if I had an uninterrupted 30 minutes I could have the thing done by now!  Gah.  Never mind.

In other news, I've been wondering how people invent crochet patterns.  Is it just hook-and-guess?  I'm trying option b) work it out with a pencil.  I've drawn my stegosaurus in profile:

(don't be rude!)


I've counted my gauge with a 3mm hook and DK cheapo wool to be 2.2 rounds/cm and 2 stitches/cm in circumference.  Now I'm going to divide my Mr Stego's body into rounds by drawing lines every 0.45cm (=1 / 2.2) and calculate the number of stitches in each one by measuring off my drawing.  Then I'll set to with my hook and bravely try and accomplish this with a bit of trial-and-error to improve things.  It'll be fun to see how it turns out and I'll be writing my stitch pattern down as I go along.

Now I've published my drawing and idea on the interwebs, the final result will be a brutal display of crochet failure, I predict!  ;-)  Wish me luck!  If it works, you get a free stegosaurus pattern.  If it doesn't you get a laugh and I get a woolly duster.

Tuesday 4 June 2013

Waistcoats and giraffes

I finally finished this little guy:


He contains a highly irritating shaker, as baby likes to hit things with toys.  I used someone else's pattern, see more information at Ravelry.  Next crochet pattern is a stegosaurus which I will be inventing myself, ha ha.  More likely it will be a straight-to-bin wonder; my current drawings of dinosaurs all look a bit slimming-world.

In other sewing news, I just finished and printed out a pattern for a waistcoat.  I'm so excited to try making it!  I googled for some more sail names to name it, and I settled on "moonraker".  It makes it sound very James Bond, but it's also a sail on a square rigger.  Who knew?  I'd better use some of the more tedious sail names soon, else it'll just look like my patterns have nutty names.

Time to raid my prom-dress off-cuts selection!  I'm thinking pink flowery brocade...