Showing posts with label tutorials. Show all posts

Monday, 9 March 2015

Disassembly instructions for Janome 423S

My toddler and my 2 or 3-week old son both napped at the same time a couple of weeks ago, and my husband retreated to his garage.  I used the quiet time to take Able Mabel apart again to fix a problem I'd been having with the presser foot.

In this post, I bring you photographic help to take apart your Janome 423S sewing machine for servicing at home.  I have previously written posts on this subject here and here, and if you are looking here for advice then I strongly suggest you read both of these also.

This one describes polishing and oiling the hook and bobbin race, and this one describes in words how to take the machine to bits.  I'm going to repeat my disassembly order here, but add pictures.
1.  Remove the casing on the end above the needle.  (The screw is hidden behind a plastic cover which can be eased off with a screwdriver.)

2.  Remove the plastic screw-cover on the opposite (plug) side of the machine and remove that screw too.  You won't be able to take the side casing off from this side yet, so don't bother with that: you just need the wiggle room.

3.  Remove the plastic cover underneath the machine.  There are LOADS of screws here.  One of these (near the front right of the machine) you won't be able to remove through the hole: that's because it's to hold the purple front-plate on.  You need to loosen this screw anyway in order to get enough movement in the front plate to work the bottom cover off.  See the image below, where the screwdriver is shoved in the hole to loosen the screw inside.  Don't worry if you hear the screw drop out into the machine: you can retrieve it later.  It's my guess that Janome made a bit of a blooper with this one: the access hole looks like it's been drilled after the case molding when they found they couldn't get the machine together without wiggle room from movement in the front plate.  Whoops!

Note how I use blobs of blu-tack to store the screws next to the holes I just took them out of.  That's my top tip for not losing any fixings.

Loosen Janome's hidden blooper screw ;-)

4.  Once you've removed all the screws, you should be able to take the bottom off by hinging it towards the belt/motor side of the machine: you'll need to wiggle the front and side covers to get enough play to be able to hinge the plate off without snapping the lugs.

Hinging the bottom plate off

Behold!  The hidden screw you were loosening through that hole in the bottom plate!

With the blooper screw removed, you can see that just loosening it will be enough.

5.  Remove the top cover of the machine: there are screws under the handle and also one holding a bobbin-winding "stop" on.  There's also one on the side at the needle-end (see last image).  There's a plastic lug at the right-hand side, so like the bottom piece, the top needs to be carefully removed by hinging it toward the motor/plug side.

Screws under the handle

The bobbin-winder stop screw needs to be removed

This bobbin-winding mechanism screw also needs to come out

Don't forget this screw at the needle-side of the machine, accessible once you've taken the end off in step 1


6.  Remove the side cover over the motor/plug.  I didn't bother to remove the lilac-coloured* front-plate, as I could get the access I needed without it.

Note the small lugs all the way up the side plate.  (Image taken before top removed in step 5)
* Does not look lilac in my image as my model has faded after 12 years in the son.  It used to be lilac!

I cleaned every metal-on-metal moving joint I could find (hand-crank the machine to spot these).  To clean, I rubbed around the area with a Q-tip, and then a drop or two of machine oil did the trick.  I took a few photos (not exhaustive) of a subset of the joints.  There are more than this!


Underneath the machine, with the machine lying on its front

Inside the top of the machine.

There is a triangular cam thingy visible when you look down inside the top of the machine (next image).  This bit needs a SERIOUS clean and oil: it was responsible for my machine groaning and stiffening, threatening to burn out the motor.

The bit highlighted here is the triangular cam thingy.

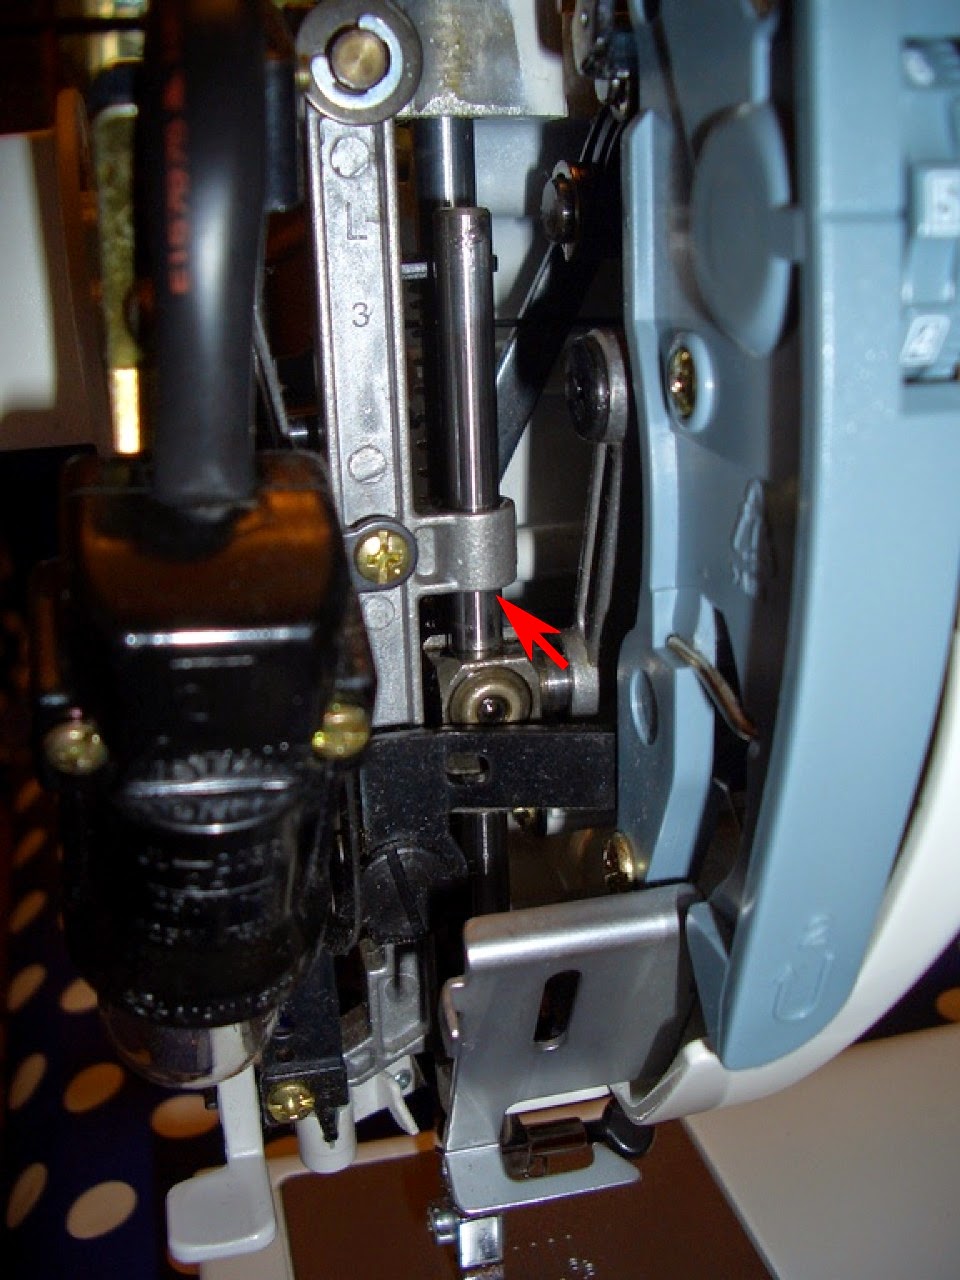
On this trip inside my machine, I paid special attention to the presser-foot mechanism, because the foot wasn't staying clamped down when I was stitching, leading to an exciting free-motion stitching experience with every project.  Argh!

Behind the presser-foot shank.  Oil the joints in the black thingy on the left, and the shank guide on the right.

Oil the presser-foot shank-guide on the front as well.

Also clean and oil the bobbin-race (see other post) to avoid nasty skipped stitches.

That's it!  If you have a Janome 423S, I hope this post helps you to get it apart quickly and without damage to the plastic work.  If you have any other type of sewing machine, I hope you feel ready to service it yourself.  It's easy!  :-)

This machine has run for 12 years with no need for any part change.  If I have to do any further maintenance excepting a clean and oil, you can be sure to hear about it here.  Lucky lucky you.  Ha ha.  There's a reason to subscribe to this blog if ever I heard one!  ;-)

They still sell this Janome model, so if you're looking for a reliable metal-bodied front-loading mechanical machine, I recommend it.  Super reliable.

Saturday, 21 June 2014

Cascading ruffles: a happy how-to

Ruffles remind me of bad 80s wedding dresses.  Especially the kind of ruffles that are gathered where they attach to the seam: eugh.  They stick out all stiff and bulky.  I do not like this kind of ruffle.

I do like the sort of ruffle that attaches to the seam smoothly, but then flares out along the loose edge.  That feels a bit less granny and a bit more modern.  These ruffles cascade beautifully, instead of sticking out nastily.  See the neckline of this pretty dress by Kathleen at Grosgrain Fabulous:


How to make such elegant ruffles?  We can deploy the magic of maths*!

For the ruffles to fall as they do, the outer (free) edge must be longer than the inner edge (attached to the garment).  Cutting a strip of fabric on a curve gives you an outer edge longer than the inner edge, so Bob is your uncle (or in my case, my mother's aunt). 

For extreme ruffles like the above dress, it turns out that the outer edge of the ruffle must be about 5 times longer than the inner edge (go on, measure it on your screen with string!).  The curve to do this will be so extreme that each end of the strip will meet, i.e. you'll cut out a circle with a hole in it.  Actually, whatever length of ruffle you need, it's easier to calculate as a section of a circle.  I like to calculate what I need to make, rather than trial-and-error cutting.  Fabric is expensive but a little time spent in thought before you cut is free.

First, decide on the width of your ruffle, we'll call it "W".  I want my ruffles to lie on my shoulders like the dress pictured above, so I'm going for a width of W = 8cm.

Next, decide on how much longer you want the outer edge to be compared to the inner edge, call this "X".  For extreme ruffles, I like X = 5, which means your outer edge is 5 times longer than your inner edge.  Lower values of X will give smaller ruffles, while bigger values will ramp up the ruffle mania.

Now imagine drawing two concentric circles (a.k.a. a picture of a doughnut).  The inner circle will become the edge you attach your ruffle on, while the outer circle defines the edge that waves free in the breeze.  Okay, you need to slice through your doughnut at the end to get your curvy strip, but that's fine.

Your generic ruffle pattern.  You're welcome.
The inner circle has a circumference of C = 2 x pi x r, where r is the radius of the doughnut hole.  We'll work out what C and r are going to be in a minute.  The outer circle has a circumference X times larger, because that's the type of ruffle we've chosen.  So, it'll be "X x C".  The radius needs to be r+W, so that when we cut our doughnut open, we have a curvy strip of width W.  So, the equation for this is (X x C) = 2 x pi x (r+W).

Like me, you were probably forced** to take a GCSE (or equivalent) in mathematics, so you can solve your two simultaneous equations for r:

C = 2 x pi x r
X x C = 2 x pi x (r + W)

Full marks if you got the solution r = W / (X-1).

For my happy case of X = 5 and W = 8cm, you get r = 2cm.  So, you draw a doughnut with the hole having radius r = 2cm and the outer edge having radius r + W = 10 cm.  Easy!  (Don't forget to add seam allowances, and finally cut though that circle to get your strip in the manner suggested on the diagram.)

How much ruffle does one circle buy you?  For this you'll be wanting the circumference of the inner circle, which is the edge you'll use to attach your ruffle.  That'll be 2 x pi x r, which is about 6 x r.  For me, that worked out at just over 12cm.  To get a longer bit of ruffle, you'll have to cut out many circles and join the strips together along the straight-cut edges in a tedious manner.

At the end of your ruffle, cut the edge into a pretty curve (see dashed line).

Hemming your ruffles is a pest because of the curve.  You can use a rolled hem on an overlocker in matching (or contrast) thread for minimum hassle, but you have to be okay with that look.  Otherwise, enjoy your painful rolled-hemming!

* I am prepared for more ridicule by posting this.  It's not as bad as the peg bag tutorial though.
** mandatory but it was a pleasure!  ;-)

Sunday, 5 January 2014

Crochet tutorial: counting stitches

I've had a lot of questions lately about how to count which crochet stitch you're on.  When I'm working in continuous rounds (like a spiral), I like to keep track of the start of the round by putting a safety pin through the first stitch in that round.  It's really that simple.  Obviously in order to work the next round, it's easiest to take the safety-pin out momentarily while you work the stitch it's in, and then you can put it back: through the first stitch in the next round.

If that's enough for you, you can stop reading now.  For the rest, I'm going to risk over-complicating this with a plethora of extra words and pictures, so here goes...

Wednesday, 1 January 2014

Stitch comparisons or, "why I prefer traditional English crochet terms"

This sounds like a dry topic, and perhaps it is.  Nevertheless, I hope this post will clear up a bit of confusion surrounding UK and US crochet terms.

The abbreviations you are about to see are spoken as follows:
slst = slip stitch
sc = single crochet
dc = double crochet
hdc = half-double crochet
htr = half-treble crochet
tr = treble crochet
dtr = double-treble crochet
trtr = treble-treble crochet

Confusingly, there are two different sets of terminology for crochet stitches and although the stitches themselves are similar, and the stitch names are similar, the mapping of name-to-stitch is different on opposite sides of the pond.  Nice.

Never fear, I am hear to save you with my handy comparison table, which also shows how to make each stitch:
Clicky on the image to enlarge it!

That's not all!  My handy table also aims to persuade you why I'll be sticking to ye traditional UK terms.  More of this in a moment.

Firstly, there is such a thing as a single crochet stitch in UK terms.  The terms "sc" and "slst" are both used in the UK to mean the same thing.  The use of "sc" is more traditional, whereas "slst" is a more modern usage. If you look up some conversion resourses, you’ll find both are given, see:
yarn forward
fresh stitches
amy’s odyssey
I’ve certainly seen UK patterns written with both versions. I prefer to use conversions from the “Happy Hooker Stitch’n’Bitch” book, which states US slst -> UK sc; US sc -> UK dc.

The reason I prefer the UK terms (and the traditional ones at that) is this:

The UK “single”, “double”, “treble” prefixes indicate how many times you wrap-and-pull your yarn through the loops on your hook; this makes it easy to remember.  If you don't believe me, see the bottom section of my table!  It's not quite true for the taller stitches, but they're not often used anyway.

In addition, it feels odd to me to skip straight to “double” with no “single” crochet in the list. So I stick the the traditional English version when I write my patterns, and then convert to US afterwards, through the magic of LaTeX command definitions.

Friday, 15 November 2013

Crochet tutorial: how to change yarn colour

Changing yarn colour


In my Chameleon pattern, I like to change yarn colour between rounds.  This tutorial shows how I like to make that happen.  Once again, sorry for the tatty hands and nasty cheap yarn.  Maybe I should employ a stunt double for the photos, with nicer hands.  Maybe my husband...?!

I'm going to talk in UK crochet terms; you can tell this by my spelling of "colour"...!  ;-)

1)  Here I am: I've made the last stitch in this round and I've come upon the marker which indicates the first stitch in my next round.  (Sorry for the plethora of other pins: I took this picture when I was mid-way through inventing the pattern!)

2)  Break the yarn, leaving a tail a few inches long.  Insert your hook into "stitch 1" of the next round.  (You'll have to temporarily remove your stitch marker to do this.)

3)  Wrap the new colour of yarn across the throat of your hook, exactly as you would if you were carrying on with the previous colour.  Now carry on making your double crochets.  If you're cool with that, you can skip to step 6.  If you want more help to do the first one, keep reading!

4)  Pull a loop of the new colour through the stitch.  You now have two loops on your hook.

5)  Wrap the yarn round the hook again and pull through both the loops on your hook.

6)  You've made your double crochet!

7)  This was the first stitch in your round, so put that start marker back in to the stitch you've just made.

8)  Merrily keep on double-crocheting along in your new colour.  In the image above, I've made two more double crochets after the first stitch.

9)  At this point, go back and tie the two loose ends together with a reef knot (right over left, left over right).  I've tilted the work towards the camera to show this.

Tuesday, 12 November 2013

Crochet tutorial: breaking yarn with sc


Breaking yarn with a single crochet

(... or slip stitch if you're stateside)


On several occasions in my crochet patterns I'll write something like "...3 dc, 1 sc.  Break yarn."  (In US terms, this would be 3 sc, 1 slst.)  From now on, I'm going to talk UK crochet terms.

This is how I like to perform this manoeuvre.  Apologies apply with regard to my tatty hands and nasty cheap yarn.  I'm not a manicure sort of girl: you can't crochet while the polish is drying.

1)  We're going to make the single crochet.  Insert your hook into the stitch.  Wrap your yarn around the throat of the hook (not shown).

2)  Pull through a loop, and keep pulling that loop through the loop already on your hook.  (The photograph shows the point just before you do that: the short instance where momentarily there are two loops on your hook.)

3)  You've made your single crochet; I like to stick a safety pin in this stitch to mark it so that I can tell it's a real stitch on the next round when I come to work it.  Time to bind off: cut the yarn leaving a tail a few inches long.

4)  Wrap your yarn over the throat of your hook and pull the tail right the way through the loop on your hook.

5)  Give the tail a short tug to tighten it.  Done!

Friday, 8 November 2013

Crochet tutorial: joining yarn with sc


Joining yarn with a single crochet

(... or with a slip stitch if you're stateside)


On several occasions in my crochet patterns I'll write something like "Join by making next st in 4th st from start marker.  1 sc, 3 dc...".  (In US terms, this would be 1 slst, 3 sc.)  From now on, I'm going to talk UK crochet terms.

This tutorial shows how I like to join my yarn by making that first single crochet before the double crochets.  I'm sorry for my tatty hands (which you'll of course notice now that I've pointed it out), but they're unlikely to improve with my current mix of housework and velcro nappy fastening.  Also, sorry for the horrid acrylic wool: oooh that's nasty!  Anyway, here goes.

1)  Create the yarn loop as in the image above.  The short end of the tail is hanging down to the right, while the yarn on the left of the picture is continuing to the ball.

2)  Insert your hook under the middle strand, from the right hand side.

3)  Pull the tails tight so that you form a slip-stitch on your hook.

4)  Look!  A stitch is now on your hook!  You're about to make a single crochet, pretending that this is an ordinary loop left on your hook as you're crocheting along.  If that makes sense to you, stop here.  If not, read on for a blow-by-blow account.

5)  Insert the hook into the stitch you want to join the yarn in.  In my example, it's the 4th stitch from the start marker, so three stitches have been left unworked.

6)  Wrap the yarn around the throat of the hook and pull it through the stitch, AND the loop currently on your hook.

6a)  This image shows the situation half-way through step 6: you now have two loops on your hook:  the starting slip stitch, and the yarn you just pulled through.  You're about to keep pulling the yarn through the starting slip stitch...

7)  You did it!  You now have one loop on your hook, and you've made a single crochet.

8)  I like to stick a safety pin through the single crochet I just made, because it's a bit wonky and might be hard to spot when you come back to crochet it later on.  I find this marking method helpful.

9)  Keep crocheting along!  Here I've continued with two double crochets.  At this point you could stop and tug the tail by the single crochet to tighten it up a bit, but I'd normally save this for the next round.  Alternately, you might like to catch the starting tail in the double crochets as you continue, to tidy things up and make the work more robust.  Saves weaving ends in...

Sunday, 22 September 2013

Penguins, dull mending and exciting knitting...

Since my last post pondering on the failures of my peg bag, not much has been going on sewing (or woolly)-wise.  I've been mainly prodding the baby to prevent him from inserting his small fingers into 240V power outlets, and other important things.

At least I've managed to finish this little chap:


He's a birthday gift for another little boy in the village.  I hope he won't mind the operating system reference!  The pattern is free, just clicky on the badge:

Homepage of free-penguin.org

The pattern does not include seam allowances or many instructions.  I made penguin up in felt, and added 1/4" seam allowances when I cut the pieces out.  The eyes are also top-stitched felt.

This is the second time I've made Tux, the first was for a friend's thesis-hat when he completed his PhD.  There are many potential ways to assemble Tux, but some are easier than others; my method makes the feet construction easier and more reliable.  If I end up making another for my husband's work desk, I'll try to take step-by-step pictures of the construction.  Meanwhile, I'll do a brief text version here, to remind myself (if nothing else):
  1. Cut out all pieces with 1/4" seam allowance.  Cut out eye shapes in black and white fabric, using the pattern illustration as a template.
  2. Top-stitch the white eye-highlight to the black pupil by hand using white thread.
  3. Top-stitch the black pupil onto the white of the eye by machine using black thread.
  4. Place the eyes onto the body pieces using the pattern as a guide, and top-stitch in place using white thread.
  5. You should have four foot-pieces.  Two should have oval holes in them.  (Holes are marked on the pattern, but cut 1/4" inside the oval shape - don't forget that seam allowance!)  For each foot, place a solid and a hole-y piece right-sides together.  Stitch half-way around the pieces in yellow thread, just stitching the toe-edge of them, and leaving the heel flapping open (we'll come back to that).  Turn the feet right-side out.
  6. Your black body-pieces should have matching oval holes in them.  Place the foot-hole up to the body-hole, right-sides together with the foot sticking out in front.  Stitch around the hole, being careful not to catch the free part of the heel you've not yet sewn.
  7. Push the foot through the hole so that it's wrong-way out again.  Now you can match the heels of the two foot-pieces and continue sewing around them in yellow thread.  Finally, push the foot back through the hole, and right-way out again.  The feet are done: cute!
  8. Sew the wing pieces with black thread, right sides together, leaving the top edge free.  Turn them the right way out.
  9. Slash the body part along the lines indicated on the pattern, and insert the wing.  Fold the body along the slash line, right sides together, and sew along the slash line to close it up, catching the top of the wing in it.  Stitch in black thread, as close as you can to the slashed edge.
  10. Stitch the darts at the head and base of the body pieces with black thread.
  11. Stitch the two stomach pieces, right-sides together, with white thread.
  12. Stitch one of the beak pieces to the top of the white bib, right-sides together.  To do this, ease the straight edge of the beak to match the curved edge at the top of the bib.
  13. Place the remaining beak piece right-sides together with the attached beak piece.  Sew around the curved edge with yellow thread and turn the right-way out.
  14. Place the two black body pieces right-sides together, and stitch along the short seam at the bottom front.  Also sew a partial seam from the top of the head down the forehead, past the eyes, to the top of the beak.
  15. Carefully pin the bib-and-beak piece into place within the body pieces, right-sides together.  Lots and lots of careful easing is required, and it's a right fiddle.  Sew around the bib-and-beak, bandage your pin-pricked fingers and make a cup of tea.
  16. Finish the back-seam of the penguin, from his head to his tail with black thread.
  17. Pin the base of the penguin to the rest of the assembly, right-sides together.  Sew most of the way around, leaving a 2-3" gap.
  18. Turn penguin right-side out through the gap.
  19. Stuff penguin firmly, beginning with his feet.  Use a fat crochet-hook to push stuffing into his toes.
  20. Whip-stitch the opening at the base closed with black thread.  Operation complete!
My subject line promises dull mending and exciting knitting.  It's true: I mended the pushchair cover yet again, this time strengthening a torn plastic grommet with two circular patches.  Thrilling.

Much more exciting is the yarn and beads that I've acquired courtesy of my yarn-expert friend for the Boo Knits hallowe'en mystery knit-along, who is kindly sharing her lace-knitting expertise with this n00b.  I'm going to keep my own progress on this knitting secret for now (so sorry for the teaser).  However, if you want yarn eye-candy, you should check out her blog as she's doing the MKAL too, and dying her own yarn for it!  Alas I'm not using Fleece Cottage yarn, but maybe for the next time.  Anyhow, the MKAL starts on October 1st, and you should join too, dearest mystery readers!

Thursday, 8 August 2013

How To: Tailor Tacks


Since I'll be recommending this method of marking construction points when I produce the Gennaker Trouser pattern, I thought I'd get ahead of myself and write a how-to on the subject of tailor tacks.

I've tried a few other methods of marking fabric (dressmakers' pencils, chalk, pins...) but really nothing compares to the slower tailor tacks, even though I'd rather be lazy.  This method uses threads to mark the fabric, so there is no chance of accidentally staining your fabric with pencils or pens, and the tacks don't rub or iron off like chalk.  I find they don't pull out either during normal construction handling, unless you're deliberately trying to remove them.

The time NOT to use tailor tacks is if you are sewing with a fabric that pin-marks easily, such as pvc, leather, oilcloth or some tightly woven silks and acetates.  In which case, don't use pins either!  Good luck, and have fun.

The only down side is that you do end up with small torn holes in your paper pattern.  I really couldn't care less about this, but if you are one of these people who likes to keep shop-bought patterns pristine, you'll have to make a copy to work with.

It's best to use thread in a contrasting colour to your fabric, and I like to use up the odds and ends on my machine bottom-bobbins.  You need to make the tacks after you have cut the fabric out, but BEFORE you take the pinned-on paper pattern pieces off the fabric.  I'm going to describe how you can tack two pieces of fabric at once, so this works even if you have cut out two pieces at once using folded fabric.

Enough chatter: I now bring you "Tailor Tacks: as my mother taught me".  Drumroll.

Friday, 10 May 2013

Bobble cushion


This cushion is a knock-off of a similar one I saw for sale in John Lewis:
John Lewis cushion

The cushion is 20.5" x 14" finished size, which meant I could just lop a bit off one side of the template I used for all the others.

The main part of the cushion is grey wool suiting that I had lying around.  Not ideal as it has a bit of stretch, so I had to be careful to use fusible interfacing on the button back.  For a tutorial on the button back, see here.  I reduced the number of buttons to two and used the same pink contrast fabric as the front.

There was an old man of the Hague, whose ideas were excessively vague; he built a balloon to examine the moon, that deluded old man of the Hague.
The front design is an Edward Lear illustration traced onto cream cotton and embroidered with back-stitch in two strands of dark grey floss.  After stitching it, I trimmed it down and pressed the edges under so that it finished as a 6.25" square.  I mounted this on pink fabric which had been pressed into a neat 7" square.  I then stitched this to the cushion front.  Each time I added a fabric layer, I secured it with machine top-stitching in matching thread.

Basting the bobbles to the front fabric before attaching to the back of the cushion.
The bobbles come on a woven strip; I had to use a double thickness to get the bobbles spaced so close.  I basted the tape along the short edges of the front piece on the right side with the bobbles facing inward toward the centre, making sure the tape did not extend further than the 1/2" seam allowance.  This meant that when I stitched the front and back together, the seam would run over the bobble-stalks.  When the cushion is turned right-way-out, the bobbles are sticking out of the seam, while the tape is concealed inside.

This tutorial is part of a series: