Tuesday, 10 June 2014

How now brown babydoll dress

I thwarted my machine to conquer twin needle stitching, and I have thwarted the fit of the "Sew-U home stretch" babydoll pattern.  See here for unfortunate fit issues and sad faces on my cheap toile (which I am actually still wearing as a dress even though it sucks apples*).

* I don't have that many clothes.


I made the following adjustments:
  • Remove 3/4" from shoulder seams (yawn) as I always do
  • Make front neckline less deep
  • Make 1 1/4" full bust adjustment and rotate out the resulting dart (see here)
  • Take in a tapered amount on the side seams from 1 3/8" at the waist up to nothing at the underarm on both front and back pattern pieces
  • Add 1/4" elastic at the waist seam before gathering and attaching the skirt (it's a lot of weight and bulk for that seam to carry without stretching).
  • Remove 2 1/2" from the height of the sleeve cap to (a) match my smaller armhole from lopping off height at the shoulder seams and (b) I hated the gathers on the sleeve cap, so they're gone
  • Cut the sleeves down to cute cap sleeves for the summer
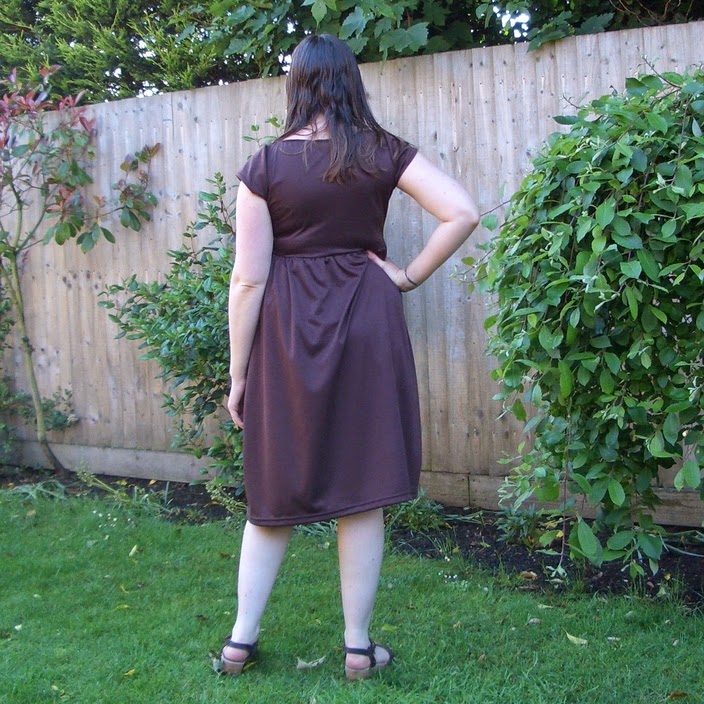
I had thought that £3/m was cheap for the first toile, and I splurged at £3.60/m for this brown interlock knit from myfabrics.co.uk.  I now know this to be expensive compared to the £1-£2/m I could have scored in Walthamstow.  Oh well.  I need another trip there to buy more jersey so that I can spend £12 to get another 6-12 dresses.

I have wet hair, not super greasy as this photo suggests: eugh!

I quite like brown, and I wanted to try sewing with interlock.  It's quite nice to handle: very drapey but quite stable and not particularly stretchy.  This fabric is a bit to shiny for my liking, but it was on sale and cheap.

Jersey dresses and cameras with self-timers balanced on clothes airers allow you room to swing your toddler around in his home-made shorts.

Despite the anger that the twin needle involved and the fixing of the machine and walking foot, it was totally worth it for the professional ready-to-wear look it gives!  Cheers for my birthday present, bro!  :-)

Sunday, 8 June 2014

I have actually spent some money on fixing my sewing machine.

I am about 3 hems away from finishing a short-sleeve babydoll dress for meeeeeee in brown interlock knit.  I have now spent several hours fixing my sewing machine and feet before I can finish it and it's driving me bananas.  I still haven't finished my dress.  On the plus side, I'm winning.

Read more of the gripping tale below:

Thursday, 5 June 2014

New crochet pattern: Fenland Vegetables

The crochet patterns for Fenland Vegetables are now available!  For just £1 you get the patterns for turnip, butternut squash, beetroot, leek, cauliflower, two widths of carrot and parsnip.  In addition, you get both UK and US terms on appropriately sized paper (A4 or US letter).  Is that a deal or is that a deal?


The pattern has been fully tested by some lovely people on Ravelry to whom I owe a debt of gratitude.

Buy it now in my Ravelry Store for just £1!  The pattern is digital and will zoom to you with all the efficiency of the internet.  Woop!

Sorbetto II: the yoke edition

I finished another Sorbetto!  It's so quick to run these up now I've finished all the pattern adjustments.  I so rarely make the same thing for myself twice that it's a real pleasure to keep sewing without stopping to have fittings/stick pins in myself.

More self-timer shots in my kitchen.  Lucky you.

Sorbetto II is a yoke design without the central front pleat.  More of which after the jump:....

Friday, 30 May 2014

New multipack vest extenders!

There are new mixed fabric selection multi-packs of vest extenders in the shop!
Get them while they're still there!  :-)

Thursday, 29 May 2014

Heads still be growing, I still be sewing.

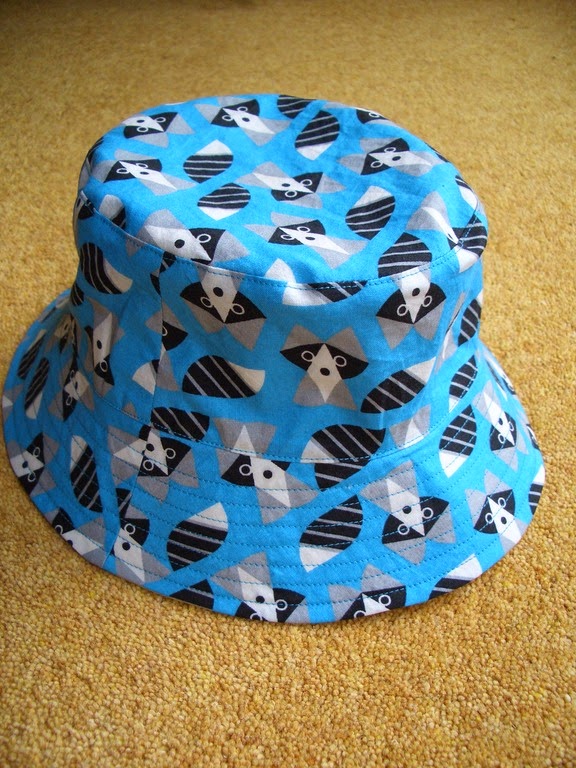
I have made many ... reversible ... bucket hats from this pattern by Oliver & S.  Toddler Button keeps growing, so I have been forced to stitch him a new hat for the sunny days.  We're now in size M (19") which sadly means there is only one size left before I have to draft my own hats.

Behold the epic new hat on a theme of racoons, with a sunny yellow reverse side:


I've got construction down to a fine art now, and I've eliminated all hand-stitchery.  It's charming but I don't have time for that malarky.


Do you want to know my non-hand-stitch secret...?


Alright, here it is:
  1. Construct the brim in it's entirety,  including the top-stitching.
  2. Construct both caps individually including the top-stitching around the top of the crown.
  3. Pin the brim to one of the caps, right sides together and machine stitch around with a 3/8" seam allowance.
  4. Stitch around a short distance (only 2-3") of the same seam but with the usual 1/2" allowance the pattern dictates.  In this area you'll have two rows of stitches.
  5. Pin the second cap around the same seam.  For this, you'll have the two caps right-sides together with the brim all squashed up and sandwiched between them.
  6. Sew around the seam with a 1/2" seam allowance, leaving a gap of 2-3" matching exactly where your double-line of stitching was.
  7. Trim and grade your seam allowances, so the cap allowances are 1/4" and the brim allowance is a shade more.
  8. Turn the hat right-sides out through the gap and press the seam flat.
  9. Close the gap left from turning the hat out, which will only appear on the inside of the hat (due to your careful double-stitching on the other side).  Press the seam allowance in this area appropriately and pin the gap shut.  Carefully top-stitch around the whole hat on the sides, which should catch the gap shut at the same time.
  10. Superb!  A hat with no hand-stitching!

The squashed on floor look: how the hat will spend most of it's life.

Hats look better on heads, so I'm sorry for the floor-based pictures.  It's raining and TButton has the lurgy, so there is no hat-wearing today.  He had a tantrum when I put his old sun-hat in the washer and the new one just wasn't the same (apparently), but I think he'll be over that soon.  I'm aiming to appeal to what remains of his 6 month long obsession with the colour yellow.

I got the fabrics from Backstitch at Burwash manor.  A lovely shop!  :-)

Sunday, 25 May 2014

More Mizzen Shorts

The last pair of shorts were so obnoxious* that I had to immediately remedy them by making some more in nicer fabric.


These shorts are in a nice pale blue linen-type fabric that drapes beautifully.  The blue is actually a soft sky-blue, not the bright shade my computer is currently rendering for me.


I went all-out with some back patch-pockets, but didn't do as much top-stitching as I'd have liked because a) I thought I was about to run out of matching thread, and b) I was bored of making the shorts already.


I went for the super-low-opening fly again, with concealed poppers.  It totally works for me, and this time I remembered to put the poppers in before finishing the fly top-stitching.  Wow!  However, I didn't remember to put the elastic in before closing the waistband, so never fear: my seam ripper still saw some action.

I'm so glad to be done with these.  I've got a lot of vest extenders to make now (the shop is empty), but more excitingly I've got some super scrummy birthday yarn to knit with and some epic 50p/m bargain fabric from Walthamstow Market to sew up.  Sorry TButton: Mummy knows you need more shorts and vests and a raincoat and a hat, but Mummy wants a new blouse.  Too bad.

* I went to the park with TButton wearing the terrible union shorts and this soldier shirt (because it was the only one that matched), and then realised it was a terrible UKIP-style combo.  I almost felt I should apologize to the other mothers...  ARGH.