
In this post, I bring you photographic help to take apart your Janome 423S sewing machine for servicing at home. I have previously written posts on this subject here and here, and if you are looking here for advice then I strongly suggest you read both of these also.
This one describes polishing and oiling the hook and bobbin race, and this one describes in words how to take the machine to bits. I'm going to repeat my disassembly order here, but add pictures.
2. Remove the plastic screw-cover on the opposite (plug) side of the machine and remove that screw too. You won't be able to take the side casing off from this side yet, so don't bother with that: you just need the wiggle room.
3. Remove the plastic cover underneath the machine. There are LOADS of screws here. One of these (near the front right of the machine) you won't be able to remove through the hole: that's because it's to hold the purple front-plate on. You need to loosen this screw anyway in order to get enough movement in the front plate to work the bottom cover off. See the image below, where the screwdriver is shoved in the hole to loosen the screw inside. Don't worry if you hear the screw drop out into the machine: you can retrieve it later. It's my guess that Janome made a bit of a blooper with this one: the access hole looks like it's been drilled after the case molding when they found they couldn't get the machine together without wiggle room from movement in the front plate. Whoops!
Note how I use blobs of blu-tack to store the screws next to the holes I just took them out of. That's my top tip for not losing any fixings.
 |
| Loosen Janome's hidden blooper screw ;-) |
4. Once you've removed all the screws, you should be able to take the bottom off by hinging it towards the belt/motor side of the machine: you'll need to wiggle the front and side covers to get enough play to be able to hinge the plate off without snapping the lugs.
 |
| Hinging the bottom plate off |
 |
| Behold! The hidden screw you were loosening through that hole in the bottom plate! |
 |
| With the blooper screw removed, you can see that just loosening it will be enough. |
5. Remove the top cover of the machine: there are screws under the handle and also one holding a bobbin-winding "stop" on. There's also one on the side at the needle-end (see last image). There's a plastic lug at the right-hand side, so like the bottom piece, the top needs to be carefully removed by hinging it toward the motor/plug side.
 |
| Screws under the handle |
 |
| The bobbin-winder stop screw needs to be removed |
 |
| This bobbin-winding mechanism screw also needs to come out |
 |
| Don't forget this screw at the needle-side of the machine, accessible once you've taken the end off in step 1 |
6. Remove the side cover over the motor/plug. I didn't bother to remove the lilac-coloured* front-plate, as I could get the access I needed without it.
 |
| Note the small lugs all the way up the side plate. (Image taken before top removed in step 5) |
I cleaned every metal-on-metal moving joint I could find (hand-crank the machine to spot these). To clean, I rubbed around the area with a Q-tip, and then a drop or two of machine oil did the trick. I took a few photos (not exhaustive) of a subset of the joints. There are more than this!
 |
| Underneath the machine, with the machine lying on its front |
 |
| Inside the top of the machine. |
There is a triangular cam thingy visible when you look down inside the top of the machine (next image). This bit needs a SERIOUS clean and oil: it was responsible for my machine groaning and stiffening, threatening to burn out the motor.
 |
| The bit highlighted here is the triangular cam thingy. |
On this trip inside my machine, I paid special attention to the presser-foot mechanism, because the foot wasn't staying clamped down when I was stitching, leading to an exciting free-motion stitching experience with every project. Argh!
 |
| Behind the presser-foot shank. Oil the joints in the black thingy on the left, and the shank guide on the right. |
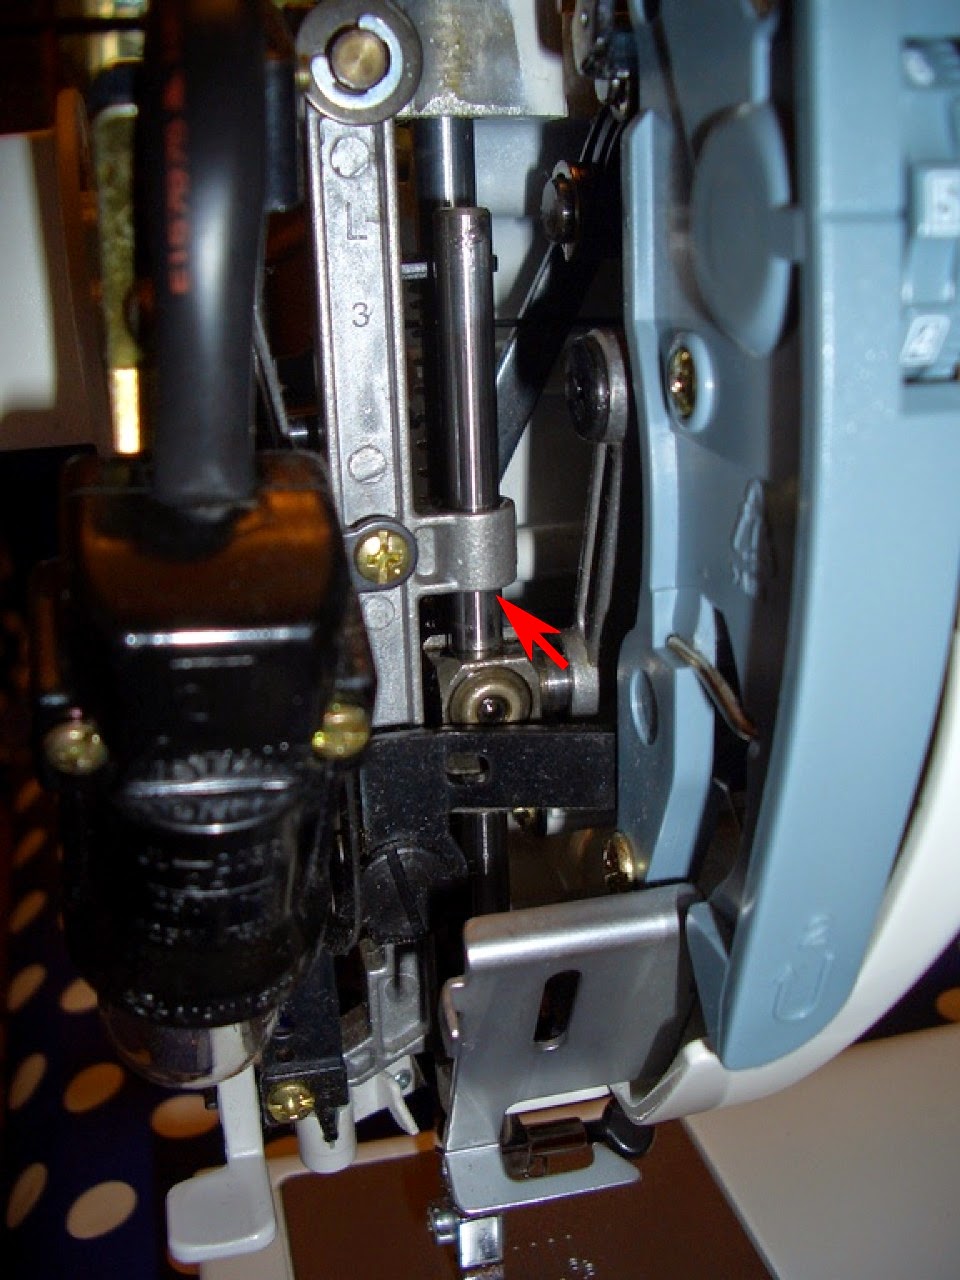 |
| Oil the presser-foot shank-guide on the front as well. |
Also clean and oil the bobbin-race (see other post) to avoid nasty skipped stitches.
That's it! If you have a Janome 423S, I hope this post helps you to get it apart quickly and without damage to the plastic work. If you have any other type of sewing machine, I hope you feel ready to service it yourself. It's easy! :-)
This machine has run for 12 years with no need for any part change. If I have to do any further maintenance excepting a clean and oil, you can be sure to hear about it here. Lucky lucky you. Ha ha. There's a reason to subscribe to this blog if ever I heard one! ;-)
They still sell this Janome model, so if you're looking for a reliable metal-bodied front-loading mechanical machine, I recommend it. Super reliable.
I love mine, had it almost 11 years. I overheated it tonight and it stopped, so I'm looking around to see how deeply I am in trouble. (I knew I should stop, but I was so close to done that stupid decorative topstitching!!)
ReplyDeleteThanks for the tips!
Glad someone can make use of them! The good news is: no central PCB, so that's a nice limit on the cost of replacement parts. I guess my first stop would be to test the resistance of the motor coil windings is sensible.
DeleteCan totally identify with the need to carry on stitching, ha ha!
Good luck!
I just finished oiling and am going to put it back together. It struck me that I should measure the output resistance of the foot pedal, which is several orders of magnitude higher than it should be, so I'm taking that apart next.
DeleteIf I'm lucky, it won't be the motor, because I'm striking out searching for that by part number!
Thanks again, this is good stuff to know. (Even if I did break off one of the plastic tabs. Drat!!!)
Really hope you find the solution! If it is the motor, a generic one might fit, so long as the ratings and torque/RPM output match. Alternately, you could try talking to Russell at Sewing Machines Direct https://www.sewingmachines.co.uk/ I don't know if they specifically do spares, but in my past dealings with them they've been extremely knowledgeable and helpful so you could ask. At least the foot pedal is more convenient to work on a small table!
Delete(Having just completed disassembly, I would like to note the little hex nut that fell out onto the table. It fits the screw holding the bobbin stop, evidenced by the hexagonal space in the plastic. I don't think, looking at it, that I had to take that piece off after all. I'll have to see how it goes back together.)
ReplyDeleteThanks for the great post! Just what I was looking for. I am going to fix the timing of my 419s. It's the same setting as 423s. I would love to get the PDFs service manual to service my machine as I live far from any professional repair service. The reliable site only carries the hard copy version. The downloaded ones are from the unknown sites. I don't trust them as we can't get any refund for the downloadable products. Do you have any suggestion on the reliable source that I can get the service manual for this machine?
ReplyDeleteSadly no - didn't occur to me to look for a service manual, so no idea where you can get it! Sorry! The above disassembly instructions were worked out by me, so strictly non-official. However, I think I've come across youtube videos on how to adjust timing of machines and I would assume this aspect of most machines is broadly similar so I guess I'd start by watching a few of those.
DeleteThank you infinity for this post!!! You saved me $100 and now I feel enabled to overcome obstacles and can really take ownership of my craft!
ReplyDeleteDelighted it's been useful to you. Go you!!! :-D
DeleteThank you!
ReplyDeleteThis is very helpful information for anyone who wants to service their own sewing machine.
ReplyDeleteIm a beginner, today I just got my 1st sewing machine, I choose janome 423s because I did some research before buying they said its easy to repair and long-lasting. When it come the spool pin was stuck, and your page help me to fix it, thank you so much. I will always remember you when I touch this sewing machine
ReplyDeleteSorry if I have spelling mistake, English not my 1st language.